I share lots of mini tutorials and step by steps for Cricut, but they are always tagged onto one on my free Alphabet and Number SVG sets. Today I am sharing a stand alone post which will work for any file to take you step by step though “How To Make A Layered Cake Topper With Cricut Design Space and Cricut Machines?“
Cake toppers are so easy to make if you know how, and once you have made one you will realise they are quick and easy to make and are perfect for personalised parties for birthdays, anniversaries, a baby shower, christenings and weddings.

This post may contain affiliate links. Which means I may receive a small commission if you click a link and purchase something that I have recommended at no extra cost to yourself. As an amazon, Cricut and Glowforge associate, I earn from qualifying purchases.
What You Will Find Here
How To Make A Layered Cake Topper With Cricut Design Space?
Cake toppers are so rewarding to make and you can make them as simple as you like, or indeed as complicated. The following tutorials will take you through a few of the Cricut Cake Topper Techniques I use. I adore making shaker cake toppers, however cake toppers with offsets also allow you to add multiple layers and stand alone to your cake topper design to make a birthday party of event special.
What Types Of Layered Cake Topper Are There?
- Shaker Cake Topper
- Printable Layered Cake Toppers
- Split Monogram Cake Toppers
- Moveable Cake Toppers ( I Have A Cute Mermaid With A Moving Tail)
- Cake Toppers With Offsets

What Do You Need To Make Your Layered DIY Cake Topper
- Cricut Maker, Cricut Explore Air or Cricut Joy to cut out of card stock or glitter card
- Weeding Tools
- Cricut mat
- Brayer
- Glitter Cardstock and plain card stock and adhesive vinyl for small details
- Straw, Bamboo Skewers or Wooden Dowel
- Glue or hot glue gun
- Transfer tape ( If using vinyl)
- Cricut fine point blade

To Make A Layered Custom Cake Topper With Cricut
Upload Your Files To Cricut Design Space
Start by uploading your SVG file to Cricut Design Space and size your file to the correct size. To size in Cricut Design Space simply use your mat as a guide, click on the arrow in the corner and drag the file to make it bigger or smaller. Being sure the width is not bigger than your cutting mat area.
Duplicate The Files And Add Personalisation
When you are happy duplicate the file, you can add words or a name to add text or personalise your letter or numbers. Use the curve tool on the top bar to help you fit the words perfectly around the number, now select all and click weld to weld the images together.

Create Contours On Your Cake Topper Layers
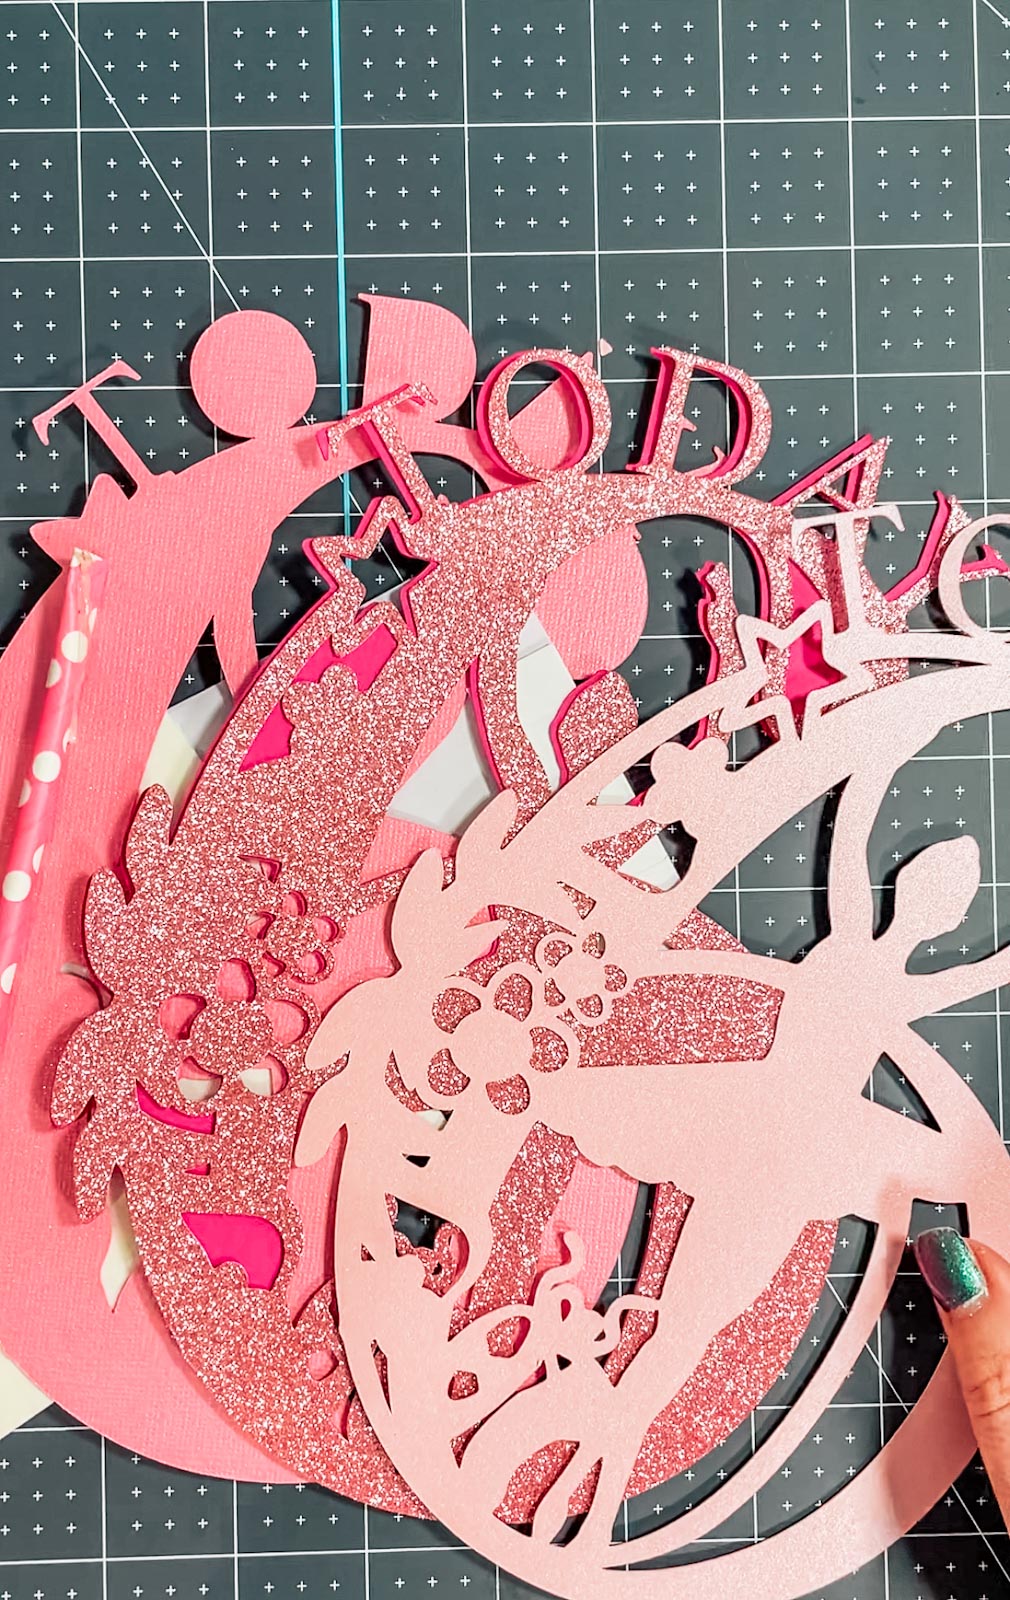
To create multiple layers for you cake topper start by duplicating the top layer. Next with layer two, click the contour tool in the top toolbar and remove a selection of the contours. I generally remove a few contours at a time, but this depends on how many layers I want to create.

Once finished, duplicate the layer you have removed the contours on and remove more contours. I did this 3 times to give me 4 layers all with different contours to create a multi layered file which I will cut if different materials and colours. Note, you must always duplicate and contour the layer you have contoured.
So contour layer 1 and duplicate, that becomes layer 2 duplicate and contour, 2 becomes 3, 3 becomes 4. This way your contours make sense and all flow for your layered cake topper. The image below isn’t the exact cake topper I made, but highlights how the contouring process works visually.

Before you cut your layers line them all up in design space to ensure they are exactly the same size, as you have been duplicating they should be. Now send to cut making note of what colour or material you want each layer to be, I wanted a mixture of textures all in pink tones.
You can see in the image below how I have lined it all up to ensure all of the layers will cut evenly.

If You Want To Add Offsets To Your Cake Topper?
The Offset tool enables you to create an even offset all around your image. You will find the offset tool on the top bar of Cricut Design Space, simply click offset then use the distance slider to make your offset as big or small as you need. The beauty is you can also add multiple offsets, even add elements to your cake topper and create offsets around the whole project.
You can see on my Eid Cake Topper below, as I added the lantern I created an offset, then again. This creates a multi layered effect that looks great.

Cutting Your Layered Happy Birthday Cake Topper On Your Cricut
When you send the project to your Cricut to cut ensure you use your brayer to roll the paper, vinyl or card to the matt. Also make sure you set your material and cut pressure correctly to match whatever material you’re cutting.
Once the cut has finished, discard the outer area of the paper, next flip the mat and gently weed. Use the weeding tool to remove any areas that need gently weeding and removing.
Building Your Layered Cake Topper
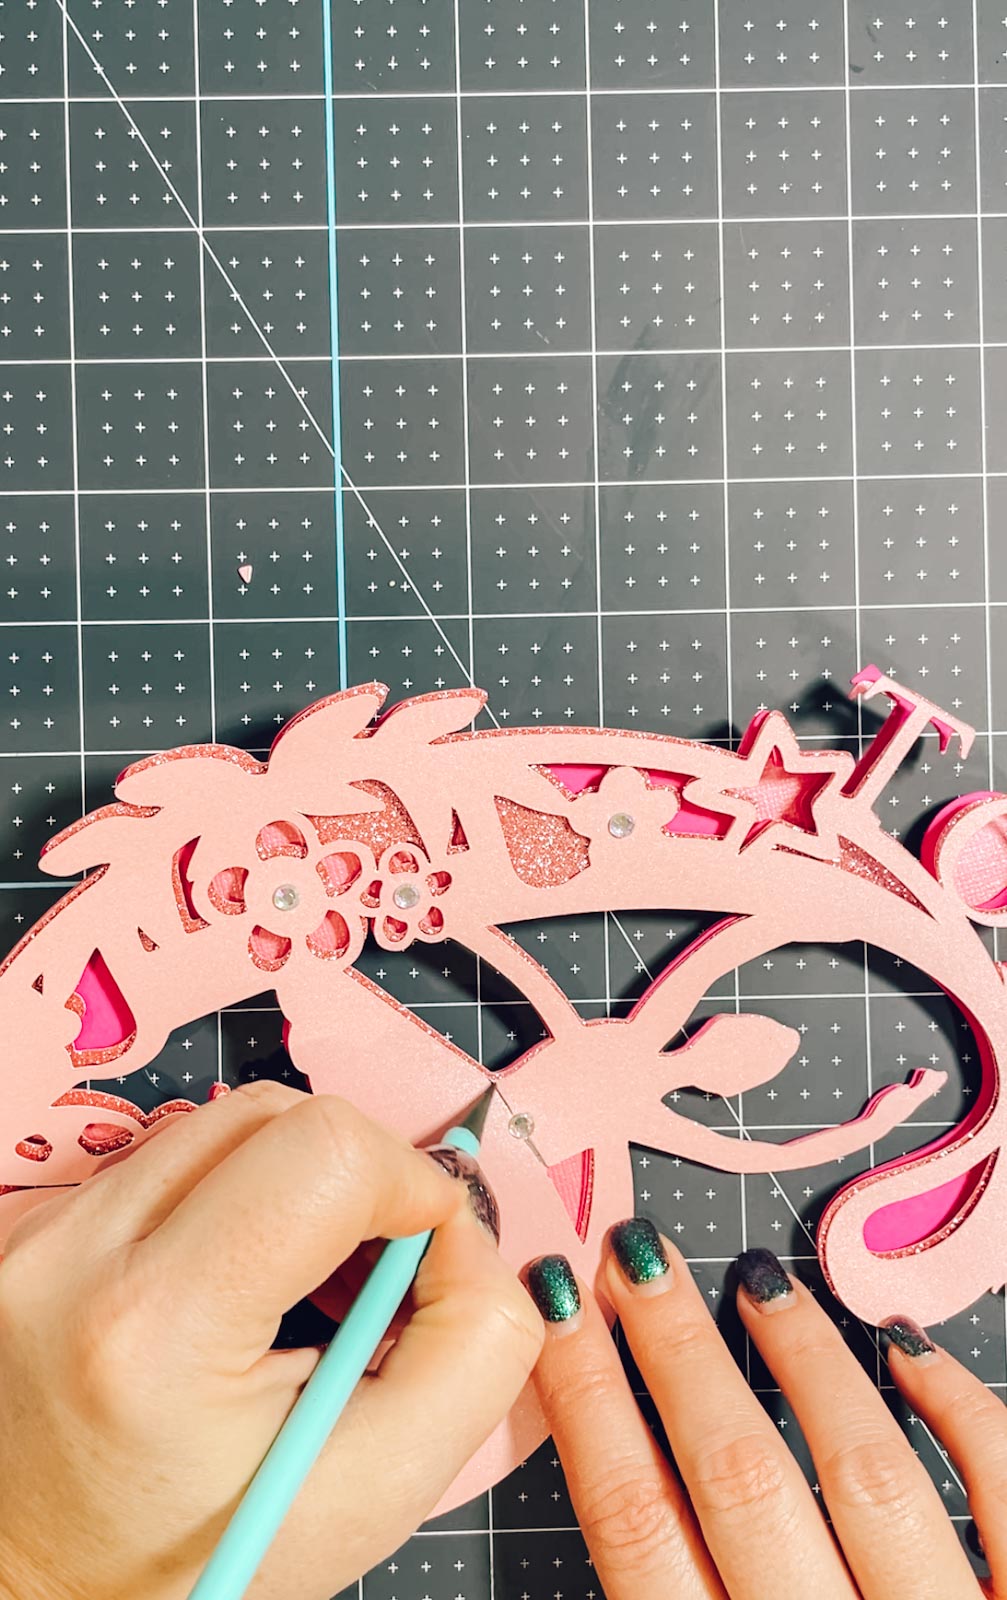
Start by placing the back layer of you layered cake topper face up and stick foam pads to the back of layer 2. Now flip the layer over and position onto the back layer, making sure it lines up. Keep going layer by layer until you’ve finished. Once finished flip it over and glue a straw or wooden dowel to the back of the topper and allow to dry.

Lastly add any details, I use diamanté to to add a few flourishes and a little waistband with a pencil. you could also use tulle or netting to add a layer to your skirt. I so wanted to do this but didn’t have any handy.

How To Get My Free Alphabet and Number SVG, PNG Files For Cricut
Click the image below to Subscribe to my weekly newsletter to get my free SVG/png files and follow these instructions to add to Cricut Design Space. Don’t forget to turn off any pop up blockers, and if your email doesn’t come through check your spam folder.

If You’re Having Problems?
Check out my trouble shooting page, hopefully it will answer any questions you may have.
Tips And Advice For Using Your Download For Cricut
- Cricut Design Space Guide
- How To Slice And Weld In Cricut Design Space
- How to upload to Cricut Design Space
- Using Iron On Vinyl
- How To Make A Split Monogram With Cricut
- Where Else To Get Free SVG Files
Also please do pop over to Instagram, and give me a follow and if you make a project tag me! I love seeing everyone else’s makes and chatting crafting. I could do that all day!


How To Make A Cake Topper With Cricut Design Space
Step by step to create a cake topper with Cricut Design Space and free letter and number SVG file templates
Materials
- Glitter Card Stock and plain card stock
- Straw
- Double Sided Sticky Pads
- Glue
Tools
- Cricut Maker
- Weeding Tools
- Brayer
Instructions
- Upload Your Files To Cricut Design Space Start by uploading your SVG file to Cricut Design Space and size your file to the correct size. To size in Cricut Design Space simply use your mat as a guide, click on the arrow in the corner and drag the file to make it bigger or smaller.
- Duplicate The Files And Add Personalisation When you are happy duplicate the file, you can add words or a name to add text or personalise your letter or numbers. Use the curve tool on the top bar to help you fit the words perfectly around the number, now select all and click weld to weld the images together.

- Create Contours On Your Cake Topper Layers To create multiple layers for you cake topper start by duplicating the top layer. Next with layer two, click the contour and remove a selection of the contours. I generally remove a few contours at a time, but this depends on how many layers I want to create.
 Once finished, duplicate the layer you have removed the contours on and remove more contours. I did this 3 times to give me 4 layers all with different contours to create a multi layered file. Note, you must always duplicate and contour the layer you have contoured. So contour layer 1 and duplicate, that becomes layer 2 duplicate and contour, 2 becomes 3, 3 becomes 4. This way your contours make sense and all flow for your layered cake topper. The image below isn't the exact cake topper I made, but highlights how the contouring process works visually.
 - Before you cut your layers line them all up in design space to ensure they are exactly the same size, as you have been duplicating they should be. Now send to cut making note of what colour or material you want each layer to be, I wanted a mixture of textures all in pink tones.
 You can see in the image below how I have lined it all up to ensure all of the layers will cut evenly.
 - If You Want To Add Offsets To Your Cake Topper? The Offset tool enables you to create an even offset all around your image. You will find the offset tool on the top bar of Cricut Design Space, simply click offset then use the distance slider to make your offset as big or small as you need. The beauty is you can also add multiple offsets, even add elements to your cake topper and create offsets around the whole project. You can see on my Eid Cake Topper below, as I added the lantern I created an offset, then again. This creates a multi layered effect that looks great.
- Cutting Your Layered Cake Topper On Your Cricut When you send the project to your Cricut to cut ensure you use your brayer to roll the paper, vinyl or card to the matt. Also make sure you set your material and cut pressure correctly to match whatever material you’re cutting.
- Once the cut has finished, discard the outer area of the paper, next flip the mat and gently weed. Use the weeding tool to remove any areas that need gently weeding and removing.

- Building Your Layered Cake Topper Start by placing the back layer of you layered cake topper face up and stick foam pads to the back of layer 2. Now flip the layer over and position onto the back layer, making sure it lines up. Keep going layer by layer until you’ve finished. Once finished flip it over and glue a straw to the back and allow to dry.

- Lastly add any details, I use diamanté to to add a few flourishes and a little waistband with a pencil. you could also use tulle or netting to add a layer to your skirt. I so wanted to do this but didn't have any handy.
 You can see on my Eid Cake Topper below, as I added the lantern I created an offset, then again. This creates a multi layered effect that looks great.
 Recommended Products
As an Amazon Associate and member of other affiliate programs, I earn from qualifying purchases.


Sarah I was hoping t find the svg files to make this exact topper as it is perfect for my grand daughter. If they exist, I could not find them so instead of GIVING me a fish you taught me HOW to fish. I made my own original design based on yours and am delighted with the results following your wonderful instructions. Thank you so much.
Hi Kerry ah thanks so much I used my Ballet Alphabet to make it, however so glad you leant enough to make you own. Here’s the link too the Ballet Alphabet https://extraordinarychaos.com/free-svg-ballet-alphabet.html Sarah x