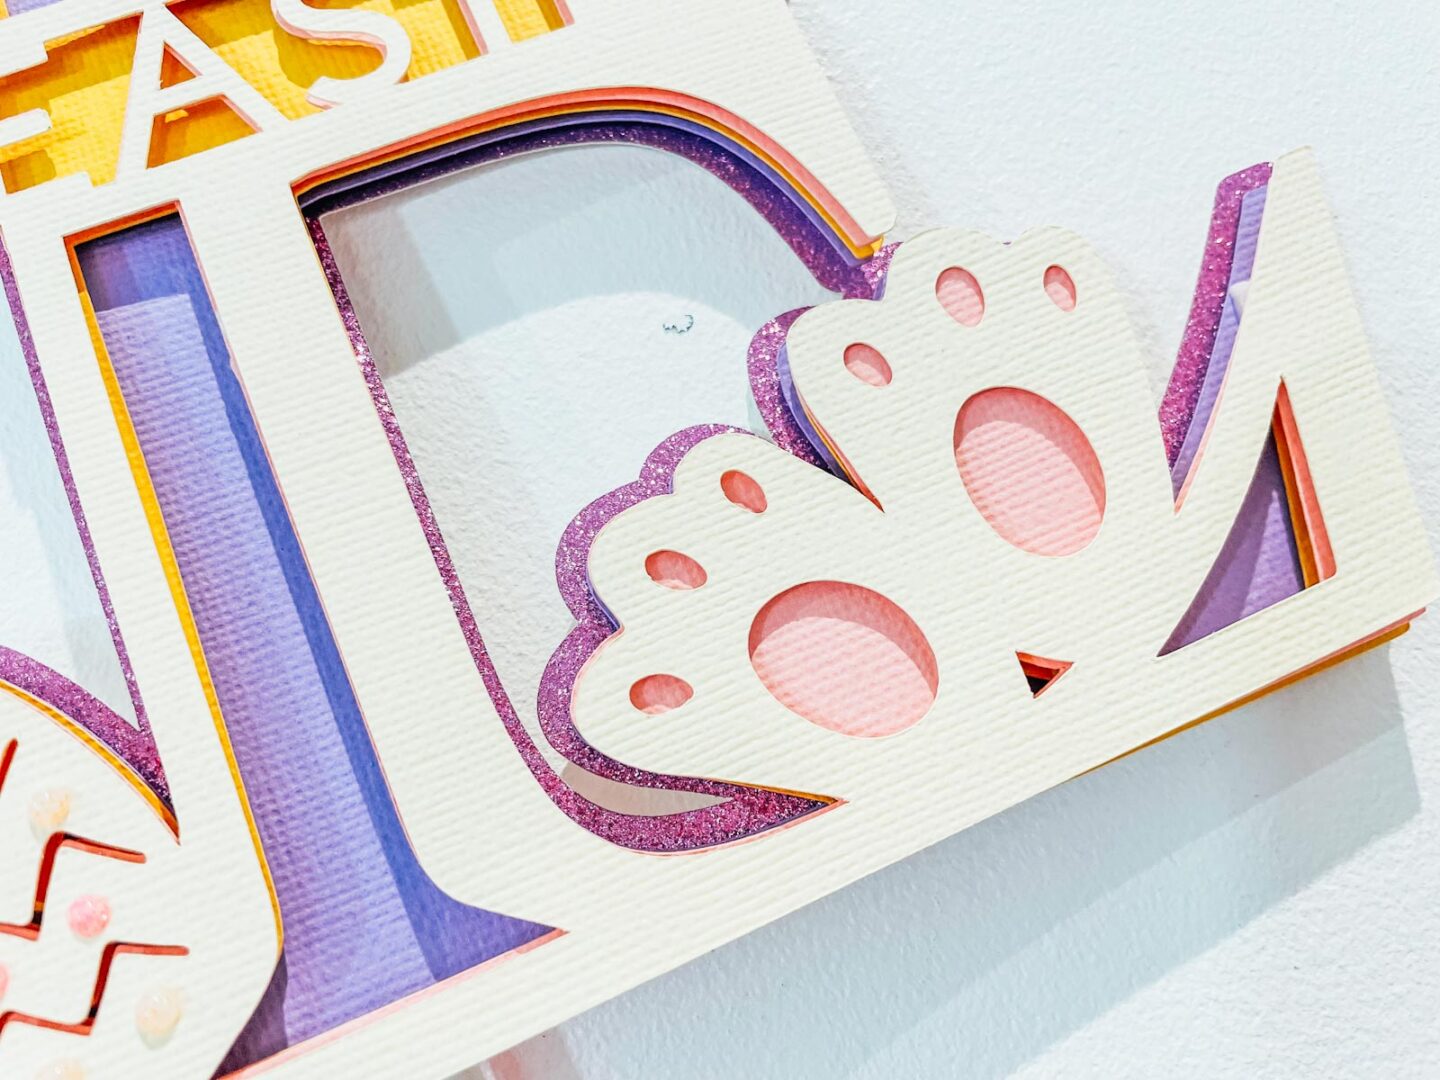
I am in full Spring and Easter mode now, doesn’t the lighter nights and sunny weather make such a difference? It makes hot sunny days feel like a possibility, after a long cold winter. Thus today I am sharing a very Spring inspired Easter Bunny Ears SVG Alphabet And Split Monogram Tutorial.
My Easter themed alphabet celebrates all things Easter Bunny, I mean come on, how cute are bunny ears and feet? So of course I had to create an alphabet which is perfect for Easter craft projects.
These Easter letters and numbers are perfect for Easter cards, scrapbooking layouts and banners. But also creating easy split monogram letters. Scroll down for a step my step split monogram tutorial. Also keep your eyes peeled for my Easter Bunny Colouring Alphabet and Colour PNG Alphabet coming soon. Also check out my Colouring Bunny Ears Alphabet over on ABC Colouring.

This post may contain affiliate links. Which means I may receive a small commission if you click a link and purchase something that I have recommended at no extra cost to yourself. As an amazon, Cricut and Glowforge associate, I earn from qualifying purchases.
What You Will Find Here
Project Ideas For My Easter Bunny Ears SVG, PNG Alphabet & Number Set For Cricut And Glowforge
- Paper Cut Letters And Words
- Easter Bunny Themed Parties
- Shaker Cake Toppers
- Easter Cards
- Wall Decals
- T-shirts, Sweaters, Jackets and Baseball Caps
- Water Bottles
- Wooden Banners With Glowforge
- Jigsaws Made With Glowforge
- Use Pegs And String For Hanging Easter Bunny Ears SVG Banners
- Framed Art For Children Bedrooms
- Iron On Vinyl Hoops
- Hanging Wooden Signs
- T Shirts
- Decoupage Cushions
- Scrapbooking Pages
- Personalised Easter Gifts

How To Make A Split Monogram Easter Bunny Ears Cake Topper With Cricut And My SVG
What You Need
- Glitter Card
- Card Stock or Foil Poster Board
- Foam Tape or Pads
- Cricut Tools
- Blue and Green Cutting Mat
- Cricut Maker
- Straw
- Glue Gun
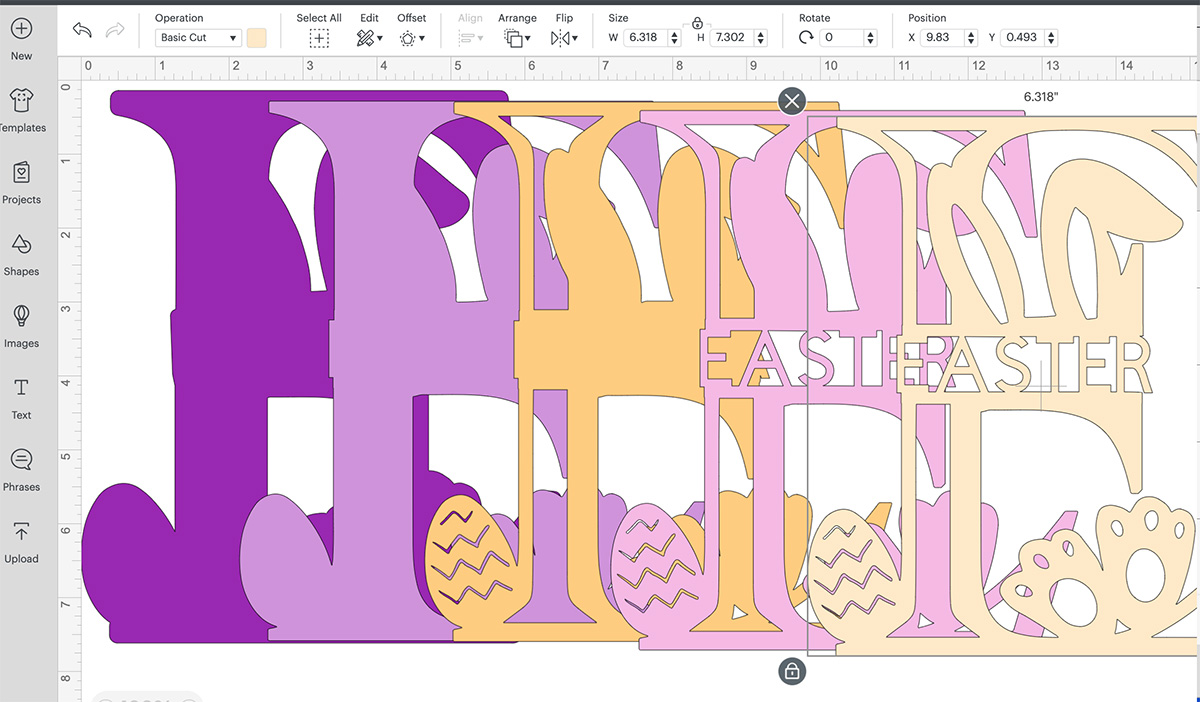
Create And Size Your Split Monogram Easter Bunny Ears Cake Topper In Cricut Design Space
To create your Bunny Ears cake topper firstly upload a letter or number of your choice to Cricut Design Space. Once uploaded choose a square from shapes and drag it larger, however you need to cover half of your letter.

Now ensuring you are splitting the letter exactly in half, slice the square into the Bunny letter. You will be left with two halves, you can discard any excess. If you get it slightly wrong click undo in the top left corner and try again.

Once you have two halves you will also want to create an edge or shelf. This will also help you when adding words and cutting you split monogram letter. To create this choose a square from the shapes bar on the left hand side.
Drag the square into a long oblong shape, you can see in the image below I have sized it to fit my shape perfectly. Once you are happy duplicate the oblong to also use on the bottom and size to fit the bottom of the letter.
You will now need to weld these together, I suggest welding both halves separately, this gives you more flexibility when adding letters and words.

To add you letters and words simply type a name and word and choose a font. You will need to size this to fit between both halves of your monogram letters.
Additionally when you do this ensure the top and Botton letters line up perfectly before right clicking and welding together. (You will find weld in the bottom right bar)

How To Create Contours In Cricut Design Space
To create a contour on your bunny letter, firstly duplicate the top layer and click contour in the bottom right corner. You can now click on certain contours to remove.
Once you have removed any contours on layer 2 (do not contour layer 1), duplicate this layer, and repeat, you always remove contours on the duplicated layers so the contours progress, thus resulting in a gradual effect.
You can see in the image below how the contours built from right to left, this also ensures you can see all contours.
Cutting Your Layered Easter Bunny Ears Layered SVG On Cricut
When you send your Bunny Ears SVG/PNG files to your Cricut to cut, ensure you use your brayer to roll the paper, vinyl or card to adhere to the mat. Movement will affect the cut.
Line up all the layers in design space, to confirm all files line up correctly and exactly the same size. Remember you are using 5 different colours so have the card stock ready to hand and really think about the colours.
I chose pastel colours as I really wanted a pastel Easter theme, but you can go for whatever colours you like.

Building The Easter Bunny Ears Split Monogram Cake Topper
To build your Easter Bunny Cake Topper flip the second layer over and sticky pads before attaching to the back layer, repeat this with layer 3, keep going until all the layers are attached.
Lastly flip the cake topper over and use a glue gun the attach a straw to the back.
You can also add Nuvo Dots to add a little detail.

How To Get Your Easter Bunny Ears SVG Alphabet and Number Files For Cricut And Glowforge
Click here or the image below to get your free downloadable Easter Bunny Ears SVG/PNG Alphabet letter and number files and follow these instructions to add to Cricut Design Space if you are using you Cricut Machine. Don’t forget to turn off any pop up blockers. Note if you are using Glowforge you need SVG files to cut the image out of wood or acrylic. Or Png or SVG to engrave.

If You’re Having Problems?
Check out my trouble shooting page, hopefully it will answer any questions you may have.
Tips And Advice For Using Your Download For Cricut
This alphabet is also perfect to make cards and cake toppers with your Cricut, check out my guides below.
- Cricut Design Space Guide
- How To Slice And Weld In Cricut Design Space
- How to upload to Cricut Design Space
- Using Iron On Vinyl
- Where Else To Get Free SVG Files
Also please do pop over to TikTok or Instagram, and give me a follow and if you make a project tag me! I love seeing everyone else’s makes and chatting crafting. I could do that all day! This is also where I share videos of my makes.

Make An Easter Bunny Ears Split Monogram
Free Easter Bunny Ears SVG Alphabet, Letters and Numbers for Cricut, Silhouette and Glowforge, and step by step Split Monogram Tutorial.
Materials
- Glitter Card
- Card Stock or Foil Poster Board
- Foam Tape or Pads
- Straw
Tools
- Cricut Tools
- Blue and Green Cutting Mat
- Cricut Maker
- Glue Gun
Instructions
- Create And Size Your Split Monogram Easter Bunny Ears Cake Topper In Cricut Design Space
To create your Bunny Ears cake topper firstly upload a letter or number of your choice to Cricut Design Space. Once uploaded choose a square from shapes and drag it larger, however you need to cover half of your letter.
- Now ensuring you are splitting the letter exactly in half, slice the square into the Bunny letter. You will be left with two halves, you can discard any excess. If you get it slightly wrong click undo in the top left corner and try again.

- Once you have two halves you will also want to create an edge or shelf. This will also help you when adding words and cutting you split monogram letter. To create this choose a square from the shapes bar on the left hand side.
 Drag the square into a long oblong shape, you can see in the image below I have sized it to fit my shape perfectly. Once you are happy duplicate the oblong to also use on the bottom and size to fit the bottom of the letter.
 - You will now need to weld these together, I suggest welding both halves separately, this gives you more flexibility when adding letters and words.
- To add you letters and words simply type a name and word and choose a font. You will need to size this to fit between both halves of your monogram letters.
Additionally when you do this ensure the top and Botton letters line up perfectly before right clicking and welding together. (You will find weld in the bottom right bar)
- To create a contour on your bunny letter, firstly duplicate the top layer and click contour in the bottom right corner. You can now click on certain contours to remove. Once you have removed any contours, duplicate this layer, and repeat, you always remove contours on the duplicated layers so the contours progress, thus resulting in a gradual effect.
You can see in the image below how the contours built from right to left, this also ensures you can see all contours.
- Cutting Your Layered Easter Bunny Ears Layered SVG On Cricut
When you send your Bunny Ears SVG/PNG files to your Cricut to cut, ensure you use your brayer to roll the paper, vinyl or card to adhere to the mat. Movement will affect the cut.
Line up all the layers in design space, to confirm all files line up correctly and exactly the same size. Remember you are using 5 different colours so have the card stock ready to hand and really think about the colours.
I chose pastel colours as I really wanted a pastel Easter theme, but you can go for whatever colours you like. - Building The Easter Bunny Ears Split Monogram Cake Topper
To build your Easter Bunny Cake Topper flip the second layer over and sticky pads before attaching to the back layer, repeat this with layer 3, keep going until all the layers are attached.
Lastly flip the cake topper over and use a glue gun the attach a straw to the back.
Notes
Ideas For My Easter Bunny Ears Alphabet
Easter Bunny Themed Parties
Shaker Cake Toppers
Easter Cards
Wall Decals
T-shirts, Sweaters, Jackets and Baseball Caps
Water Bottles
Wooden Banners With Glowforge
Jigsaws Made With Glowforge
Use Pegs And String For Hanging Easter Bunny Ears SVG Banners
Framed Art For Children Bedrooms
Iron On Vinyl Hoops
Hanging Wooden Signs
T Shirts
Decoupage Cushions
Scrapbooking Pages
Personalised Easter Gifts
Recommended Products
As an Amazon Associate and member of other affiliate programs, I earn from qualifying purchases.


Love these
Thank you x
Thank you for all your wonderful designs and your generosity in sharing them with all of us.