I’ve been keeping the Cricut Foil Transfer Kit secret for weeks now! Omg it’s been torture not talking about something I’m so excited about. I have been dying to try foiling on my Cricut forever but didn’t want to add a kit to my Cricut that was not part of the warranty.
However we now have a Cricut Foil Kit that’s designed to work with all Cricut Maker and Explore Machines and after a week or two of playing with it, here’s what I thought and also tips on how to use it.
What You Will Find Here
What Is The Cricut Foil Kit, The Ultimate Guide.
The Cricut foiling kit is a fabulous way to add a bit of bling to projects large and small. It comprises of a foil attachment tool and foil sheets which allows you to use your foiling kit to create cards, art, invitations and more.
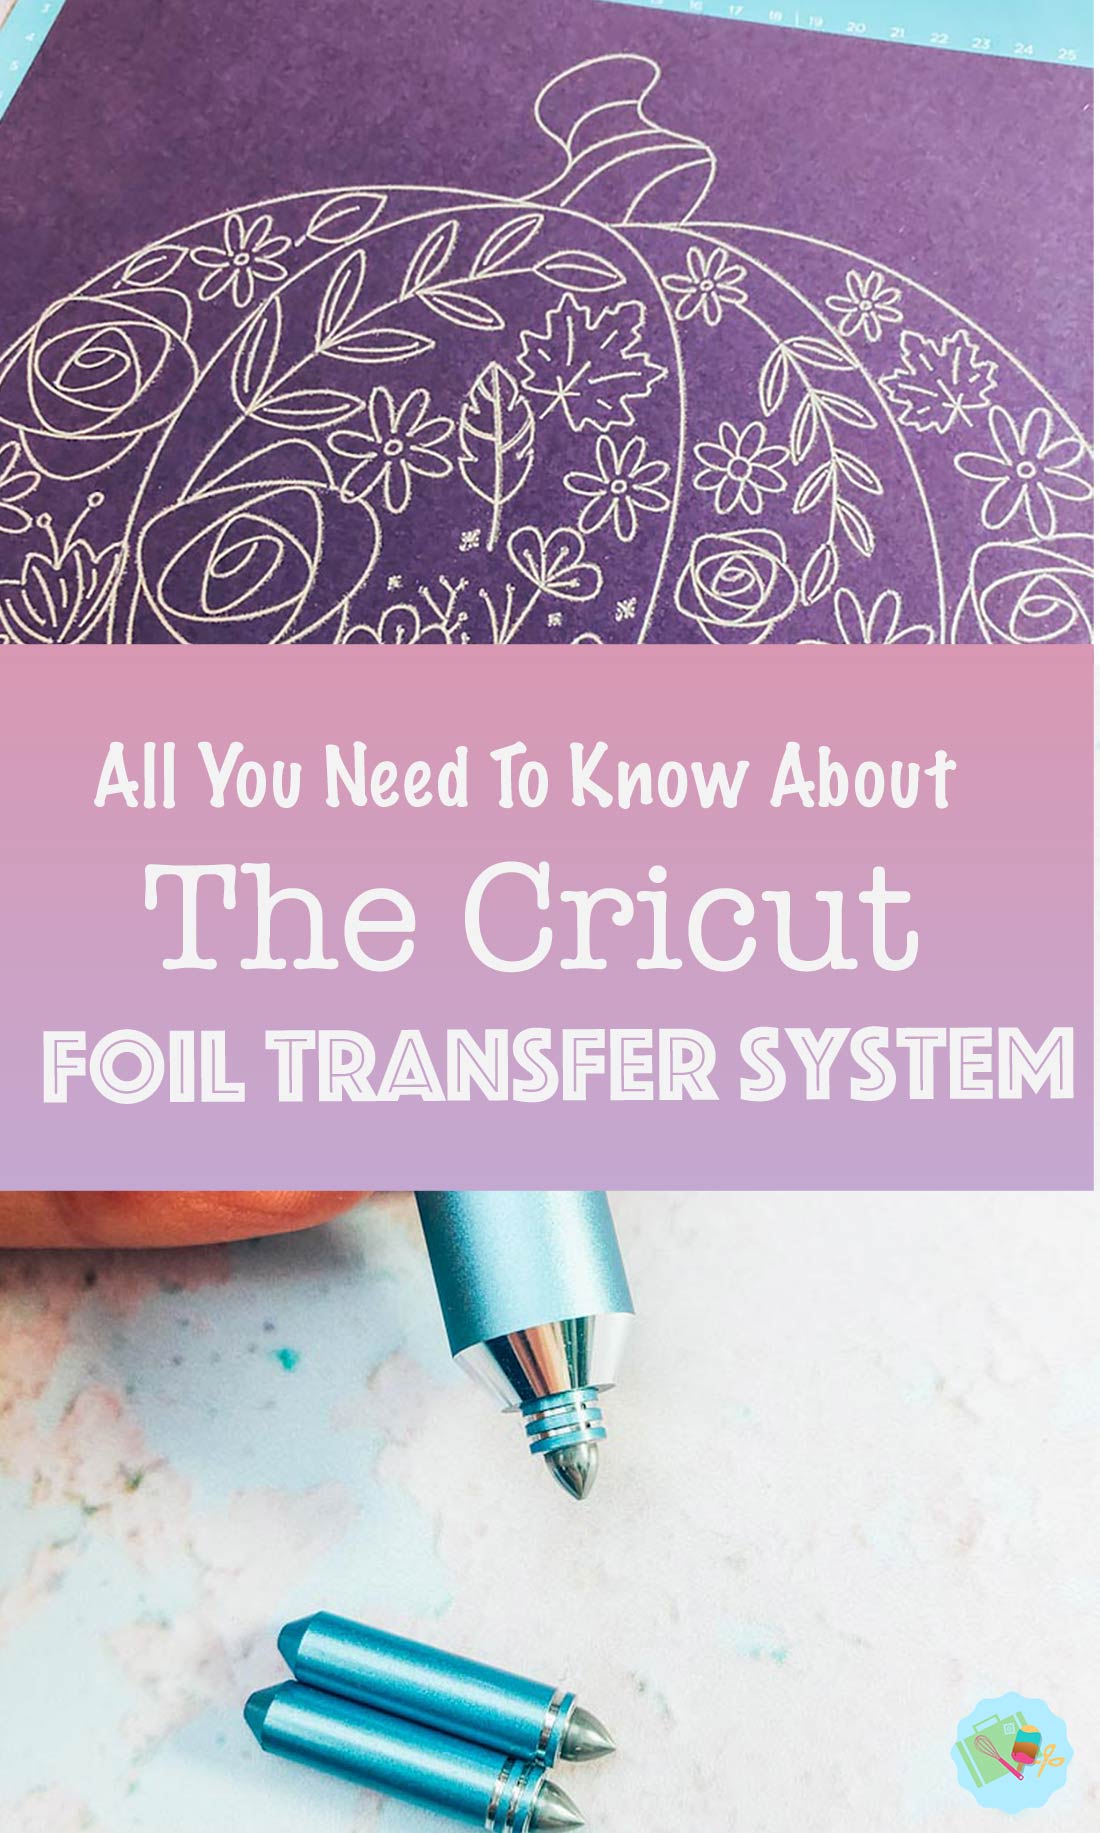
It is able to cope with quite complex projects, the map below was the first project I ever made with the foil transfer sheets, I decided to go large and be ambitious and was thrilled with the result.

What Cricut Machines Does The Cricut Foil Tool Work On?
You ‘re able to use the Foil tool on the Cricut Maker and all Explore Family machines. The foiling tool fits into Clamp B on your Cricut, thats the clamp your knife blade also fits into. This enables the tool to apply the right amount of pressure to transfer the foil onto Cricut Projects. However it is not compatible with the Cricut Joy.
How Does Cricut Foil Work?
The Cricut Foil System works with pressure, thus there are no wires or heat, just the 3 in 1 foil tool which is a housing that has 3 different interchangeable tips; fine medium and bold.
These tips are magnetic and very easy to change, however are very small. I store mine in my Cricut draw, they stick nicely to the magnetic strip in the left hand compartment.
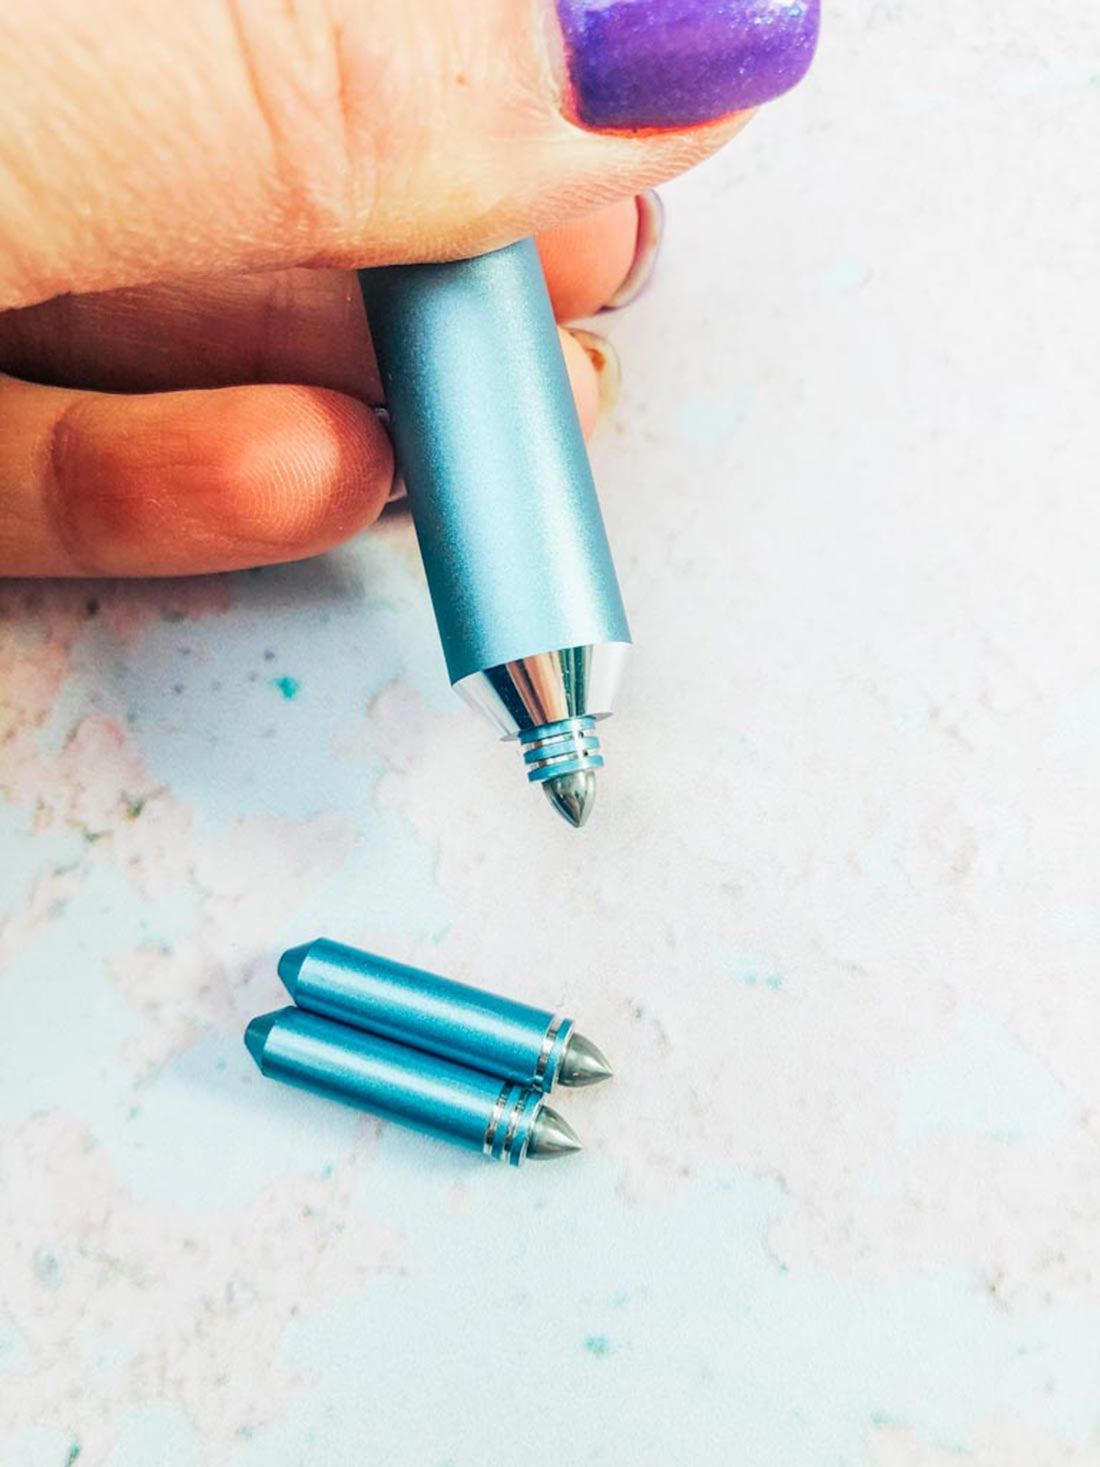
The foil tool works in conjunction with Cricut Design Space, here you can choose the size of your foil line by changing the tips to correspond with the line type you choose for your foil project in Cricut Design Space. ( My favourite is bold)
However it is important to get the right tool with the right pressure, using the wrong tool can cause your project to rip.
The foil comes in two different sizes, 12×12 for large or bulk projects or 4×6 which is perfect for smaller projects and cards and comes in a choice of colours including silver, gold, teal, green and purple. The pack also contains enough adhesive strips for all the foil in the pack.

What Materials can you Use The Cricut Foil Transfer Kit On?
- Cardstock
- Light
- Heavy
- Medium
- Adhesive Backed
- Faux Leather
- Deluxe Paper
- Foil Embossed
- Watercolor Paper
- Pearl Paper
- Vellum
- Printable Vinyl (and sticker paper)
- Kraftboard
What Colours Does Cricut Foil Come In?
The foil is currently available in silver, gold, and the Jewel pack with consists of Aqua, Eggplant and Emerald.
How To Use The Cricut Foil Transfer Kit
Designing Images To Work On A Foil Project
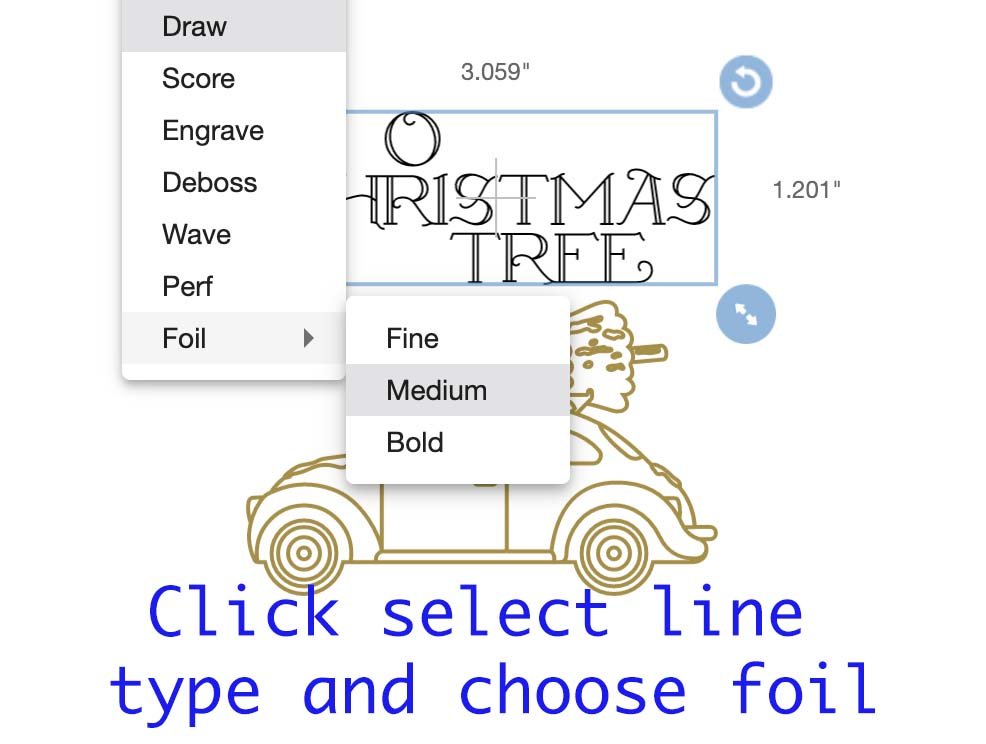
To be able to use a project as a foil image you must use a draw image, these can be found in Cricut Design Space in images under Art type in the left hand bar. I have found the foil system is great with quite complex projects, thus its ok to be a little daring.

Once you have chosen your draw image, click on line type and select foil, here you can choose your project colour and line thickness. You will also be able to choose your foil colour, this is a great help especially when working with multiple foil colours.
Handling The Foil
The Foil is fragile and will mark if you crease it, it will also stick to your Cricut Cutting Mat. If this happens the foil transfer layer will be removed from the back, it also marks the cutting mat. I only made this mistake once!
It also sticks together as you take it out of the pack, however Cricut have considered this and have made the foil packs into fully opening envelopes. Simple cut the plastic seals at the side of the packets and you are able to take foil out and put back in easily. This may only be a simple thing but it makes handing the foil so much easier, especially if you change your mind a lot like me.

Sticking The Cricut Foil Transfer Kit To Your Mat And Card
To attach your foil simply lay the foil over you card stock, taping each edge of the foil to the cutting mat. It’s important to get the foil as even as possible to ensure the transfer is even and the foil doesn’t rip. The more even the foil, the better the transfer. Its also important not to get the foil to tight as this can also rip the foil.
I found it worked to attach the two opposite edges first, then move onto the side. Use even tension to get the foil as even as possible.

Sending Your Project To Your Cricut
When you send your project from design space to your mat drag your image, this was it’s situated centrally on the the mat. Thus allowing a little space around the edge of the project.

Next ensure you slide the roller guides back on your Cricut Machine, this will prevent marks appearing on the foil.

What Order Does The Cricut Foil/ Cut In
Once you have attached your Cardstock and foil to your cutting mat you can send the project to foil/cut. The foil will transfer your design first.
Design space will prompt you to ensure you have the correct foil transfer kit tool in place. This is important as each tool works on pressure using the wrong tool can tear the project.

Once the foil transfer tool has finished you are prompted to remove the foil before your Cricut can go on to cut the project, this is also the point that you must swap back to the knife blade. IT IS IMPORTANT NOT TO UNLOAD THE MAT! Simply un-peel the tape and gently remove the foil.
Now you can continue with your project if it requires cutting.
Using The Cricut Foil Kit, My Top Tips
- Don’t let the foil touch the cutting mat.
- I find the foiling kit works better with draw images. I spent a lot of time trying to make it work alongside my Papercut Alphabets. However, it works so much better when you think of it as a drawing tool. Forget cutting and think drawing and doodling. This way of thinking helped me to design and new Alphabet and Pumpkin designed just for drawing and foiling.
- Ensure you attach the foil to your cutting mat evenly and securely.
- Don’t unload your mat half way through the project, follow the on screen instructions.
- Enjoy creating, it was a learning curve for me, however the more I have used the Cricut Foil Kit the more I get excited about the projects I can create with it, its all about getting that foil secure and even on the mat.
What Can You Make With The Cricut Foil Transfer Kit?
I have been busy trying out lots of different projects, I have designed my own and also used draw images from design space. The Cricut Foil is perfect for pre designed projects, drawing over existing projects and designing your own, check out all of my projects here with links to Design Space, including a special bonus project for subscribers.

Some Of The Projects I have Created
- Cards
- Christmas Tags
- Art Work
- Alphabets For Personalised Projects
- Bookmarks
- Halloween Decorations
- Christmas Decorations
Also Check Out

Please note I was gifted the foil system in return for my review, my opinions are all my own.

How To Use The Cricut Foil System
The Cricut Foil Transfer Kit, How Does It Work? How to use the Cricut transfer systemn and what can you make with the foil tool in this fab foiling kit.
Materials
- Cricut Foil
- Card Stock
- Or Cricut Cards ( I use these on a cutting mat)
Tools
- Cricut Foil Tool
- Maker Or Explore Machine.
- Cricut Weeding Tool and Scraper
Instructions
What Cricut Machines Does The Cricut Foil Tool Work On?
You ‘re able to use the Foil tool on the Cricut Maker and all Explore Family machines. The foiling tool fits into Clamp B on your Cricut, thats the clamp your knife blade also fits into. This enables the tool to apply the right amount of pressure to transfer the foil onto Cricut Projects. However it is not compatible with the Cricut Joy.
How Does Cricut Foil Work?
The Cricut Foil System works with pressure, thus there are no wires or heat, just the 3 in 1 foil tool which is a housing that has 3 different interchangeable tips; fine medium and bold.
These tips are magnetic and very easy to change, however are very small. I store mine in my Cricut draw, they stick nicely to the magnetic strip in the left hand compartment.
The foil tool works in conjunction with Cricut Design Space, here you can choose the size of your foil line by changing the tips to correspond with the line type you choose for your foil project in Cricut Design Space. ( My favourite is bold)
However it is important to get the right tool with the right pressure, using the wrong tool can cause your project to rip.
The foil comes in two different sizes, 12×12 for large or bulk projects or 4×6 which is perfect for smaller projects and cards and comes in a choice of colours including silver, gold, teal, green and purple. The pack also contains enough adhesive strips for all the foil in the pack.
How To Use The Cricut Foil Transfer Kit
Designing Images To Work On A Foil Project
To be able to use a project as a foil image you must use a draw image, these can be found in Cricut Design Space in images under Art type in the left hand bar. I have found the foil system is great with quite complex projects, thus its ok to be a little daring.
Once you have chosen your draw image, click on line type and select foil, here you can choose your project colour and line thickness. You will also be able to choose your foil colour, this is a great help especially when working with multiple foil colours.
Handling The Foil
The Foil is fragile and will mark if you crease it, it will also stick to your Cricut Cutting Mat. If this happens the foil transfer layer will be removed from the back, it also marks the cutting mat. I only made this mistake once!
It also sticks together as you take it out of the pack, however Cricut have considered this and have made the foil packs into fully opening envelopes. Simple cut the plastic seals at the side of the packets and you are able to take foil out and put back in easily. This may only be a simple thing but it makes handing the foil so much easier, especially if you change your mind a lot like me.
Sticking The Cricut Foil Transfer Kit To Your Mat And Card
To attach your foil simply lay the foil over you card stock, taping each edge of the foil to the cutting mat. It’s important to get the foil as even as possible to ensure the transfer is even and the foil doesn’t rip. The more even the foil, the better the transfer. Its also important not to get the foil to tight as this can also rip the foil.
I found it worked to attach the two opposite edges first, then move onto the side. Use even tension to get the foil as even as possible.
Sending Your Project To Your Cricut
When you send your project from design space to your mat drag your image, this was it’s situated centrally on the the mat. Thus allowing a little space around the edge of the project.
Next ensure you slide the roller guides back on your Cricut Machine, this will prevent marks appearing on the foil.
What Order Does The Cricut Foil/ Cut In
Once you have attached your Cardstock and foil to your cutting mat you can send the project to foil/cut. The foil will transfer your design first.
Design space will prompt you to ensure you have the correct foil transfer kit tool in place. This is important as each tool works on pressure using the wrong tool can tear the project.
Once the foil transfer tool has finished you are prompted to remove the foil before your Cricut can go on to cut the project, this is also the point that you must swap back to the knife blade. IT IS IMPORTANT NOT TO UNLOAD THE MAT! Simply un-peel the tape and gently remove the foil.
Now you can continue with your project if it requires cutting.
Notes
What Materials can you Use The Cricut Foil Transfer Kit On?
Cardstock
Light
Heavy
Medium
Adhesive Backed
Faux Leather
Deluxe Paper
Foil Embossed
Watercolor Paper
Pearl Paper
Vellum
Printable Vinyl (and sticker paper)
Kraftboard
Using The Cricut Foil Kit, My Top Tips
- Don’t let the foil touch the cutting mat.
- I find the foiling kit works better with draw images. I spent a lot of time trying to make it work alongside my Papercut Alphabets. However, it works so much better when you think of it as a drawing tool. Forget cutting and think drawing and doodling. This way of thinking helped me to design and new Alphabet and Pumpkin designed just for drawing and foiling.
- Ensure you attach the foil to your cutting mat evenly and securely.
- Don’t unload your mat half way through the project, follow the on screen instructions.
- Enjoy creating, it was a learning curve for me, however the more I have used the Cricut Foil Kit the more I get excited about the projects I can create with it, its all about getting that foil secure and even on the mat.
Recommended Products
As an Amazon Associate and member of other affiliate programs, I earn from qualifying purchases.


