With Hanukkah fast approaching, I decided I wanted to create a Free Mickey Hanukkah SVG file for all of my readers and friends who celebrate the Festival Of Light. Hanukkah means dedication in Hebrew and this eight-day holiday celebrates the triumph and rededication of the Temple of Jerusalem after it was retaken by the Maccabees, a group of Jewish warriors, from the Greeks in the 2nd century BCE.
Every day during the 8 day holiday a candle on the Menorah is lit, the Menorah is a candelabra with nine candles. Having a candle in the centre and four on either side. The centre candle is intended to light all of the other candle. This is known as the shamash and it sits higher, or slightly apart from the other candles.

What You Will Find Here
Hanukkah SVG Free Download For Festival Of Light Cards And Crafting
Project Ideas For My Hanukkah SVG
- Hanukkah Decorations
- Porch Signs
- Holiday Wall Art
- Holiday Door Wreaths
- Themed Home Decor
- Hanukkah Mugs
- Iron On Vinyl Hoops
- Decoupage Cushions
- Cards
- Scrapbooking Pages And Memory Books

If You Want To Use This Hanukkah SVG For Cricut Or Silhouette?
Click here or the image below to get your free downloadable Hanukkah SVG/png files and follow these instructions to add to Cricut Design Space. Don’t forget to turn off any pop up blockers.
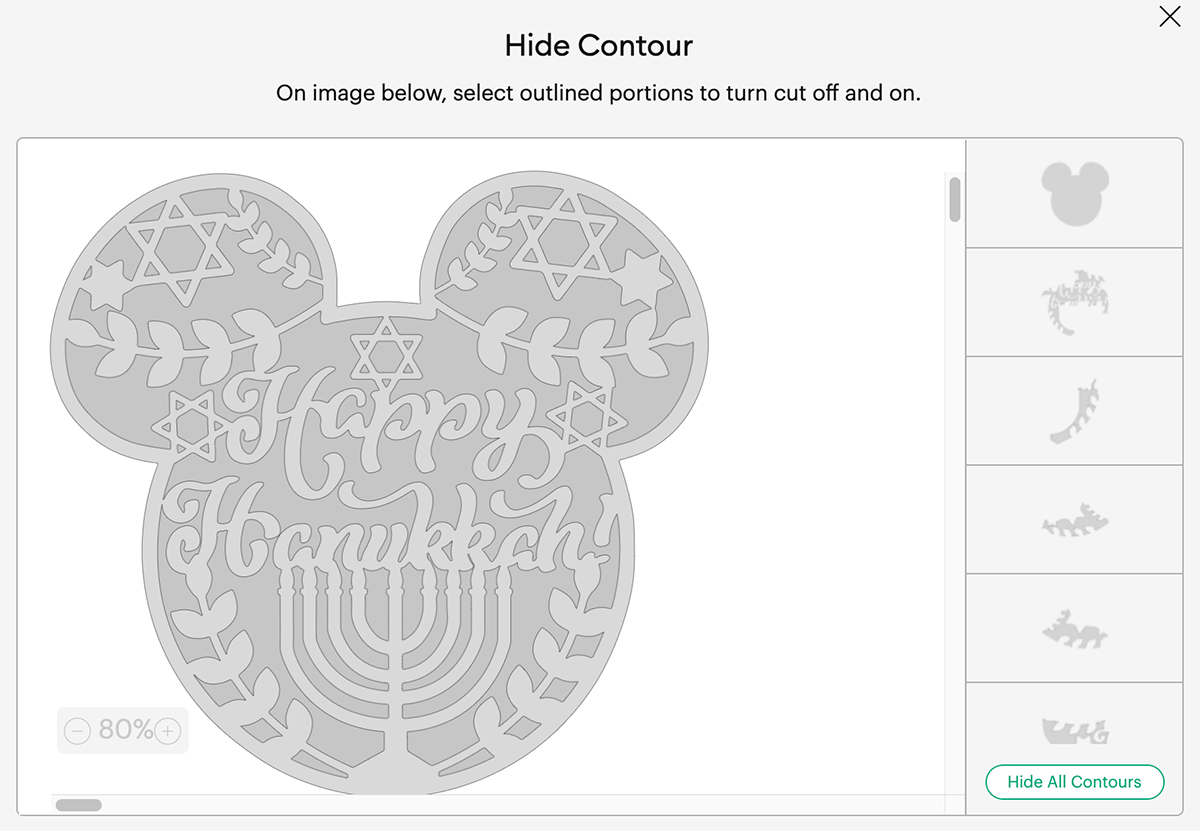
How To Make A Back File In Cricut Design Space?
Start by uploading your Hanukkah SVG to Cricut Design Space. Once uploaded, duplicate your image and then select the contour tool in the bottom right hand corner.
The contour tool allows you to remove areas of a file to personalise any cut files and craft projects, it is also a great way to work on multiple layers to create DIY mandalas and layered files.
Once it loads, remove all contours, this will give you a solid back layer.
This post may contain affiliate links. Which means I may receive a small commission if you click a link and purchase something that I have recommended at no extra cost to yourself. As an amazon associate, I earn from qualifying purchases.
Cutting Your Hanukkah SVG Cut File
When you send your Hanukkah SVG/PNG files to your Cricut to cut, ensure you use your brayer to roll the paper, vinyl or card to adhere to the mat. Movement will affect the cut.
Also organise your coloured layers before hand if you are using a back file, thus you can feed in order and get the colours right. for this projects I used a Cricut Sparkle Paper which is actually a thick sparkly card for the back layer. and white card stock for the top layer.
If your cutting mat looses its stickiness this will affect the quality of cut. Also make sure your mat is in good condition, this is vital for cutting intricate cuts.
Additionally, set the material and cut pressure correctly to match whatever materials you’re cutting to guarantee a clean cut. If you have any problems cutting check the mat, pressure and material settings as generally this is where the problem will lie.

Building Your Layered Hanukkah Mickey
Lay out and line up both for the Hanukkah layers and gently apply glue with a glue stick on the back of the top layer, before attaching to the back sparkly layer.
Tips And Advice For Using Your Download.
- Cricut Design Space Guide
- How To Slice And Weld In Cricut Design Space
- How to upload to Cricut Design Space
- Using Iron On Vinyl
- Where Else To Get Free SVG Files
More Mickey Craft Projects
Also please do pop over to Instagram, and give me a follow and if you make a project tag me! I love seeing everyone else’s makes and chatting crafting. I could do that all day!
