I have had a few messages asking me for a more basic Design Space Cricut Tutorial. Admittedly I am guilty of assuming the obvious and forgeting how overwhelming I found the Cricut Design space when I started out. So today I am here to remedy that. And share how to get started, with a How To Use Cricut Design Space for beginners. With some top Cricut Hacks And Tips. Also check my individual tutorials here.
You see here’s the thing? Your Cricut machine can be overwhelming when you first get started. Being a Cricut beginner isn’t always easy, its all about grabbing the bull by the horns and making Cricut projects. You get over the Cricut fear by doing, playing and experimenting, this is how you become a Cricut expert. Trust me, I’m not a manual reader I am a player, a lets try this out kind gal.
So my best advice is check my my post, Cricut tips and tricks and go for it! Trust me it’s so rewarding. Also please note this step by step design space guide works on all machines the Cricut Joy, Cricut Maker And Cricut Explore Air.

What You Will Find Here
How To Use Cricut For Beginners
How Much Does Cricut Design Space Cost In The UK?
If you pay monthly Cricut Access is £7.49 a month (which you can cancel anytime), however a yearly subscription is £71.88 will save you £18 pounds over a year. This works out at £5.99 as month. Thus giving you unlimited access to over 200,000 images, over 1,000 Ready To Make projects, and 700+ fonts. This replaces the cartridges that people used to use on the old style Cricut machines.
Can I Use Design Space For Free?
Yet, the Cricut design space software is free to use if you just want to upload and edit your own images and not use the design space images. Although there are some free images and fonts available in design space.
Ultimately you don’t need a subscription for that, there are also plenty of places to get free SVG files on the internet.

Getting Around Cricut Design Space For Beginners
Once you have your new machine setup you will have a design space canvas. In your home screen you have several options. Down the left hand side you have all the setting options. If you can’t see this simply click on the three little lines next to home, then the side bar will appear.
Here you can connect a Cricut machine, calibrate your machine, and get access to your account. Calibration is important and this enables the machine to cut accurately. This is particularly important for print then cut projects (Note you can’t print then cut on the Cricut Joy)

Starting A New Project
To start a project click on new projects on the left hand side. If the side bar is open it may be sitting underneath. You can also upload images and fonts to Cricut Design Space. Note you can cut projects up to a width of 12 inches. Cricut mats are either 12×12 or 12×24.

How To Use Your Cricut Design Space Canvas For Beginners
This is your dashboard for your designs. Therefore where you will be able to design and add images and text to create Cricut Projects. The canvas is marked out in inch squares which is directly related to the cutting mat.
When working on a project refer to your cutting mat for a size guide as the canvas can be deceiving. But ensure you remember one marked out square on the canvas is the equivalent to one square on the cutting mat.
How To Use The Side Bar On Cricut
Down the left hand side of your canvas you will find several options. These are the main features of Design Space, thus allowing you to produce and edit projects.
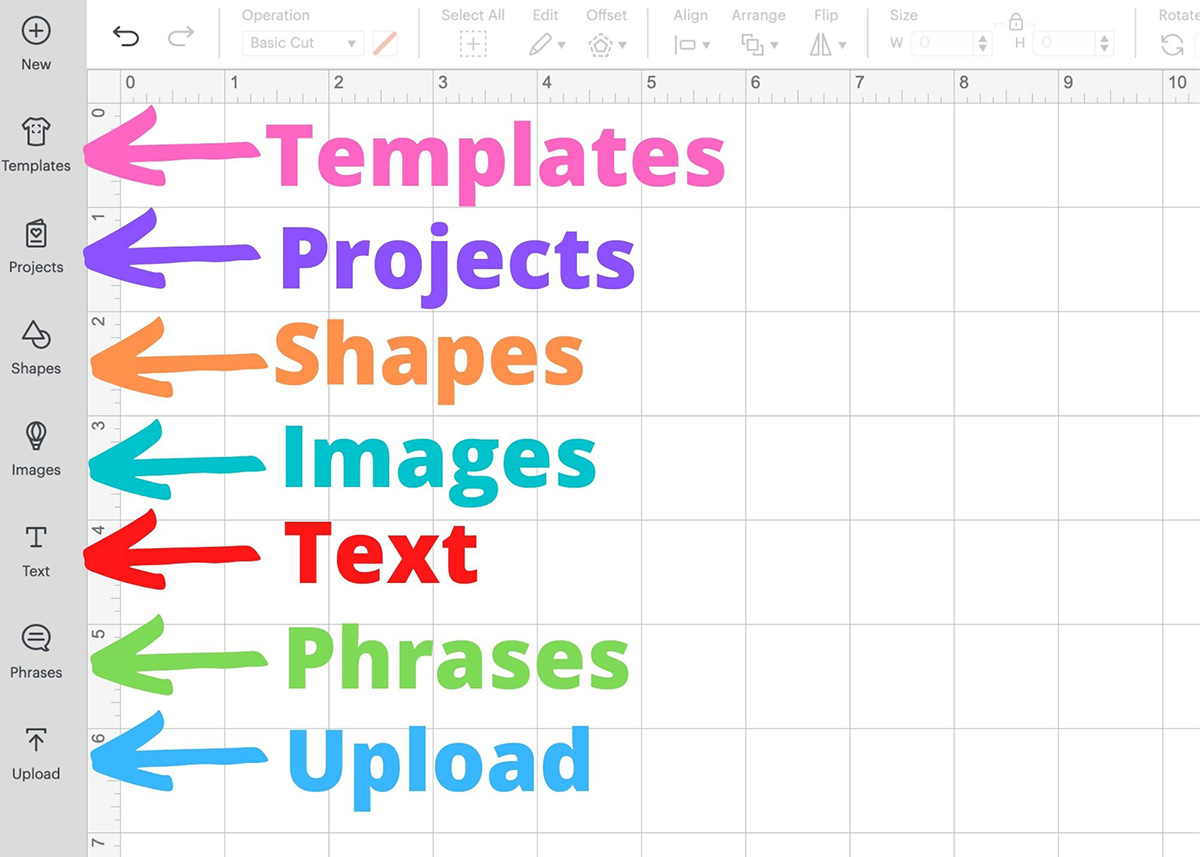
Design Space Cricut Templates For Projects
The template option allows you to visualise a project. For example should you want to create a mug you can select a mug template to allow you to visualise your project. However the template is a guide only and will not cut.
Ready Made Projects
Alternatively using the ready made projects is a great way to start. These are step by step guides and have ability levels highlighted. Thus allowing you to start gradually and work onto more difficult projects.
Text
This is where you add text to your projects, and there is a huge choice of fonts. However if you want a saying, there are also lots of these in the image library.
Design Space Images
The image library is packed with fun images. We are currently mid home project, as such I am creating cushions. So far I have embellished a car cushion, see below, however the bicycle and hot air balloon are next on my list.
This is a great example of how design space images can be used. There are images available for all occasions and needs, such as homewares, clothing, and cards.

Shape Library
The shape library is useful for starting templates, adding shapes to projects, but also slicing and welding. There is more about slicing and welding in THIS MORE ADVANCED CRICUT DESIGN SPACE POST.
Phrases
Here you will find phrases in every language including card templates for Cricut Cards.

The Option To Upload Your Own Images And Files
Should you want to download and add files, you can do this here, adding files and images to Cricut is super easy, you can add many different formats including JPG, SVG, PNG and screenshots.
How To Use Cricut, The Top Toolbar In Design Space For Beginners
In this section I am going to take you through how to use the features on the top bar on Cricut Design Space. This for me is where all the magic happens and you can create and design your own images and projects easily.
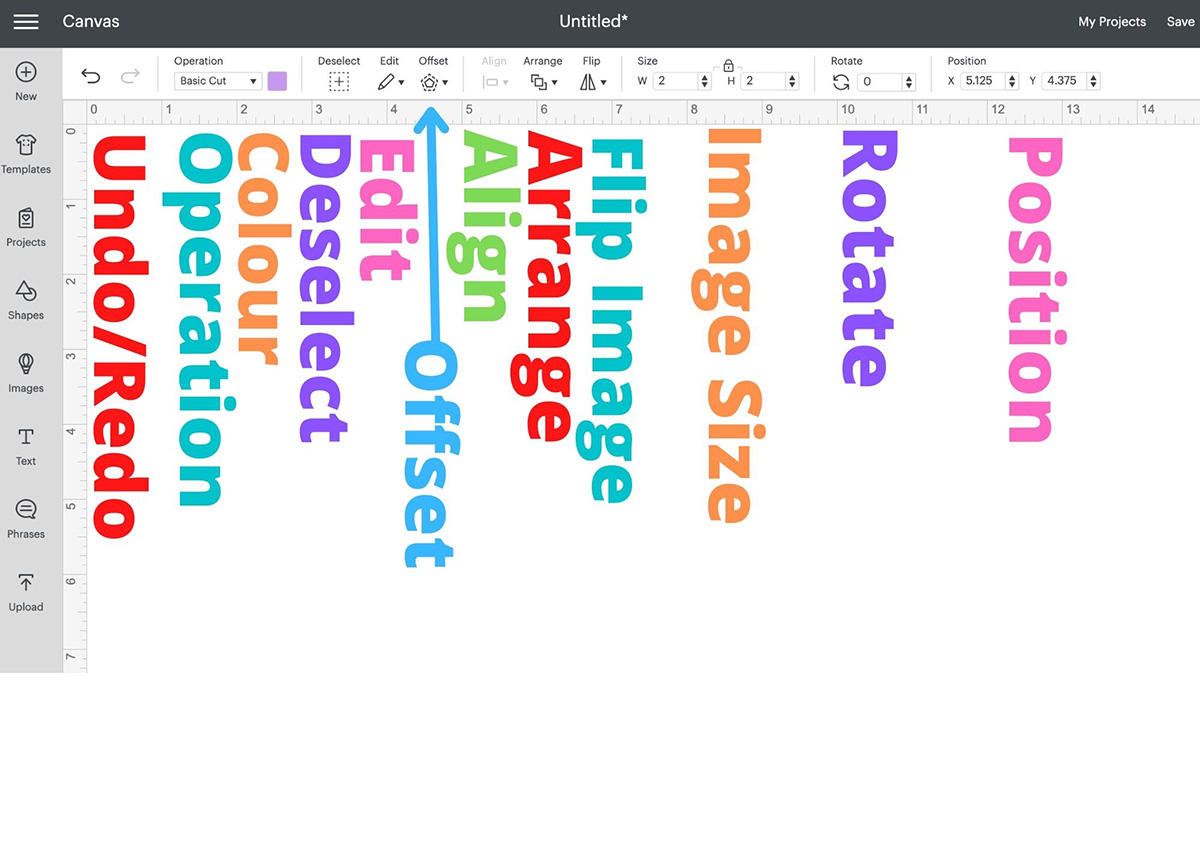
Undo Button / Redo Button
Undo your previous move, this is particularly helpful if you want to undo a weld. The undo button can go back many times. It is useful if a project isn’t going as planned and you want to make changes.
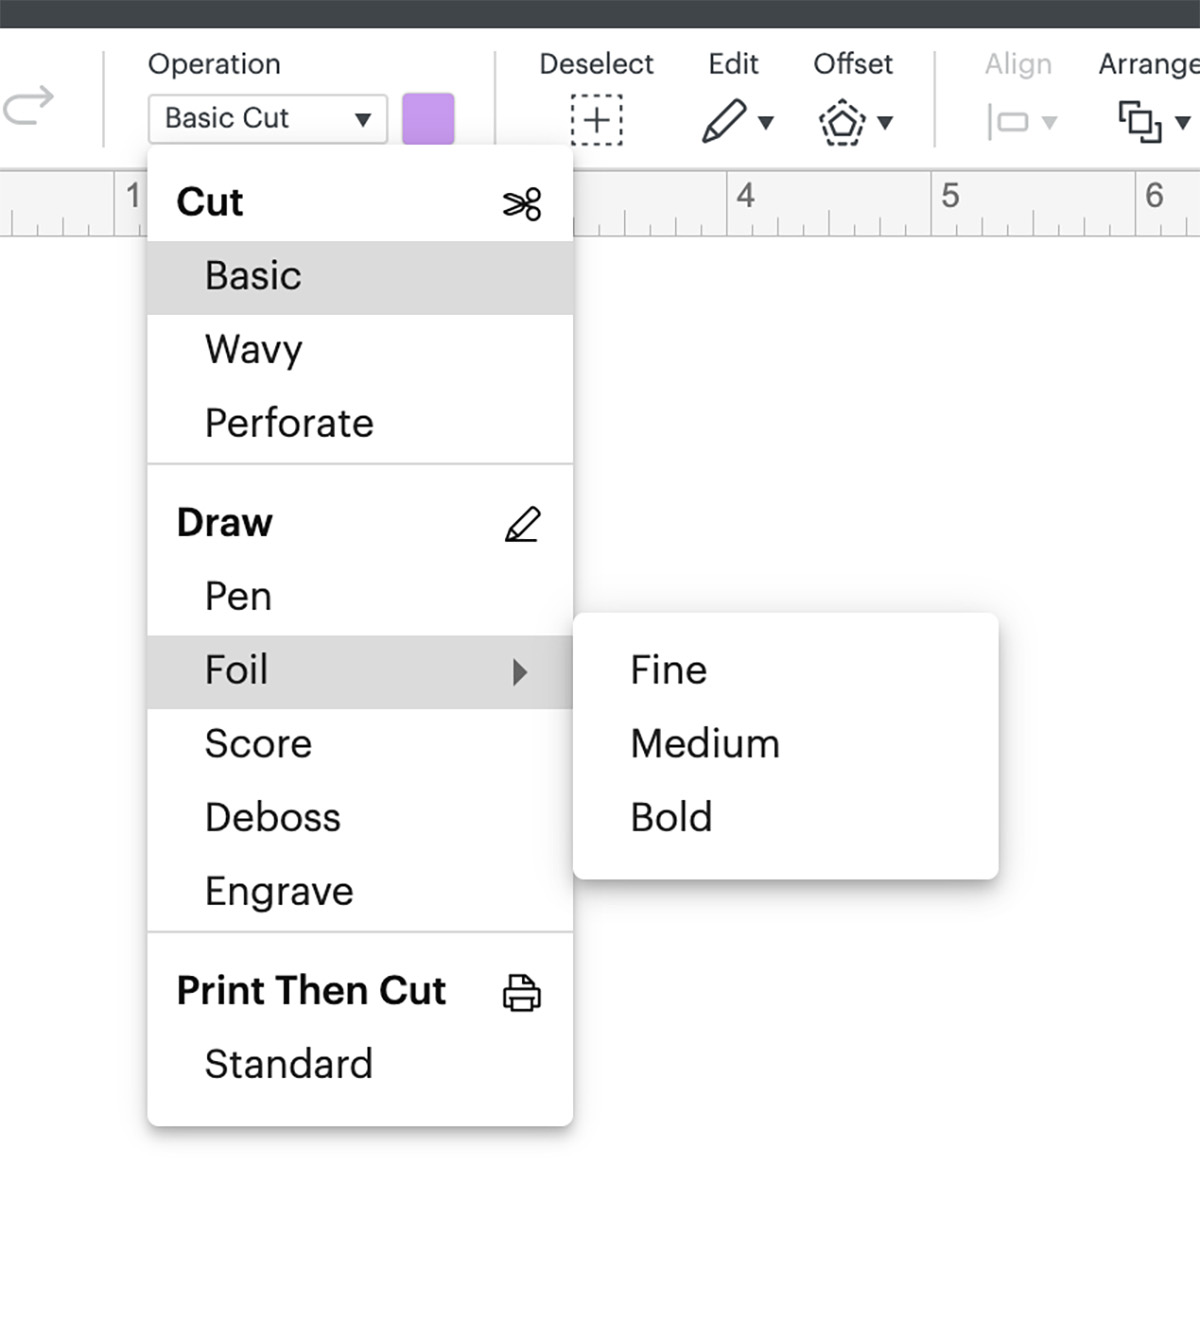
Operation
Operation is the type of project you are working on, whether it is cut, foil, score, deboss or engrave. This is where you will choose the operation.
Colour
To change colours of a project, this is great for designing paper cuts if you keep all of your images the same colour. Or for a multi layered project use the colours you intend to use to cut out for a visual idea of the project. You will also use the colour option for designing print and cut options.
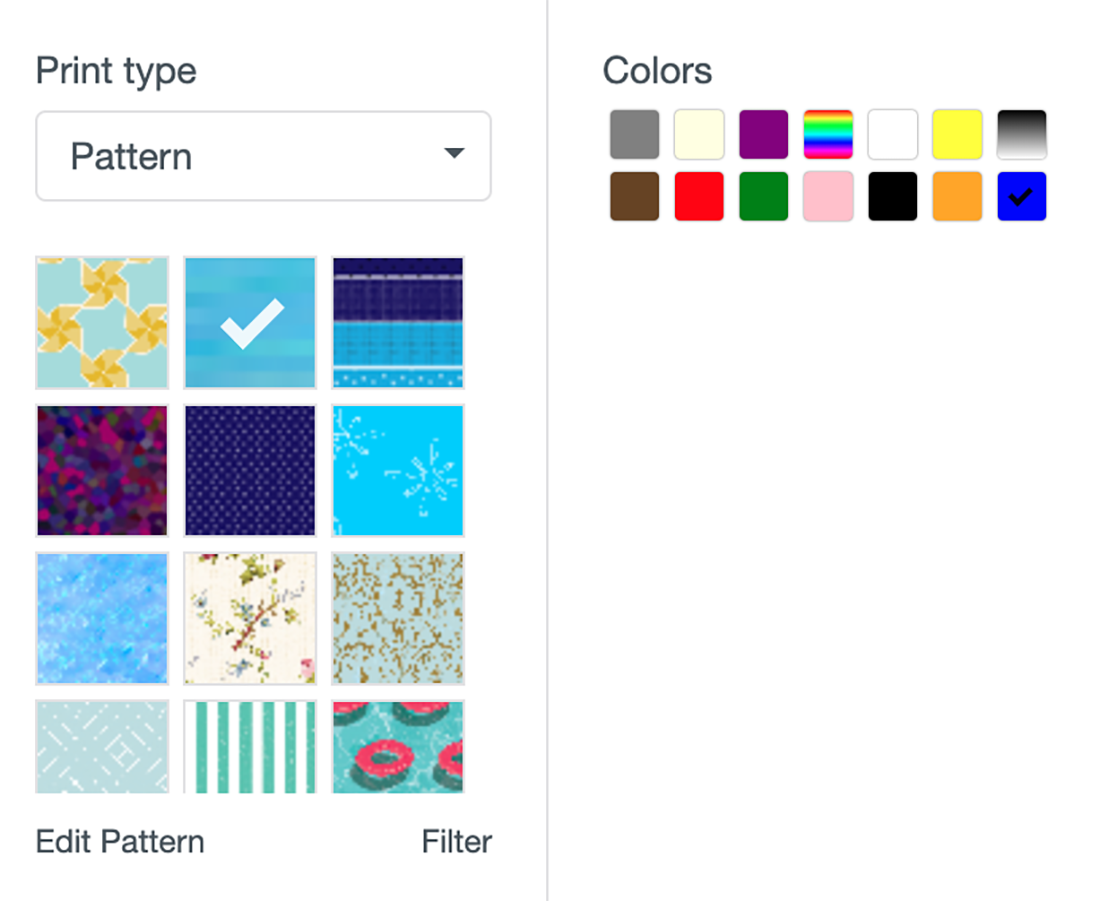
Pattern Fill
For print and cut projects. Any image can be filled with a pattern and there is lots to choose from. I used the pattern fill on shapes to create planner stickers.
Select And Deselect
Click on select all to select all the images on your canvas, deselect to de select the images. Which can also be done also by clicking directly on and off and image.
Edit
When you click in Edit in Cricut Design Space you get a drop down box with the options to cut, copy and paste images. This is useful when working on larger projects such a Alphabets as it enables you to copy one image and keep clicking paste to paste multiples.
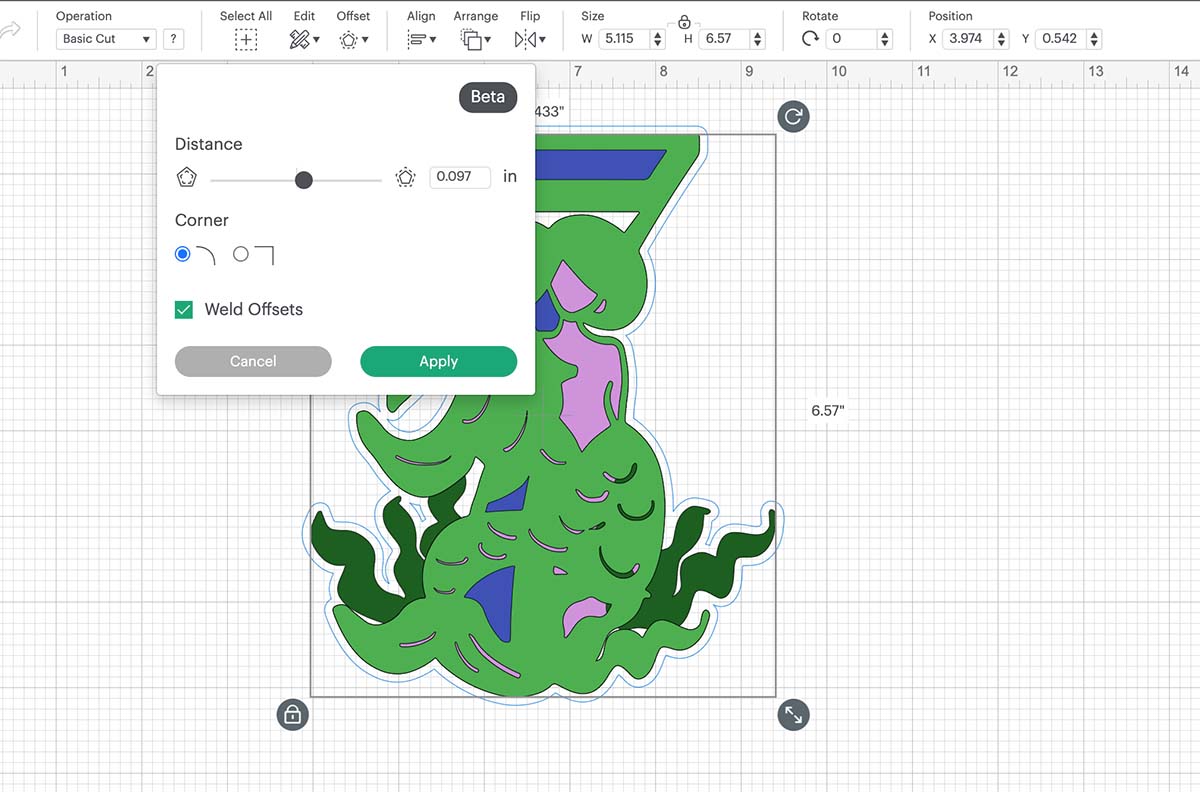
Offset
The offset tool is one of my favourite features in Cricut Design Space. When you click on the Offset tool you get the option to create an even offset all around your image. Simply use the distance slider to make your offset as big or small as you need. The beauty is you can also add multiple offsets.
Align Text And Images In Cricut
You can align images and text in whichever format you want to fit in with your project. To Alight text or images right click and select all the images and fonts together, click align and choose from the drop down options.

Arrange Layers Of A Project
To move layers forwards and backwards. Particularly useful when slicing images to align the image.
Flip Images Or Text
Images and text can be flipped horizontally and vertically, for instance when waning a paper cut or project to be symmetrical.
Resize Images And Text
You can do this here, or by right click and dragging the text with your mouse.
Rotate Images And Text
For rotating images, either 1 degree at a time or inputing a chosen degree. Alternatively you can click on the image and rotate via the icon on the right hand top corner.
Position Images Or Text On Canvas
Working on an x and y axis you can move projects around the mat. Alternatively images can be moved by dragging the image.

How To Use Cricut Design Space Side Bar
My Projects And Save
This is where you will see all of your saved images. Finally click save to save projects you are working on, especially if you pause half way through. Also be sure to save any projects with a name, and not just save. I have deleted over projects this way.

Make It
When you are ready to send your project to your Cricut Maker click make it.
Canvas Images
All the images you pull onto your design space canvas will appear here. Where you can drag and re arrange them, or click on the closed eye to remove layers or images.
Grouping Images
When working on a project with many levels grouping is a great way to keep the project together visually. However when the project is on the mat, images will separate. More About Grouping And Ungrouping Images.
Ungrouping Images
If you want to make changes to a collection of grouped images simply ungroup and make changes, before regrouping. This is excellent if you only want part of an image from the library, you simply ungroup and delete anything you don’t need.
Duplicate Images
Also done by right clicking and selecting from the menu. I use duplication a lot when working on paper cuts. For example if I want to use a lot of flowers to connect images.
Deleting Images
Can also be done by right clicking on an image, or highlighting and pressing delete on the keyboard.
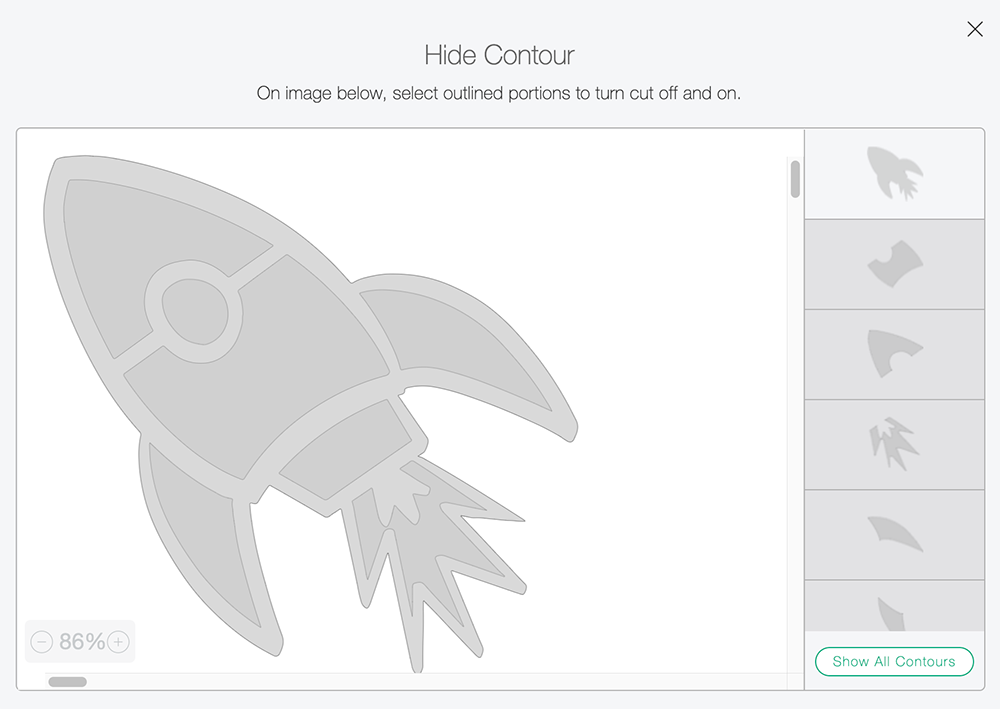
Contour Settings
If you come across a great project, but it has elements that you don’t love. For example, polka dots or an element in my space rocket below! You can go into contours and remove certain elements of the image to make it a little more personalised.
Flattening Images
Print and cut is another of my favourite features of the Cricut Maker, more on print and cut here. All images in design space can be printed, however they must be flattened first. This reduces images in the layers panel into one flat printable image.

Attaching Images
Attaching images or letters will allow you to cut them as an attached image and keep the contours of the original image.
The New Combine Tools In Cricut Design Space
In a recent update of Cricut Design Space we were given more options in the weld tool and caked it the combine tool. They have now added…
- Unite
- Subtract
- Intersect
- Exclude
I am not sure how useful they are in all honestly but have had a play to see what eat feature does.

Welding Images
Welding images together may slightly change contours where the images overlap. However will cut as an attached image. Once you weld it will lock the image as a solid image. This is the best tool for paper cutting and still my go to out of all these tools. You now also have the option to unite, subtract, intersect and exclude, there is more about this in our welding post.
Slicing Images
And lastly slicing allows you to cut into images, cut images in half or cut shapes out. This is a great feature that gives you so much versatility. There is more about slicing in the more advance tutorial linked above.
How To Use Cricut Design Space, Handy Things You Can Do To Make Life Easy
Change Your Canvas Colour On Cricut
If you are working on a project in Cricut Design Space and want to change the background colour, simply click on blank canvas on the bottom corner. Now a box appears on the top bar, click colour and choose a colour.

Remove The Grid Lines On Design Space
To remove the grip lines on Cricut Design Space click on the left hand corner between the two 0,s and you can change the grid lines. There are 3 options, 1 inch grid, mm grids or blank. I prefer working with a blank canvas, however also like the options of having the grids for measuring and aligning.

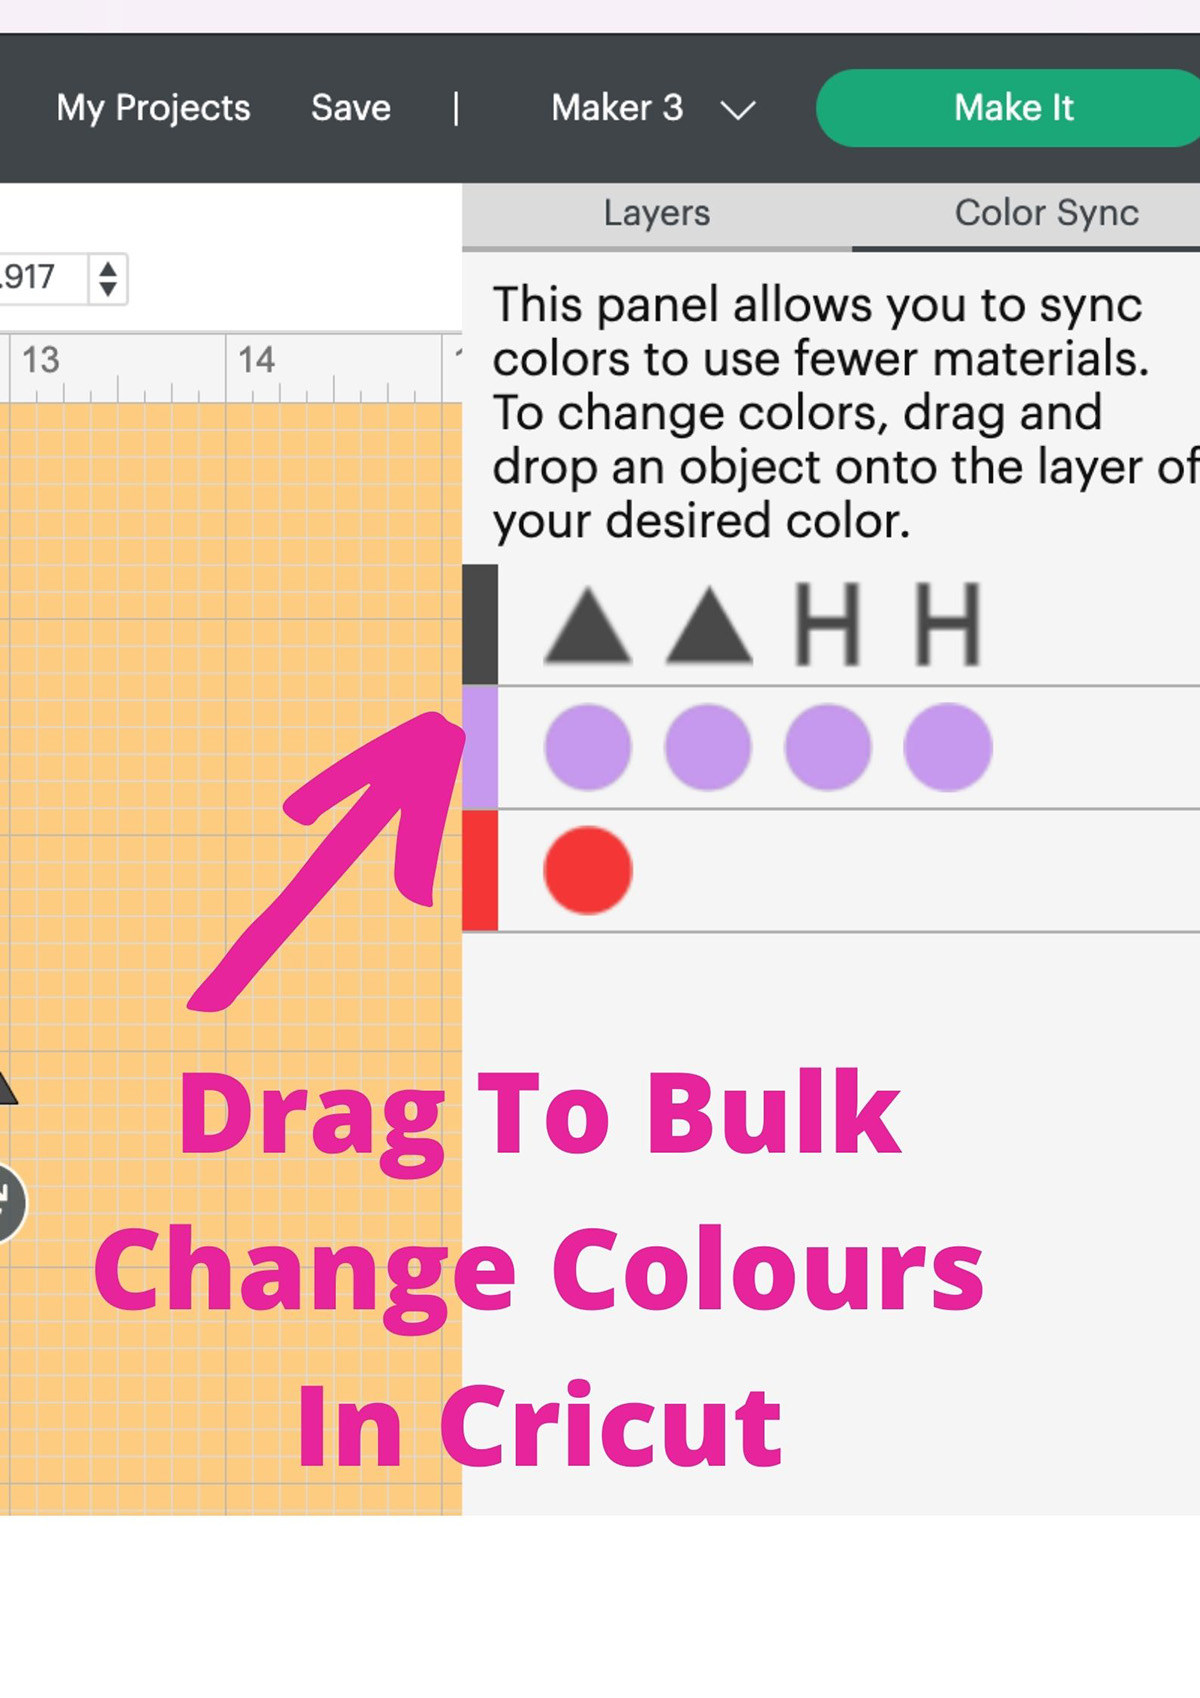
Sync Colours In Cricut
To sync colours on your Cricut canvas, simply click on colour sync on the right hand bar. You can now see the colours of your project. Here you can drag images from one colour to another. This is such an easy way to bulk change colours.
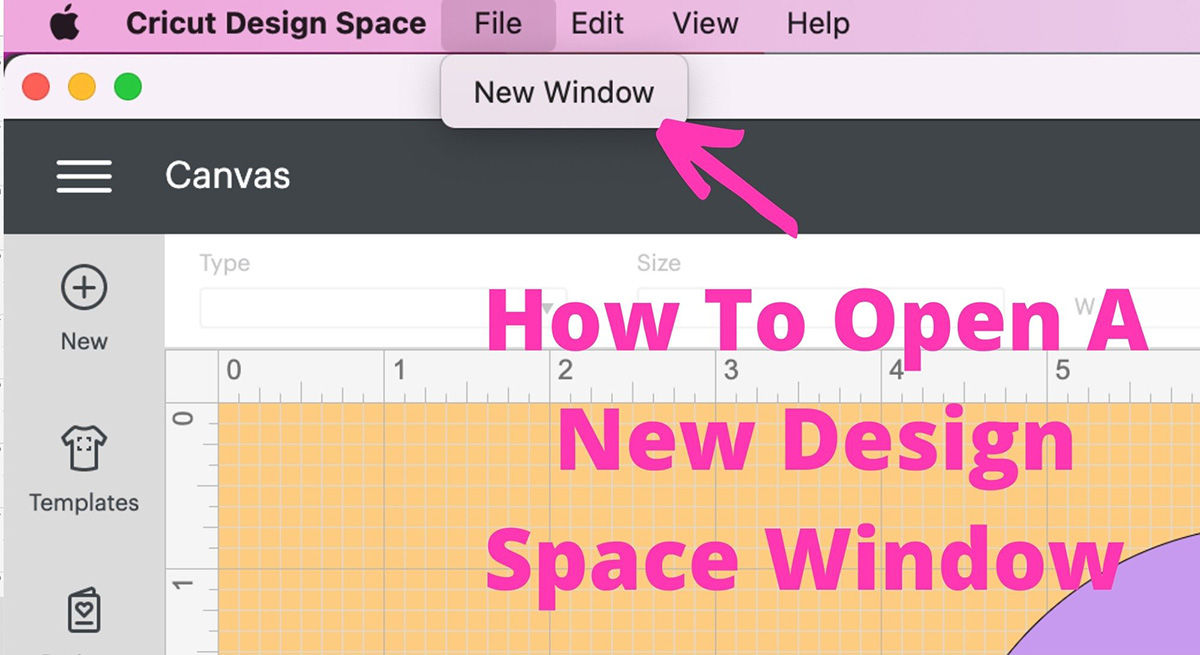
How To Open A New Cricut Workspace?
This for me was a game changer when I discovered how to open a new workspace. You can work on multiple desktops at a time. This means you can cut one project and and design another at the same time. To open a new Cricut Design Space window, go to the very top bar click file and choose New Window, a window will open in another tab.
Right Clicking Also Gives Lots Of Shortcuts
And lastly if you right click, you have lots of options at your finger tips. This is something I use ALL THE TIME, right clicking gives you so many different actions that are quick and easy.
By Right Clicking In Cricut You Can
- Group
- Ungroup
- Cut
- Copy
- Paste
- Duplicate
- Delete
- Bring A Layer To The Front
- Bring A Layer Forwards
- Send A Layer Backwards
- Send A Layer To The Back
- Attach
- Detach
- Slice
- Weld
- Flatten
- Unflatten

Hope That Has Helped You Master How To Use Cricut And Design Space?
And I think that covers it, the absolute basics of the Design Space, Cricut is such a wonderful invention. I am not sure quite how I would manage without it now. However it’s all about trial and error and getting to know The Design Space and your machine.
My best advice is play about, try new things and mastering how to use your Cricut is all about playing and having fun crafting.
Also Try These Posts
- How To Make A Layered Cake Topper With Cricut
- Uploading Fonts To Design Space
- How To Make Cricut Joy Stickers
- Cricut Print and Cut Sticker Tutorial

I’ve said before, I so want a Cricut machine. It does look complicated so thanks for the details. I know it just takes time and getting used to it. I swayed towards a new Sizzix machine (we have an old one) but I prefer the flexibility of personalising designs with the Cricut. I’m loving your creations.