It’s time to start preparing the Christmas crafts. Thus making all those things that make Christmas and the Holiday season a magical time for families. In this post I am going to share the secret magic reindeer dust ingredient to make reindeer fly. And Also How To Make Magic Reindeer Food With A Free Printable.
As Christmas Eve draws near, and Christmas lists are ready and waiting at the North Pole. The Santa Treat Plate and Milk Bottle‘s are ready.
Now is also time in the preparations to make magic reindeer dust. That magical food to leave out in the moonlight to make those reindeers fly, and also find your house on Christmas Eve.
Please note this is not food for real reindeers to eat, only to leave for the magical North Pole variety on Christmas Eve Night.

What You Will Find Here
To Use This Free Template?
If you have Cricut Design Space paid access? Follow this link and the project is ready to make. Alternatively you can right click on the Reindeer Food Printable below and either print and cut out by hand and attach with pritt stick. Or follow these instructions to add them to Cricut Design Space.

How To Make Reindeer Food For Christmas Eve
To Make Magic Reindeer Dust You Will Need
- Cricut Joy
- Cricut Design Space
- Weeding Tool
- Plastic test tubes with cork stopper’s
- Cricut Joy Writable Smart Label Paper ( This can also be used on a cutting mat with the Cricut Explore Air Or Maker)
- Red And Black Cricut Joy Pens.
- A Large Handful of Porridge Oats
- 3 Table Spoons Of Fine Silver Holographic Crafting Glitter (The Magic Variety)
- 1 Dessert Spoon Of Larger Red Glitter (For Rudolph)

Magic Reindeer Food Recipe
Mix together a handful of porridge oats with 3 tablespoons of silver edible holographic glitter then add in a dessert spoon of larger red glitter and mix well. UPDATE glitter is harmful to wildlife, it is best filling the tubes with birdseed or nuts and no glitter. If you must use glitter put it on a plate and bring it in as soon as the kiddies are tucked up for the night.


Making The Food Tubes
Create A Label
In Cricut Design Space choose images and search for a label or tag, scroll until you find a tag you like the shape of and select.
Now unlock your image, you can do this by clicking on the label and selecting the lock on the left hand bottom corner then click the right bottom corner to drag and re-shape into a longer label shape.

Next change the colour of your shape by selecting line type on the top bar, it should be set to cut. Click on the colour and change to the colour of your chosen material.
Once you have your chosen shape and colour for the label you can decorate it. Click add text and click font and filter, now select writing. I used the Alexis Mattox font.
When you’ve typed your text search for an image, ensuring you click filter in the left hand bar and choose draw. I used the sketched Christmas Reindeer.

Colour your text by selecting the line-type box on the top left, it should be on draw. Now choose the colour for your text and image and position on your tag.
Next right click select all and attach the images to the label. Now when you send you project to cut it will keep the project together. Size your label (mine are just over 2 inches long) and duplicate as many times as you need.

Making The Seal’s For The Bottles’.
To make the seals choose a rectangle and drag into a narrow line, just like you did in the steps above.
Now choose 2 hearts or snowflakes and position on each end of your line before selecting all and choosing weld in the bottom right hand corner, then colour your seal.
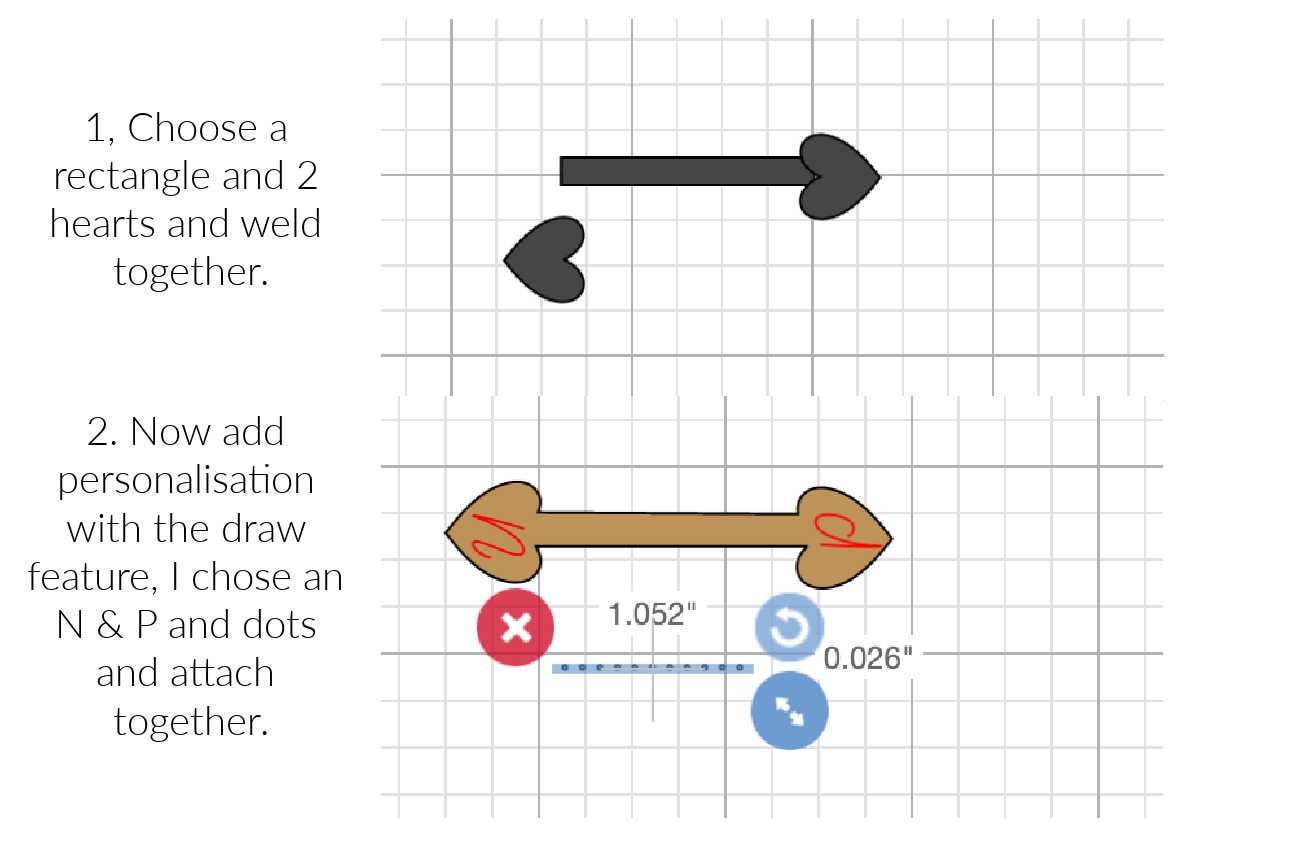

To add personalisation go back to a draw font, I chose a red N & P for the North Pole and selected a simple line of dots in images decorate the top.
Once you are happy, position, right click and click attach in the bottom right corner. Now size and also duplicate until you have the right amount before sending your project to the Cricut Joy.

Cutting The Magic Reindeer Food Printable.
When you send the project to your Cricut Joy to cut select the material and the Joy will prompt you to add a pen.

This is simple, un-click the green clip on your blade and gently take the blade out and replace with the first pen. Once this is done you will be asked to change to the next colour pen and then the blade.
Making The Magic Reindeer Dust Tubes
Once the labels are cut carefully attach to each test tube. Additionally, fill the tube with magic reindeer food and attach the bottle seal over the cork to secure the bottle.
Happy creating and see more Christmas Crafts On My Cricut Christmas Page.


How To Make Magic Reindeer Food For Christmas Eve
How To Make Magic Reindeer Food, the secret recipe for creating magic reindeer dust to help Santas Reindeer fly and Free Printable labels and bottle seals.
Materials
- Plastic test tubes with cork stopper’s
- Cricut Joy Writable Smart Label Paper ( This can also be used on a cutting mat with the Cricut Explore Air Or Maker)
- Red And Black Cricut Joy Pens.
- A Large Handful of Porridge Oats
- 3 Table Spoons Of Fine Silver Holographic Glitter (The Magic Variety)
- 1 Dessert Spoon Of Larger Red Glitter (For Rudolph)
Tools
- Cricut Joy
- Cricut Design Space
- Weeding Tool
Instructions
Making The Magic Reindeer Food Tubes
In Cricut Design Space choose images and search for a label or tag, scroll until you find a tag you like the shape of and select.
Now unlock your image, you can do this by clicking on the label and selecting the lock on the left hand bottom corner then click the right bottom corner to drag and re-shape into a longer label shape.
Next change the colour of your shape by selecting line type on the top bar, it should be set to cut. Click on the colour and change to the colour of your chosen material.
Once you have your chosen shape and colour for the label you can decorate it. Click add text and click font and filter, now select writing. I used the Alexis Mattox font.
When you’ve typed your text search for an image, ensuring you click filter in the left hand bar and choose draw. I used the sketched Christmas Reindeer.
Colour your text by selecting the line-type box on the top left, it should be on draw. Now choose the colour for your text and image and position on your tag.
Next right click select all and attach the images to the label. Now when you send you project to cut it will keep the project together.
Making The Seal’s For The Bottles’.
To make the seals choose a rectangle and drag into a narrow line, just like you did in the steps above.
Now choose 2 hearts or snowflakes and position on each end of your line before selecting all and choosing weld in the bottom right hand corner, then colour your seal.
To add personalisation go back to a draw font, I chose a red N & P for the North Pole and selected a simple line of dots in images decorate the top.
Once you are happy, position, right click and click attach in the bottom right corner. Now size and also duplicate until you have the right amount before sending your project to the Cricut Joy.
Cutting The Magic Reindeer Food Printable.
When you send the project to your Cricut Joy to cut select the material and the Joy will prompt you to add a pen.
This is simple, un-click the green clip on your blade and gently take the blade out and replace with the first pen. Once this is done you will be asked to change to the next colour pen and then the blade.
Making The Magic Reindeer Dust Tubes
Once the labels are cut carefully attach to each test tube. Additionally, fill the tube with magic reindeer food and attach the bottle seal over the cork to secure the bottle.
Recommended Products
As an Amazon Associate and member of other affiliate programs, I earn from qualifying purchases.


