We have already celebrated Mothers Day here in the UK however, it’s not a universal day and as such is celebrated 7 month of the year around the world. Thus for all my readers who haven’t celebrated Mothers Day yet, I have created the prettiest Floral Mothers Day Card SVG Files for you to upload to your Cricut and and cut out for beautiful DIY Mothers Day Cards. Also check out my Cricut Joy Mother Day Card Template and Split Monogram cut file.
Yet despite the fact these cards have been designed with Mothers Day in mind, they can also be used for birthday cards and wedding invitations. The base template is plain to leave it open for so many opportunities.

This post may contain affiliate links. Which means I may receive a small commission if you click a link and purchase something that I have recommended at no extra cost to yourself. As an amazon, Cricut and Glowforge associate, I earn from qualifying purchases.
What You Will Find Here
How To Make My Mothers Day Mum, Mom Card Using The SVG
You Will Need
- Cricut Maker,
- Glue Gun or Glue, I use Cosmic Shimmer Acrylic Glue
- Cricut Design Space
- Cricut Mat
- Card Stock In Your Choice Of Colour
- Paper For The Insert
- Brayer and weeding tools
- Brads Or Eyelets And Silent Setter
- Double Sided Sticky Tape
- Foam Pads
- Scissors

Adding Your Floral Mothers Day Card SVG To Design Space.
Firstly click upload at the bottom of the left hand bar and click browse to find your chosen SVG file on your MAC, Phone or PC. Find the file and click upload.
Next you will see is the image below, click on the image and press upload in the bottom right corner. Now you can select to pull into Cricut Design Space.

Sizing And Putting The Score Line Onto Your Card
If you are using a pre made envelope size your card to fit. However do remember the you only need to measure half the card as it is below to fit into your envelope.
To create a score line select shapes and choose the score line.

Now position the line so it fits directly in the centre. Right click, select all and click attach in the bottom right corner to attach the line to you Mothers Day Card.

Choose either the Mom or Mum template, or indeed make you own personalised name and pull in and size flowers. You can add as many floral layers as you want.
I mounted my name onto a rectangle card with sticky pads to give it a bit of height and dimension. You can create this in design space by selecting a square in shapes and unlocking and resizing to create a rectangle. This is a great way too visually see your card before you cut it.
You will also need an insert, I used luxury paper that has a sheen for this, simple cut a rectangle slightly smaller than your overall card size.

Cutting Your Mothers Day Card
Once you are happy with and have coloured all cards to cut, send to cut. For a pattern this delicate I always choose extra pressure for whatever card stock I use.
Ensure you use a brayer to ensure the card is fully attached to the mat, before sending to cut.
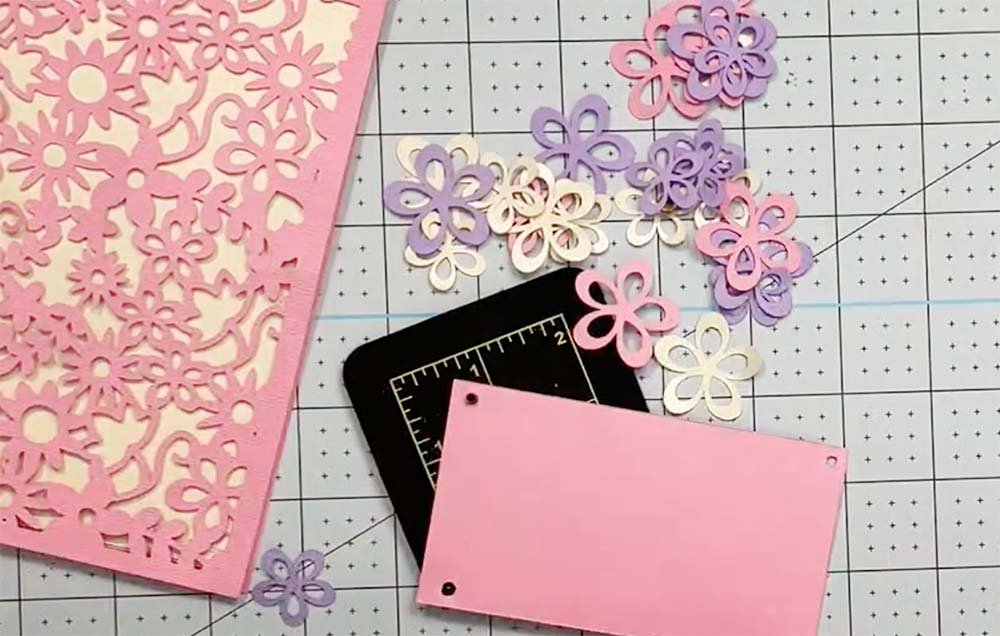
When the cut has finished cut gently lift it away from the mat and use the weeding tool to get the small areas.

How To Construct Your Mothers Day Mum, Mom Card?
Check out my little video I have uploaded for a fast forward video.
Start by folding at the score line to ensure your fold is clean. Now add your insert, to do this I added double sided sticky tape to the right hand side of the fold and secure the insert.
You can also add some small dots of glue to the back of the front of your card to secure it to the sleeve. However when do this ensure you keep the balance of the card, you may need to smooth from the fold outwards to do this.
To add your Mum or Mom start by adding brads or eyelets to each corner to add detail. This is optional but add a little extra detail. You can now glue your name to the card and use sticky pads to add the the card.

Lastly add detail with any flowers you have cut, I layered mine with 2 different colours by adding the first flower with a sticky pad, then the top with a small dot of glue from the glue gun. You can do this as much or as little as possible.

How To Download My Free Floral Cricut Mothers Day Card SVG/ PNG Files
Simply click here or on the image below to get my free Cricut Mothers Day Card SVG PNG downloads and I will pop them across to you.


Floral Mothers Day Card
Free Cricut Floral Mothers Day Card SVG Files to create a beautiful floral Mothers Day card with mom and mum templates.
Materials
- Card Stock In Your Choice Of Colour
- Paper For The Insert
- Brads Or Eyelets
- Double Sided Sticky Tape
- Foam Pads
Tools
- Cricut Maker
- Cricut Design Space
- Brayer and weeding tools
- Silent Setter
- Glue Gun
- Scissors
Instructions
- Adding Your Floral Mothers Day Card SVG To Design Space.
Firstly click upload at the bottom of the left hand bar and click browse to find your chosen SVG file on your MAC, Phone or PC. Find the file and click upload.
Next you will see is the image below, click on the image and press upload in the bottom right corner. Now you can select to pull into Cricut Design Space.
- Sizing And Putting The Score Line Onto Your Card
If you are using a pre made envelope size your card to fit. However do remember the you only need to measure half the card as it is below to fit into your envelope. To create a score line select shapes and choose the score line. Now position the line so it fits directly in the centre. Right click, select all and click attach in the bottom right corner to attach the line to you Mothers Day Card.
  Choose either the Mom or Mum template, or indeed make you own personalised name and pull in and size flowers. You can add as many floral layers as you want.
I mounted my name onto a rectangle card with sticky pads to give it a bit of height and dimension. You can create this in design space by selecting a square in shapes and unlocking and resizing to create a rectangle. This is a great way too visually see your card before you cut it.
You will also need an insert, I used luxury paper that has a sheen for this, simple cut a rectangle slightly smaller than your overall card size.
- Cutting Your Mothers Day Card
Once you are happy with and have coloured all cards to cut, send to cut. For a pattern this delicate I always choose extra pressure for whatever card stock I use.
Ensure you use a brayer to ensure the card is fully attached to the mat, before sending to cut.
When the cut has finished cut gently lift it away from the mat and use the weeding tool to get the small areas. - How To Construct Your Mothers Day Card?
Check out my little video I have uploaded for a fast forward video.
Start by folding at the score line to ensure your fold is clean. Now add your insert, to do this I added double sided sticky tape to the right hand side of the fold and secure the insert.
You can also add some small dots of glue to the back of the front of your card to secure it to the sleeve. However when do this ensure you keep the balance of the card, you may need to smooth from the fold outwards to do this.
To add your Mum or Mom start by adding brads or eyelets to each corner to add detail. This is optional but add a little extra detail. You can now glue your name to the card and use sticky pads to add the the card.
Recommended Products
As an Amazon Associate and member of other affiliate programs, I earn from qualifying purchases.

