If you’re looking for a creative and personalised way to surprise someone special, an explosion box is a perfect choice! This unique craft project may look like an ordinary gift box, but when opened, it ‘explodes’ into layers of decorated panels, revealing messages, gifts, photos, and other surprises.
In this guide, we’ll walk you through the step-by-step process of making an explosion box, and as an added bonus, we’ve included a free SVG template to make things even easier. Whether you’re new to crafting or an experienced DIYer, this project is both fun and rewarding!
Explosion boxes are curious little things, and have the ability to fill you with such joy. Especially if you create a themed box as a gift. They make perfect interactive cards and gifts, the opportunities and endless.

What You Will Find Here
How To Make An Explosion Box
Project Ideas For Using My DIY Explosion Box SVG Cut Files.
- Birthday celebration explosion box
- New baby announcement
- Gender reveal
- Mariage proposals
- Character themed boxes
- Wedding invitations
- Party favours
- 3d mini scrapbook
- Christmas gifts
- Holiday announcement or reveals

You Will Need
- 6 sheets of double sided card stock to make:
- 1 lid template (5.5 inches)
- 1 outer shape template (10 inches)
- 2 shaped pocket layers (9 inches)
- 2 straight pocket layers (8 inches)
- 1 bow template
- Ruler
- Strong glue
- 8 eyelets and silent setter
- Ribbon or string
- Cricut Maker
- Cutting Mat
- Brayer

If You Want To Use My Explosion Box SVG?
Simply click here or on the image below to get our explosion box cut file download from our shop.

Additionally if you’re a subscriber, the download is ready for you in the free members area. The link to the page is in your members email.
However, make sure your pop-up blocker is turned off and if the email doesn’t land check your spam folder. Here’s how you upload the files to Cricut Design Space.
If You’re Having Problems?
Check out my trouble shooting page, hopefully it will answer any questions you may have.

Cutting Your Explosion Box
Once your SVG files are uploaded to design space use the guide below for sizes and score lines.
To add the score lines you will need a scoring wheel or tool, following the guide for guidance. To add a score line choose score in shapes and resize and position to match the guide. Once in position, one template at a time right click and select all, now click attach. This will attach the line in place. If attach doesn’t work group first then attach.
When sending to cut you will need 2 each of the pocket layers. I used a different pattern for each layer but the choice is yours.
Alternatively you can cut out by hand a using a ruler a pen lid to score.

How To Make Your Explosion Box
Start by folding all the score lines with a ruler, the outer layer does not need glueing, once all the folds are in place put to one side. Check my in post video for guidance.

Next fold all the lines for the lid, folding the corner out then inwards and securing with strong glue or tape.

Now using your ruler, fold the angled flaps inwards to cross over on the angled pocket layers. You need to tape right across the bottom of all 3 sections before folding, this will secure the pocket. Repeat this stage until both layers have 2 folded pockets each.

The final two layers are designed to be fold over full pockets, these can be glues as above. However as an alternative I chose to cut each flap in half and add brads, you can see how I did this in the video, or the end result in the photo below. This will enable you use string or ribbon to tie the pocket for added detail.


Repeat this with the last 2 pocket layers and pop on the lid to hold the box together.
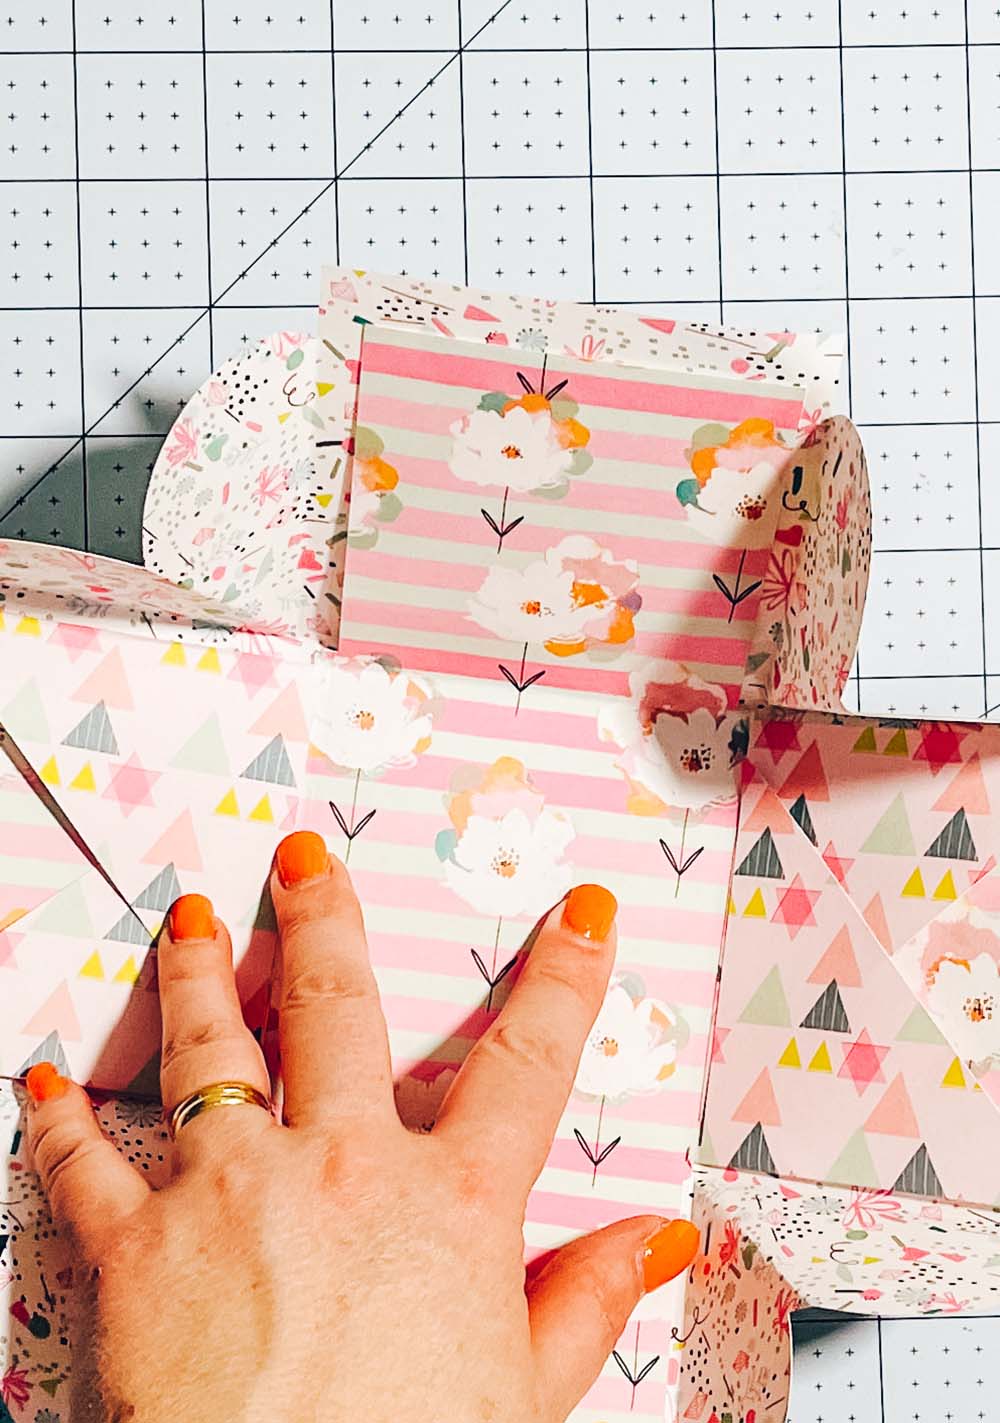
Now starting with the out layer, glue the inside base and attach layer 2, this will be an angled pocket layer. Add the next layer on top rotating the pockets. This will give you a pocket on each corner.

Lastly build the bow, fold both bow pieces and glue into shape, then position one on top on the other. Wrap the small middle section around the centre and glue before glueing the ribbon pieces onto the back and attaching to the lid of your box.

Now fill your explosion box with gifts, tickets, messages and photos, its you choice be creative.
Also please do pop over to Instagram, and give me a follow and if you make a project tag me! I love seeing everyone else’s makes and chatting crafting. I could do that all day!


How To Make A Explosion Gift Box
How To Make An Explosion Box & Free Template to make an Exploding gift box with 5 layers and pockets for photos, tickets and gifts.
Materials
- 6 sheets of double sided card stock to make:
- 1 lid template (5.5 inches)
- 1 outer shape template (10 inches)
- 2 shaped pocket layers (9 inches)
- 2 straight pocket layers (8 inches)
- 1 bow template
- 8 eyelets
- Ribbon or string
Tools
- Ruler
- Strong glue
- Silent setter
- Ribbon or string
- Cricut Maker
- Cutting Mat
- Brayer
Instructions
- Cutting Your Explosion Box
Once your SVG files are uploaded to design space use the guide below for sizes and score lines.
To add the score lines you will need a scoring wheel or tool, following the guide for guidance. To add a score line choose score in shapes and resize and position to match the guide. Once in position, one template at a time right click and select all, now click attach. This will attach the line in place. If attach doesn’t work group first then attach.
When sending to cut you will need 2 each of the pocket layers. I used a different pattern for each layer but the choice is yours.
Alternatively you can cut out by hand a using a ruler a pen lid to score.
- How To Make Your Explosion Box
Start by folding all the score lines with a ruler, the outer layer does not need glueing, once all the folds are in place put to one side. Next fold all the lines for the lid, folding the corner out then inwards and securing with strong glue or tape.
  Now using your ruler, fold the angled flaps inwards to cross over on the angled pocket layers. You need to tape right across the bottom of all 3 sections before folding, this will secure the pocket. Repeat this stage until both layers have 2 folded pockets each.
  The final two layers are designed as fold over full pockets, these can be glues as above. However as an alternative I chose to cut each flap in half and add brads, you can see how I did this in the video, or the end result in the photo below. This will enable you use string or ribbon to tie the pocket for added detail.
  Repeat this with the last 2 pocket layers and pop on the lid to hold the box together.
Now starting with the out layer, glue the inside base and attach layer 2, this will be an angled pocket layer. Add the next layer on top rotating the pockets. This will give you a pocket on each corner. -
 Lastly build the bow, fold both bow pieces and glue into shape, then position one on top on the other. Wrap the small middle section around the centre and glue before glueing the ribbon pieces onto the back and attaching to the lid of your box.
 - Now fill your explosion box with gifts, tickets, messages and photos, its you choice be creative.
Notes
Project Ideas For Using My DIY Explosion Box SVG Cut Files.
Birthday celebration explosion box
New baby announcement
Gender reveal
Mariage proposals
Character themed boxes
Wedding invitations
Party favours
3d mini scrapbook
Christmas gifts
Holiday announcement or reveals
Recommended Products
As an Amazon Associate and member of other affiliate programs, I earn from qualifying purchases.


This looks like so much fun to make and give. Thank you!
You refer to a video but I am unable to find it. Where am I missing it?
Hi Jo I have just checked and the video is in the post, it has a advent first so you may have missed it x
Not seeing the video.
What is “a advent first”?
Hi its here now there was an error sorry
Hi Sarah,
I also can’t find the video for the explosion box to watch how to assemble. Are you please able to link it?
Thank you
Hi Rebecca all fixed now thanks for letting me know