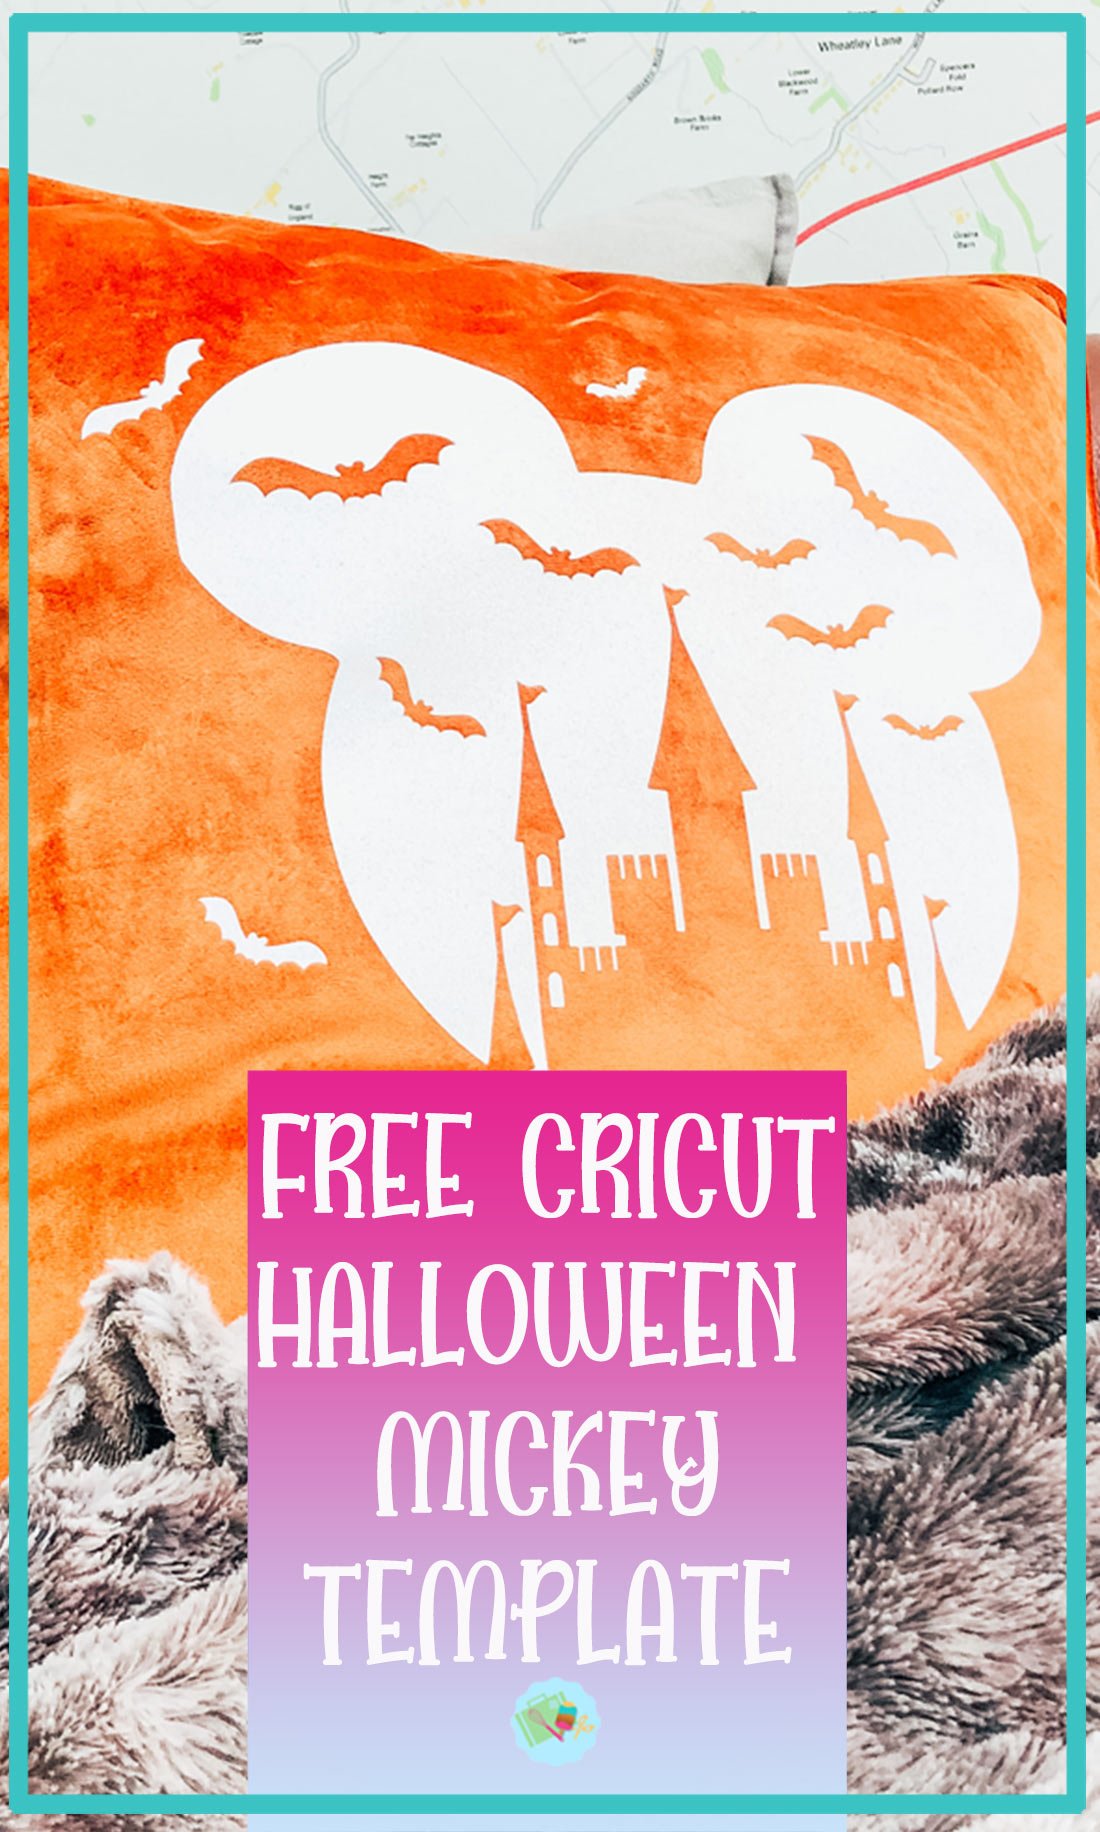
Woohoo it’s October that means it’s ok to talk about Halloween ALL THE TIME, and goodness’s knows we need something to look forward to at the moment. My latest project adds a little Mickey Mouse to the home with this Cricut Halloween Mickey SVG Free Haunted Castle File should you want to have a go a making a Mickey Halloween Cushion yourself.
But you know what I need all the Mickey I can get at the moment, it just makes you smile doesn’t it? And with our planned Disney trip on hold, designing Mickey Mouse inspired projects in design space it a great way to meg my Disney fix.
Of course this isn’t the exact Disney castle, but its a pretty good substitute, and making home made products that look great is always to rewarding. Also check out my latest Christmas Crafts and Alphabets.

What You Will Find Here
How To Make A DIY Iron On Cricut Halloween Mickey Cushion With This Free SVG PNG File.
You Will Need?
- Cricut Maker
- White Glitter Iron On Vinyl
- Cushion ( This rust coloured cushion was £2.50 in Primark)
- Cricut Easy Press
- Cricut Easy Press Mat
- Brayer And Tweezers

How To Make A Cricut Halloween Mickey Haunted Castle Cushion With My SVG
Choose Your Fabric Or Base For Your Cricut Halloween Project.
I chose a cushion as I wanted some stylish in the home, that I can pull out every year to Celebrate Halloween. However this Cricut Halloween Mickey Haunted Castle png can also be used on;
- Bags and ruck sacks
- PJ’s
- T Shirts
- Tea Towels
- Wall Decals
- Passport Covers
- Pumps
- Cups

To Get Your Free Cricut Mickey Halloween SVG PNG File
Click here or the image below to access the free template which is designed for personal use only. Also, check this link if you are not sure how to add your file to Cricut Design Space.

Make And Attach Your Iron On Image
Before cutting you must size your Decal, I used my cutting mat as a guide to lay over my cushion. This gives me an idea of how big I want to cut my decal. This is perfect for getting an idea of where it will sit on the cushion and getting the size perfect.
When sending your image to cut ensure you mirror the image (Especially if you add words to your project). Its also important to place your iron on vinyl on the cutting matt shiny side down. Thus you can’t see the glitter side of the vinyl on the top. (The shiny side is the top film part you will use to apply your heat press to to protect the vinyl.)
I used the blue cutting mat for this project, however find the green mat is much better for glitter vinyl.

Weed the design ensuring you have got all the little bits, once ironed on it is too late. Also if you want bats around the edge of your image, gently weed those out and place around the edge of your Cricut Halloween Mickey.

Heat press your cushion to warm it up and prepare for your Cricut Mickey Halloween Decal.
Put your design into place and set the heat press to the appropriate heat as per the heat guide. For this project using the easy press 2 and a heat mat 330° for 30 seconds. Then flip and press for 15 seconds, then allow to cool before peeling. Check the heat guide if you are using alternative products or fabrics.

Top tip, to protect the fabric I overlay with my clear top layer of my cutting mat, I feel this protects the velour from marking.
More Tips And Advice For Using Your Mickey Download.
- Cricut Design Space Guide
- How To Slice And Weld In Cricut Design Space
- How to upload to Cricut Design Space
- Using Iron On Vinyl
- Where Else To Get Free SVG Files
Also please do pop over to Instagram, and give me a follow and if you make a project please do tag me! I love seeing everyone else’s makes and chatting crafting. I could do that all day!


Cricut Halloween Mickey Haunted Castle Cushion And Free PNG File
Cricut Halloween Mickey Haunted Castle Cushion And Free PNG File to download and create a gorgeous Cricut Halloween Cushion with Cricut Iron On Vinyl
Materials
- White Glitter Iron On Vinyl
- Cushion ( This rust coloured cushion was £2.50 in Primark)
Tools
- Cricut Maker
- Cricut Easy Press
- Cricut Easy Press Mat
- Brayer And Tweezers
Instructions
Choose Your Fabric Or Base For Your Cricut Halloween Project.
I chose a cushion as I wanted some stylish in the home, that I can pull out every year to Celebrate Halloween. However this Cricut Halloween Mickey Haunted Castle png can also be used on;
Bags and ruck sacks
PJ’s
T Shirts
Tea Towels
Wall Decals
Passport Covers
Pumps
Cups
Make And Attach Your Iron On Image
Before cutting you must size your Decal, I used my cutting mat as a guide to lay over my cushion. This gives me an idea of how big I want to cut my decal. This is perfect for getting an idea of where it will sit on the cushion and getting the size perfect.
When sending your image to cut ensure you mirror the image (Especially if you add words to your project). Its also important to place your iron on vinyl on the cutting matt shiny side down. Thus you can’t see the glitter side of the vinyl on the top. (The shiny side is the top film part you will use to apply your heat press to to protect the vinyl.)
I used the blue cutting mat for this project, however find the green mat is much better for glitter vinyl.
Weed the design ensuring you have got all the little bits, once ironed on it is too late. Also if you want bats around the edge of your image, gently weed those out and place around the edge of your Cricut Halloween Mickey.
Heat press your cushion to warm it up and prepare for your Cricut Mickey Halloween Decal.
Put your design into place and set the heat press to the appropriate heat as per the heat guide. For this project using the easy press 2 and a heat mat 330° for 30 seconds. Then flip and press for 15 seconds, then allow to cool before peeling. Check the heat guide if you are using alternative products or fabrics.
Notes
Top tip, to protect the fabric I overlay with my clear top layer of my cutting mat, I feel this protects the velour from marking.
Recommended Products
As an Amazon Associate and member of other affiliate programs, I earn from qualifying purchases.


Hi, Sorry but the link is error :/
Hi Anais
thanks for letting me know its all fixed now. Sarah x