I recently shared my Mermaid Alphabet, which is perfect for creating so many projects with Cricut and Glowforge. However I felt the alphabet needed a standalone Mermaid to go with it. Thus I have created a free Layered Mermaid SVG for Cricut and Glowforge. This is the perfect layered file to use with wood, acrylic, card and vinyl.
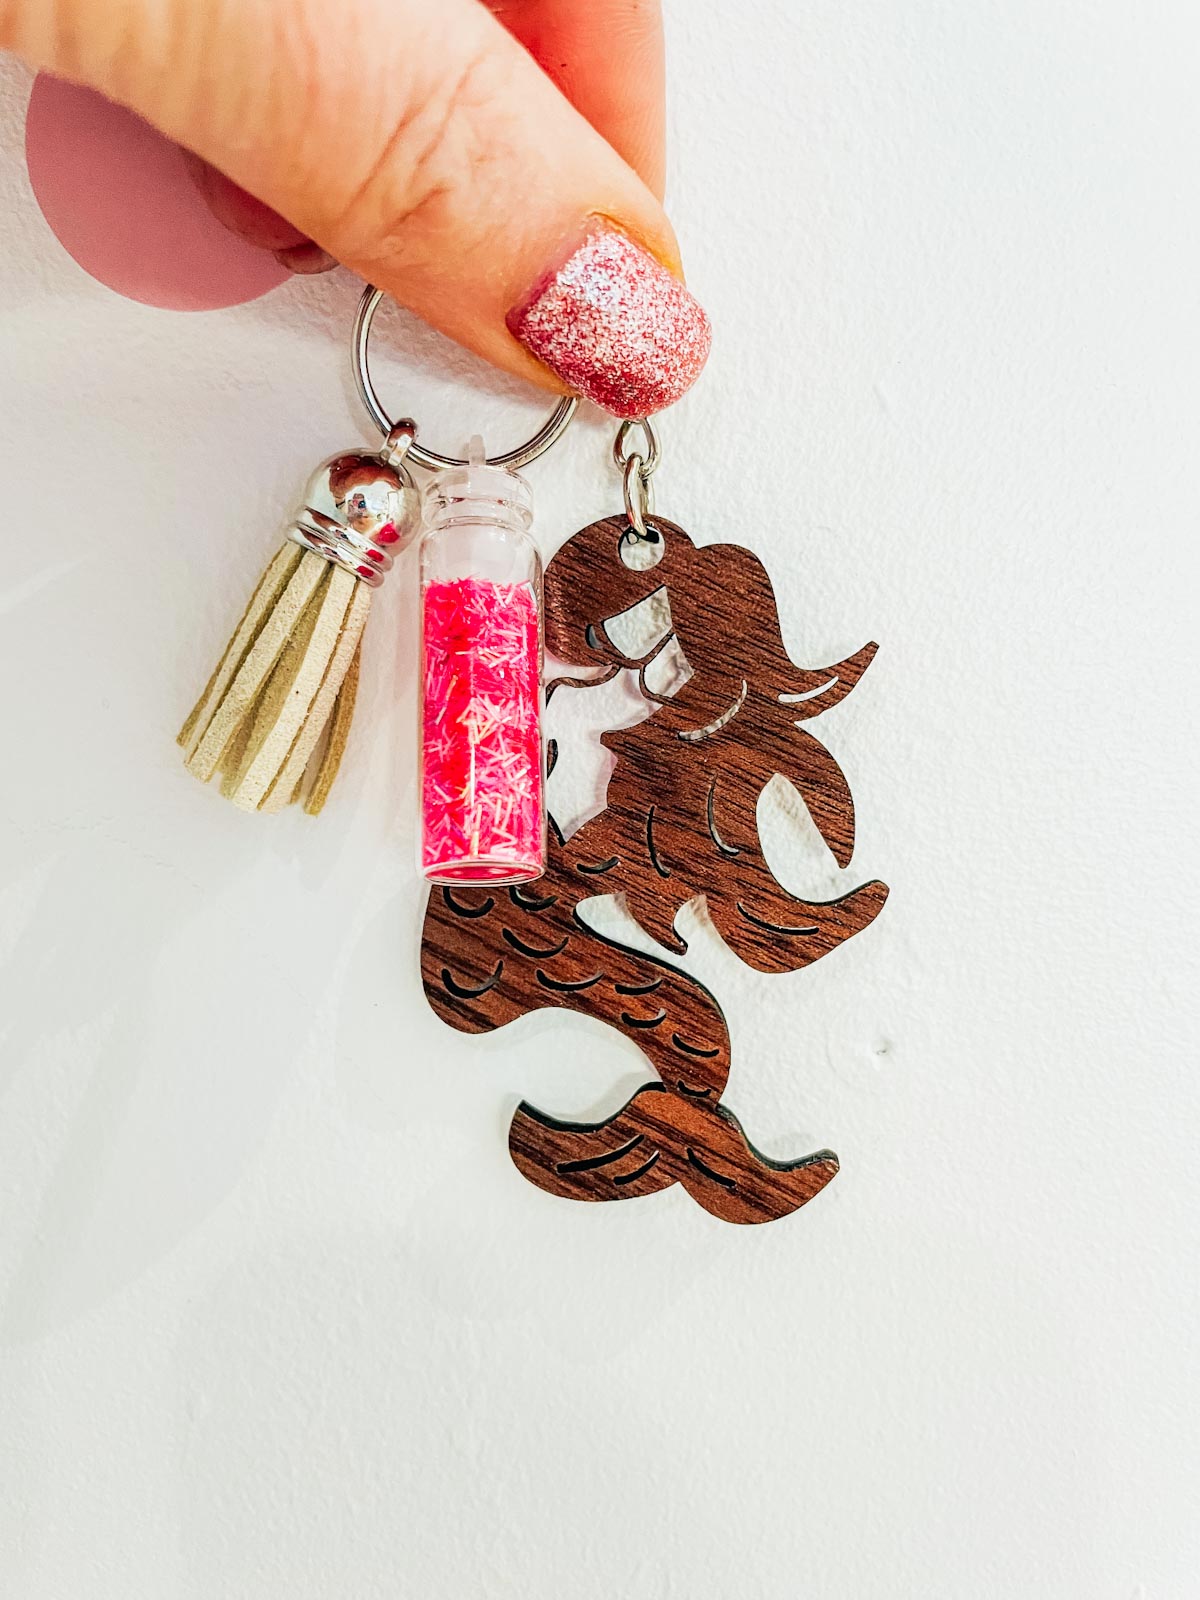
You can also use you mermaid for themed parties, bedroom decor and clothes, I have so many ideas for this cute mermaid SVG. The beauty is you can also use one single layer for scrapbooking, and cutting on Glowforge, I made a super cute keyring this way. Or use multiple layered with iron on vinyl.

This post may contain affiliate links. Which means I may receive a small commission if you click a link and purchase something that I have recommended at no extra cost to yourself. As an amazon, Cricut and Glowforge associate, I earn from qualifying purchases.
What You Will Find Here
Project Ideas For My Layered Mermaid SVG
- Mermaid Cake Toppers
- Wooden Art With Glowforge
- Use Pegs And String For Hanging Mermaid Banners
- Framed Art
- Iron On Vinyl Hoops
- Themed Mermaid Bedrooms
- Keyrings
- Welcome Signs
- Decoupage Valentines Cushions
- Scrapbooking Pages
- Party Invitations And Cards
- T Shirts
- Backpacks
- Caps

How To Make My Layered Mermaid SVG
What Do I Need To Make My Mermaid With My Free SVG On Cricut Or Glowforge
- A Glowforge Printer
- Medium Wallnut Plywood (Proofgrade)
- Or you could use Plywood and Spraypaint for a coloured effect.
- Keyring chains and tassels to make the keyring down the page.
Or
- Cricut Maker, to cut out of Cardstock or Glitter Card
- Weeding Tools
- Brayer
- Glitter Card Stock
- Tape Runner
- Card Stock To Suit Desired Skin Tone
- Glue Gun
- Straw

Also Use My Glowforge Discount Code To Get The Following Discounts If you Are Thinking Of Investing.
- Glowforge Pr, $500 USD.
- The Glowforge Plus, $250 USD
- Glowforge Basic, $125 USD
If you are UK based your Glowforge will ship from the UK.
How To Upload My File To Glowforge?
If you are cutting on Glowforge, make sure you upload the SVG file to cut, you are unable to cut PNG files. ( However can engrave PNG files.) Simply click the + sign in the top bar, choose upload and select your Mermaid files. Now drag the file to the correct size and click on the image to select the cut or engrave option.
You can now select the correct materials for whatever machine you are using, and send your project to cut or engrave. You have many options now, cut the top layer as a card decoration. Or cut a small keyring like the image below.
Making Your Layered Mermaid On Cricut
Creating Your Layers In Cricut Design Space
My file comes as a 4 layer project, the back, mermaid, tail and hair. However you can easily add more layer’s by adding contours to layered of your project. Simply start by duplicating a layer and selecting the contour tool. Now you can start to remove contours by clicking on them. I did this to the tail to create a coloured background to my mermaid tail.
You can see in the below image the result of duplicating and removing contours, the important thing to remember is you have to duplicate the layer then remove the contour. Always duplicate the layer you have just contoured, this way you will create a pattern that will layer.
If I made this again I would make my second layer closer to my skin colour as it stands out a little too much for my liking!

Cutting Your Layered Mermaid SVG On Cricut
When you send your Mermaid SVG/PNG files to your Cricut to cut, ensure you use your brayer to roll the paper, vinyl or card to adhere to the mat. Movement will affect the cut.
Line up all the layers in design space, to confirm all files line up correctly and exactly the same size. Remember you are using 5 colours in this case so have the card stock ready to hand and really think about the colours.

How To Build Your Mermaid Layered File
Start by making sure all of your layers align before laying out the back solid layer, now flip layer two (The Mermaid) over and glue the back.
Now attach the solid tail layer followed by the open tail, add the hair last.
Now flip the layer over and position onto the back layer, making sure it lines up. Keep going layer by layer until you get to the top layer, I attached the top layer with glue.

Also Check Out My Mermaid Keyring I Printed On My Glowforge
How To Get Your Mermaid SVG SVG/PNG Files
Click here or the image below to get your free downloadable Valentines Heart SVG/png files and follow these instructions to add to Cricut Design Space. Don’t forget to turn off any pop up blockers. Note if you are using Glowforge you need SVG files to cut the image out of wood or acrylic. Or Png or SVG to engrave.

If You’re Having Problems?
Check out my trouble shooting page, hopefully it will answer any questions you may have.
Tips And Advice For Using Your Download For Cricut
- Cricut Design Space Guide
- How To Slice And Weld In Cricut Design Space
- How to upload to Cricut Design Space
- Using Iron On Vinyl
- Where Else To Get Free SVG Files
Also please do pop over to Instagram, and give me a follow and if you make a project tag me! I love seeing everyone else’s makes and chatting crafting. I could do that all day! Additionally I also post daily videos of my makes in progress.


Mermaid Cake Topper
Free Layered Mermaid SVG For Cricut And Glowforge, to create single or multiple layered files, cake toppers and keyrings.
Materials
- Glitter Card Stock
- Card Stock To Suit Desired Skin Tone
- Straw
Tools
- Cricut Maker, to cut out of Cardstock or Glitter Card
- Weeding Tools
- Brayer
- Tape Runner
- Glue Gun
- Straw
Instructions
- Creating Your Layers In Cricut Design Space
My file comes as a 4 layer project, the back, mermaid, tail and hair. However you can easily add more layer’s by adding contours to layered of your project. Simply start by duplicating a layer and selecting the contour tool. Now you can start to remove contours by clicking on them. I did this to the tail to create a coloured background to my mermaid tail.
You can see in the below image the result of duplicating and removing contours, the important thing to remember is you have to duplicate the layer then remove the contour. Always duplicate the layer you have just contoured, this way you will create a pattern that will layer.
If I made this again I would make my second layer closer to my skin colour as it stands out a little too much for my liking!
- Cutting Your Layered Mermaid SVG On Cricut
When you send your Mermaid SVG/PNG files to your Cricut to cut, ensure you use your brayer to roll the paper, vinyl or card to adhere to the mat. Movement will affect the cut.
Line up all the layers in design space, to confirm all files line up correctly and exactly the same size. Remember you are using 5 colours in this case so have the card stock ready to hand and really think about the colours. - How To Build Your Mermaid Layered File
Start by making sure all of your layers align before laying out the back solid layer, now flip layer two (The Mermaid) over and glue the back.
Now attach the solid tail layer followed by the open tail, add the hair last.
Now flip the layer over and position onto the back layer, making sure it lines up. Keep going layer by layer until you get to the top layer, I attached the top layer with glue.
Notes
Project Ideas For My Monogram Mermaid Alphabet & Number Set
Paper Cut Letters And Words
Mermaid Themed Parties
Mermaid Cake Toppers
Birthday Mermaid Cards
Wall Decals
Wooden Banners With Glowforge
Mermaid Door Signs
Use Pegs And String For Hanging Mermaid Banners
Framed Art
Iron On Vinyl Hoops
Hanging Wooden Signs
Welcome Signs
Mermaid T Shirts
Decoupage Mermaid Cushions
Scrapbooking Pages
Recommended Products
As an Amazon Associate and member of other affiliate programs, I earn from qualifying purchases.
