
If you are hunting for a trick-or-treat gift that is cute, cheap and not a sweet in sight, you are in the right place. Today I am showing you how to make Cricut Trick or Treat Book Magnets with a little Boo fridge magnet to match.
Each one is two gifts in one. The bookmark clips onto a page, and the Boo magnet goes on the fridge. Better still, they look far fancier than they are to make. Grab a cuppa and let’s get crafting!
We’re also excited to share our adorable Printable PNG Cute Kawaii 3D Pumpkin Patch Alphabet and Number Set, a cosy and versatile autumn-themed set perfect for all your creative projects! Featuring smiling kawaii pumpkins, a charming pumpkin cottage, autumn leaves and moonlit skies, this full collection of alphabet letters and numbers is designed for crafters, makers, and party planners who love adding a playful, handmade touch to their creations.

This post may contain affiliate links. Which means I may receive a small commission if you click a link and purchase something that I have recommended at no extra cost to yourself. As an amazon, Cricut and Glowforge associate, I earn from qualifying purchases.
What You Will Find Here
Project Ideas For Our Printable Pumpkin Patch Clip Art PNG Alphabet
- Personalised Fall Decor
- Cake Toppers
- Pumpkin Themed Halloween and Fall Banners
- Planner Stickers
- Sublimation Mugs
- Cute Pumpkin Patch Scrapbooking Page Layouts

What You Will Need
- Cricut machine (Explore, Joy or Maker)
- Cricut Design Space (free software)
- Standard Gripmat (green) ?? Weeding tool (for removing small bits)?? https://amzn.to/3SFlEdL
- Brayer (optional, to smooth cardstock on mat)
- Hp Printer
- Printable Magnetic Sheets
- 6×6 Cards
- My Full Pumpkin Alphabet of Free Letters B and O (See Below)
How to Make Cricut Magnetic Bookmarks
Here is the full process, from blank canvas to finished favour.
1. Upload and Resize your Letters
Open Cricut Design Space and upload your first letter as a flat graphic. Once one is uploaded, you can upload the rest. The letters arrive quite large, so drag them down to size. I also turn the canvas background grey and hide the grid because it makes the design easier on the eyes.

2. Build the Bookmark Strip
Insert a square and drag it into a long, thin rectangle. Place your letter on top and send the strip to the back. This strip is the part that folds over the page. It holds a matching letter on each side.

3. Add an Offset
Select the letter and open Effects. Add an offset that is big enough to leave no scrappy bits to cut. Hide the contours, then click apply. This gives your letter a neat, sticker style edge.

4. Pick Your Perfect Colour For Your Magnet
White looked too stark for me, so I used the advanced colour picker. Slide it towards pink, then nudge it towards red for a creamy autumn shade. It takes a little practice, but the sliders are easy once you get the hang of them. Next, change your strip to Print Then Cut and use the colour picker to match it to your offset.

5. Duplicate and Flip The Letter
Duplicate your letter and place it at the other end of the strip. Turn it around so the letter is the right way up on both sides of the page. They will never sit back to back, because a page goes between them. Then select everything and click flatten.

6. Make the Boo magnet
Line up a B and two Os and flatten them together. Then add a rectangle behind them and send it to the back. Make it Print Then Cut in the same pink. Add a slight brown offset to match your letters, and flatten again.

7. Fit Everything On One Sheet To Print and Cut on Your Cricut
Duplicate the Boo magnet, because you need one per card. Then arrange all your pieces on one print then cut sheet yourself. If you leave it to Cricut, it tends to waste a lot of space. A red dot in the corner tells you when something is too big.
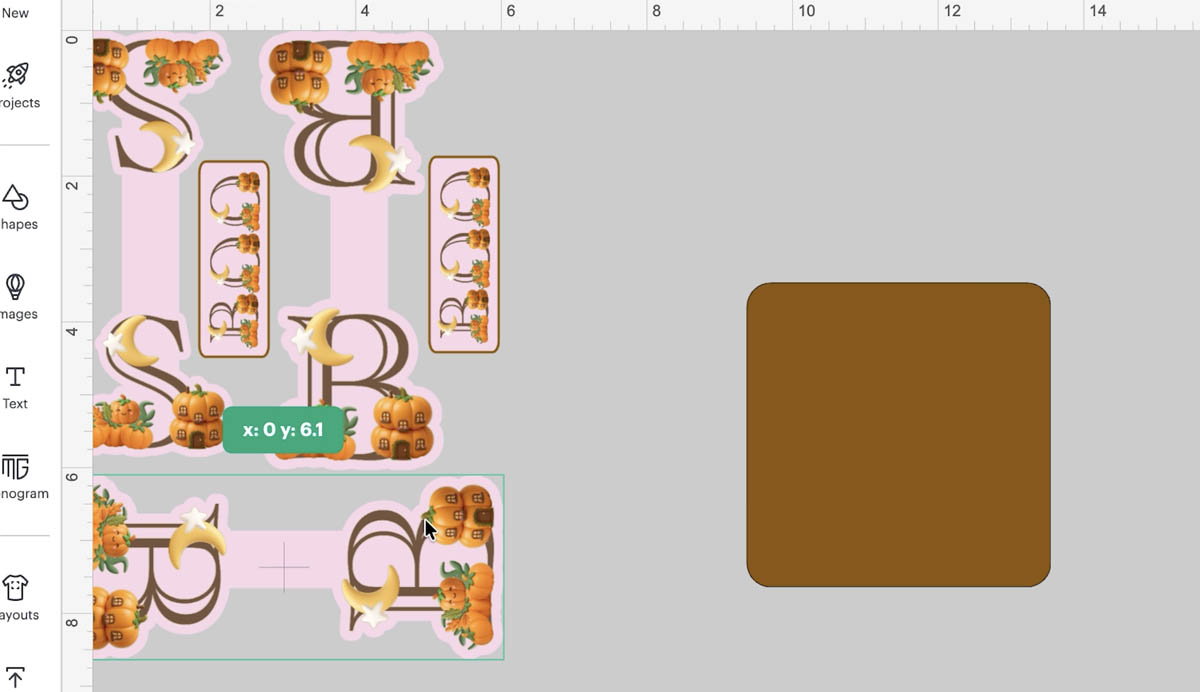
8. Size Your Card Squares
Make your card squares no bigger than five by five inches. Look at the crease on your card and mat. Mine sat at six inches, so I positioned the squares either side of it. This means the cut misses the crease. Then weld each pair together. This is a brilliant tip whenever you cut folded card.
9. Print With The Right Settings
Click Make, remove the bleed, and choose the system dialog. Check that you have selected the right printer. Then choose best quality. The results really are so much better when you go through the printer settings.

10. Cut the Magnetic Sheets on Your Cricut
Choose printable magnetic sheets as your base material. If they are not in your favourites, browse the materials list. I always use more pressure so the blade cuts cleanly all the way through. Afterwards, reverse weed the pieces.
11. Cut Your Card
Place your card on the mat so one square cuts each side of the crease. I cut mine with a craft blade because the card is so thick. Next, score the middle of each bookmark strip so it folds neatly.
12. Assemble and Decorate Your Trick or Treat Book Magnets
Stick your Boo magnet to the bottom of the card with a sticky pad. Then loop the bookmark strip over the top. Add a book quote sticker underneath, because that gives a lovely surprise when the bookmark comes off. Finally, add a few stars for some Halloween sparkle.

Also Get Our Other Halloween Alphabets
Click on the images to get more of our cute Halloween alphabets.


If You Want To Use These Printable Pumpkin Patch PNG Alphabet Letters And Numbers Template?
Click here or on the image below to visit our shop and get your download of our Printable Kawaii Pumpkin Patch PNG cut files. They are instant downloads from our shop. Or the free letters B and O here.

If You’re Having Problems?
Check out my troubleshooting page, hopefully it will answer any questions you may have.
Tips And Advice For Using Cricut
- Cricut Design Space Guide
- How to upload to Cricut Design Space
- How To Make Print And Cut Stickers In Cricut Design Space
- Where Else To Get Free SVG Files
Also please do pop over to Instagram, or TikTok and give me a follow and if you make a project please do tag me! I love seeing everyone else’s makes and chatting crafting. I could do that all day! This is also where I share all my projects in progress.

How To Upload and Print Your Printable Kawaii Pumpkin Art Alphabet Letters And Numbers To Cricut Design Space.
Follow this step-by-step guide to upload images and SVG and PNG files to Cricut Design Space. Once uploaded, click Make it; if you need help with this, follow our step-by-step print and cut guide.
If You Don’t Have Cricut ?
You can upload our Pumpkin Patch Alphabet to Canva, a great program for making posters and cards, or to Word or Pages. Just arrange your letters or numbers with spaces between them and cut them with a guillotine.
