I have seen so many people sharing Spiral Betty lately in the crafting community, it really has created the most wonderful buzz. However it also has a lot of people scratching their heads. I mean come on it’s some sort of genius wizardry, created by Shalanah Dawson, it takes the ordinary and makes it extraordinary. Today I want to share How To Use Spiral Betty With Vinyl and your Cricut machine to create unique gifts or indeed products to sell.
However like all crafting, this requires a little thinking out of the box. I have so many ideas for projects using Spiral Betty.
Photos are great and what the feature is designed for. However, there are so many more things you can use and convert which makes Spiral Betty the ultimate pop art resource.

What You Will Find Here
What Is Spiral Betty?
It’s an online tool that turns images into spiral works of art, think of it a bit like a record? When I first saw it, I assumed it was a printable image and I know many have thought the same. I mean that’s exactly what it looks looks like right?
When in fact Spiral Betty is exactly like a record, and a genus idea. The image is created by splitting the image into two spiral layers and if you zoom in these spiral lines differ in depth to create light and shade and this creates an image.

Once your cut file is weeded, the way the image presents itself depends on the background. It’s like an olden day negative. I have seen lots of talk and people berating themselves for creating or weeding their Betty wrong. However a simple change of background will resolve that.
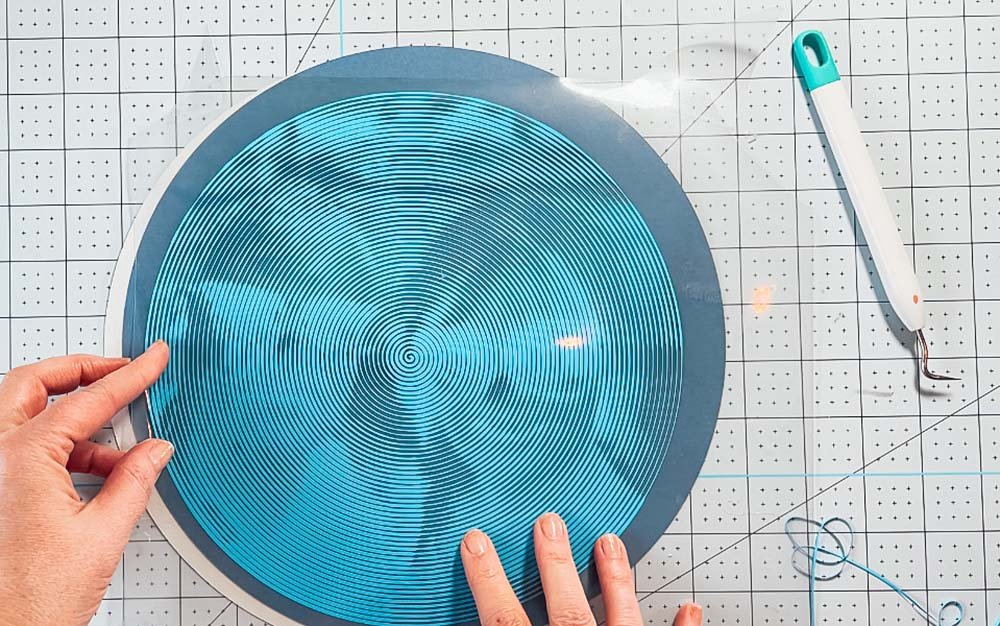
I have cut the below image on blue iron on vinyl and transferred it to card. The lighter background shows the image as blue shaded photo, it totally blow my mind that a series of lines can create an image so detailed.

However on a darker background the image appears more like a negative. This doesn’t mean you have weeded you cut wrong, it means the back layer need to be lighter. Have a play around with this as the results really differ depending on the colour.
Update: The New Swap Background And Foreground Feature.
This new feature allows you to cut your Spiral Betty depending on a chosen background. Thus you can flip your image to suit a light or dark background, this is such a wonderful addition and it give you so many more options.
Simply click the squares underneath the download image and you can flip your image in seconds to suit a darker background.

What Images Can I Use?
Although it was designed for people, have a play around. I tried some landmark images and travel photos and they didn’t work! Words and shapes work so well and have a pop art feel, as do objects.
Is Spiral Betty Free?
Spiral Betty is free for personal use, however you can buy Shalanah a coffee.
If you intend to use your files commercially, you can, but will need to buy a licence. Licences are a bargain at $3 for one or $25 for unlimited downloads for one year.
As someone who created free to use files, I know the work that goes into it. So I did buy a licence for use in the post.

How To Use Spiral Betty
What Can I Make With Spiral Betty?
I have found that is works well with vinyl, and is super easy to transfer using iron on vinyl. Using iron on vinyl on card is a recent discovery for me, but I love how easy it is! Anyhow I digress. Here are a few suggestions for using Spiral Betty.
- Iron On Vinyl on cards or framed art, this can be photos or images.
- Permanent Vinyl for Mugs and Plates
- T Shirts
- Signs
- Embroidery Hoops and Iron On Vinyl
- Scrapbooking Layouts with Vinyl
- Wooden Disks

You Will Need
- Cricut Maker or Joy
- Iron On Vinyl
- Cushion, Card Or Other Blank
- Cricut Easy Press
- Cricut Easy Press Mat
- Brayer And Tweezers
How To Make Your Spiral Betty
Decide on a photo you want to use, for my “I Love You, Cushion” I simply used a circle in Cricut Design Space, typed my text and chose the font. The click on the curve text tool on the top bar to curve the test into a circle, it is super easy and can be personalised to fit any occasion.
Upload your photo or image to Spiral Betty, once uploaded you can zoom in and out, position your image and change to contrast to get it exactly how you want it.

Also check out the right hand bar, this is for printing. However changing the colours can really help you choose which colour vinyl to use.

If you click on the rings tab you can increase or decrease the rings in your art work. The more rings, the better the detail.
Uploading To Design Space And Cutting
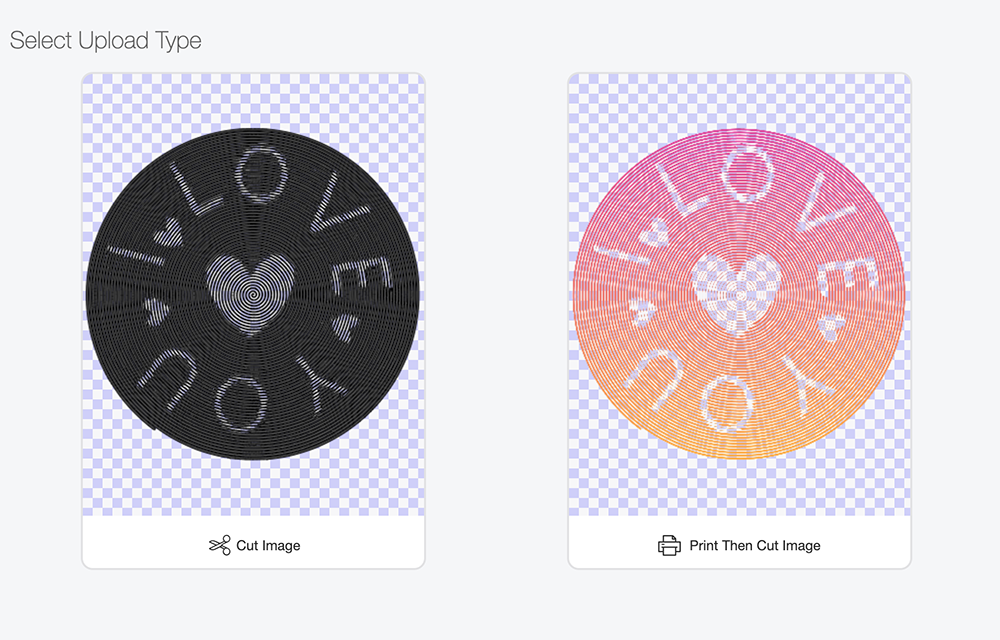
The great thing about Spiral Betty is it is super easy to add to design space and clean up. Choose your image and select complex.

Hint, if you upload you image in black and white it takes the back off in one single click. The coloured image took 5 clicks, one for each corner and one for the spiral. Simply click on the white areas to remove and leave you with you cut file.

Now you can save your file as a cut image, I know it looks dark and shaded but it will be fine when you cut it.
Once in design space size the image correctly, if you are mounting on card select a circle and size it to fit behind and send your project to cut. However if you are using iron on vinyl don’t forget to mirror the image!

Weeding Your Spiral Betty
This is the most satisfying weed I have EVER done, omg it just goes on forever in one piece! I find it helps to cut the corders of the backing sheet, flip them over and stick one to each corner to stick the backing to your crafting mat or bright pad. This keeps the project still whilst you weed.

Transferring With The Easy Press
Heat press your cushion/card to warm it up and prepare for your Spiral Betty Decal.
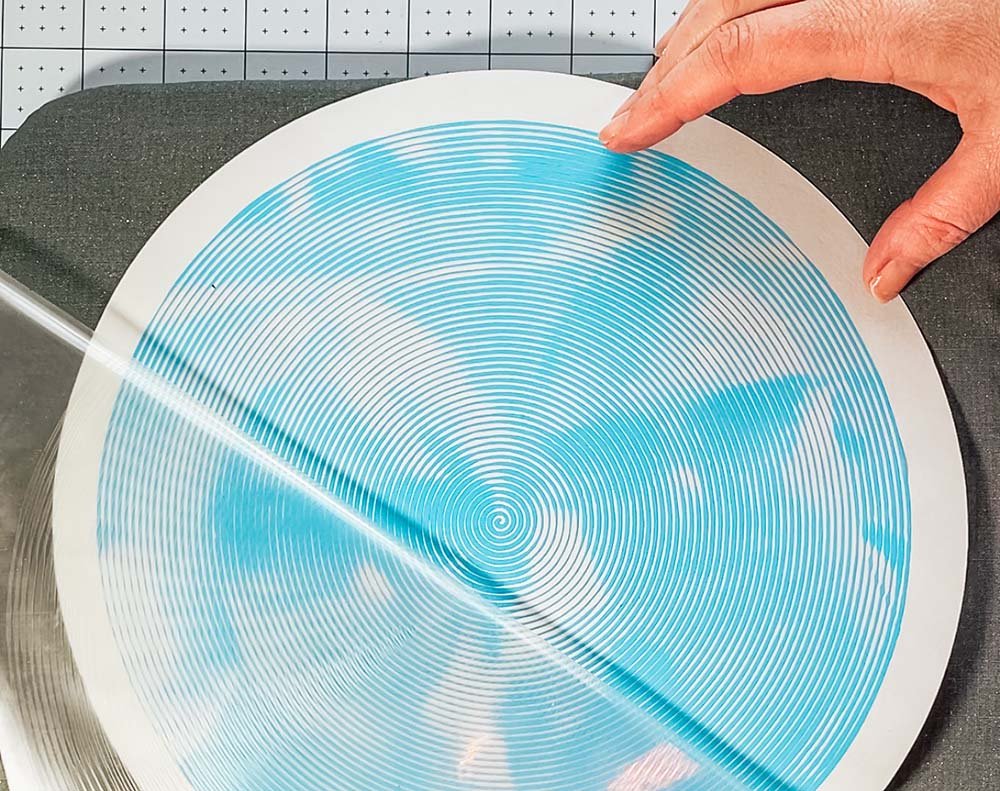
Put your design into place and cover with teflon paper, this protects the areas outside the vinyl backing, if you are using a velour cushion this prevents you getting lines. Or protects the card if using card-stock.
Set the heat press to the appropriate heat as per the heat guide. For these projects the temperatures and times were different, using the easy press 2 and a heat mat. Check the heat guide to get exact heat and timings for your project.
It needs to have cooled slightly but still be warm to peel off. The backing on the card peeled off super easy.
However on the velour cushion it moved a little, this was the velour not the vinyl, but it had me sweating a bit. Yet the result was fabulous, I just had to take my time.
There are so many projects I can see this working on, and being a huge fan of retro! I am currently hatching plans for artwork in our lounge.
Please do pop over to Instagram, and give me a follow and if you make a project tag me! I love seeing everyone else’s makes and chatting crafting. I could do that all day!


How To Use Spiral Betty
How To Use Spiral Betty With Vinyl, step by step guide on how to use and weed Spiral Betty to make custom artwork with your Cricut
Materials
- Iron On Vinyl
- Cushion, Card Or Other Blank
Tools
- Cricut Maker or Joy
- Cricut Easy Press
- Cricut Easy Press Mat
- Brayer And Tweezers
Instructions
- How To Make Your Spiral Betty
Decide on a photo you want to use, for my “I Love You, Cushion” I simply used a circle in Cricut Design Space, typed my text and chose the font. The click on the curve text tool on the top bar to curve the test into a circle, it is super easy and can be personalised to fit any occasion.
Upload your photo or image to Spiral Betty, once uploaded you can zoom in and out, position your image and change to contrast to get it exactly how you want it. Also check out the right hand bar, this is for printing. However changing the colours can really help you choose which colour vinyl to use.
  If you click on the rings tab you can increase or decrease the rings in your art work. The more rings, the better the detail.
 - Uploading To Design Space And Cutting
The great thing about Spiral Betty is it is super easy to add to design space and clean up. Choose your image and select complex. Hint, if you upload you image in black and white it takes the back off in one single click. The coloured image took 5 clicks, one for each corner and one for the spiral. Simply click on the white areas to remove and leave you with you cut file.
  Now you can save your file as a cut image, I know it looks dark and shaded but it will be fine when you cut it.
  Once in design space size the image correctly, if you are mounting on card select a circle and size it to fit behind and send your project to cut. However if you are using iron on vinyl don’t forget to mirror the image!
- Weeding Your Spiral Betty. This is the most satisfying weed I have EVER done, omg it just goes on forever in one piece! I find it helps to cut the corders of the backing sheet, flip them over and stick one to each corner to stick the backing to your crafting mat or bright pad. This keeps the project still whilst you weed.

- Transferring With The Easy Press
Heat press your cushion/card to warm it up and prepare for your Spiral Betty Decal.
Put your design into place and cover with teflon paper, this protects the areas outside the vinyl backing, if you are using a velour cushion this prevents you getting lines. Or protects the card if using card-stock.
Set the heat press to the appropriate heat as per the heat guide. For these projects the temperatures and times were different, using the easy press 2 and a heat mat. Check the heat guide to get exact heat and timings for your project.
- It needs to have cooled slightly but still be warm to peel off. The backing on the card peeled off super easy.
However on the velour cushion it moved a little, this was the velour not the vinyl, but it had me sweating a bit. Yet the result was fabulous, I just had to take my time.
Notes
What Background To Use
Once your cut file is weeded, the way the image presents itself depends on the background. It’s like an olden day negative. I have seen lots of talk and people berating themselves for creating or weeding their Betty wrong. However a simple change of background will resolve that.
On a darker background the image appears more like a negative. This doesn’t mean you have weeded you cut wrong, it means the back layer need to be lighter. Have a play around with this as the results really differ depending on the colour.
What Images Can I Use?
Although it was designed for people, have a play around. I tried some landmark images and travel photos and they didn’t work! Words and shapes work so well and have a pop art feel, as do objects.
Is Spiral Betty Free?
Spiral Betty is free for personal use, however you can buy Shalanah a coffee.
If you intend to use your files commercially, you can, but will need to buy a licence. Licences are a bargain at $3 for one or $25 for unlimited downloads for one year.
What Can I Make With Spiral Betty?
I have found that is works well with vinyl, and is super easy to transfer using iron on vinyl. Iron on vinyl on card is a recent discovery for me, but I love how easy it is! Anyhow I digress. Here are a few suggestions for using Spiral Betty.
Iron On Vinyl on cards or framed art, this can be photos or images.
Permanent Vinyl for Mugs and Plates
T Shirts
Signs
Embroidery Hoops and Iron On Vinyl
Scrapbooking Layouts with Vinyl
Wooden Disks
Recommended Products
As an Amazon Associate and member of other affiliate programs, I earn from qualifying purchases.


When I’m cutting my spiral Betty it is ripping up all my vinyl into ribbons and not leaving it on the mat.
Hi Colleen thats so odd, have you made sure the cut is not too fine? Maybe reduce the rings on the spiral or try using a brayer on the vinyl, it sounds like its not stuck to the backing very well ?