Today, I will share another fantastic way to make stickers with Creative Fabrica for Cricut and Silhouette or to cut them out by hand if you don’t have a cutting machine. If you are a regular visitor here, you will know I am obsessed with stickers and printables.
We are going to use the Creative Fabrica Studio. I kid you not—this space is fabulous, super user-friendly, and has great images and options. If, like me, you thought Creative Fabrica was somewhere to download fonts and images. Then, you will be as surprised as I was that there is so much more to this platform for creating and designing.

AD | I have been or could be if you click on a link in this post compensated via a cash payment, gift or something else of value for writing this post.
What You Will Find Here
What Can You Do In Creative Fabrica Studio?
First, you need to open Creative Fabrica Studio Online Graphics Design Tool. Now, I had no idea about this space, but after a bit of play, I found it easy to use and work around. Within 10 minutes, I had decided to upgrade to pro, at a cost of £56.40 for the year. This gave me more image options. However, you do have a lot of options with the free version.
This platform is fabulous for making custom stickers as you are able to export PNG files and remove the background its great for creating custom PNG logos for t-shirts, baseball caps and hoodies. Especially because there is such a huge choice of fonts.

Creative Fabrica Studio also has an excellent custom template section packed full of free templates, from party invitations to kiddies’ worksheets. This gives you so much flexibility to create custom kids’ birthday parties and home-school resources.
How I Made Custom PNG Stickers With Creative Fabrica Studio
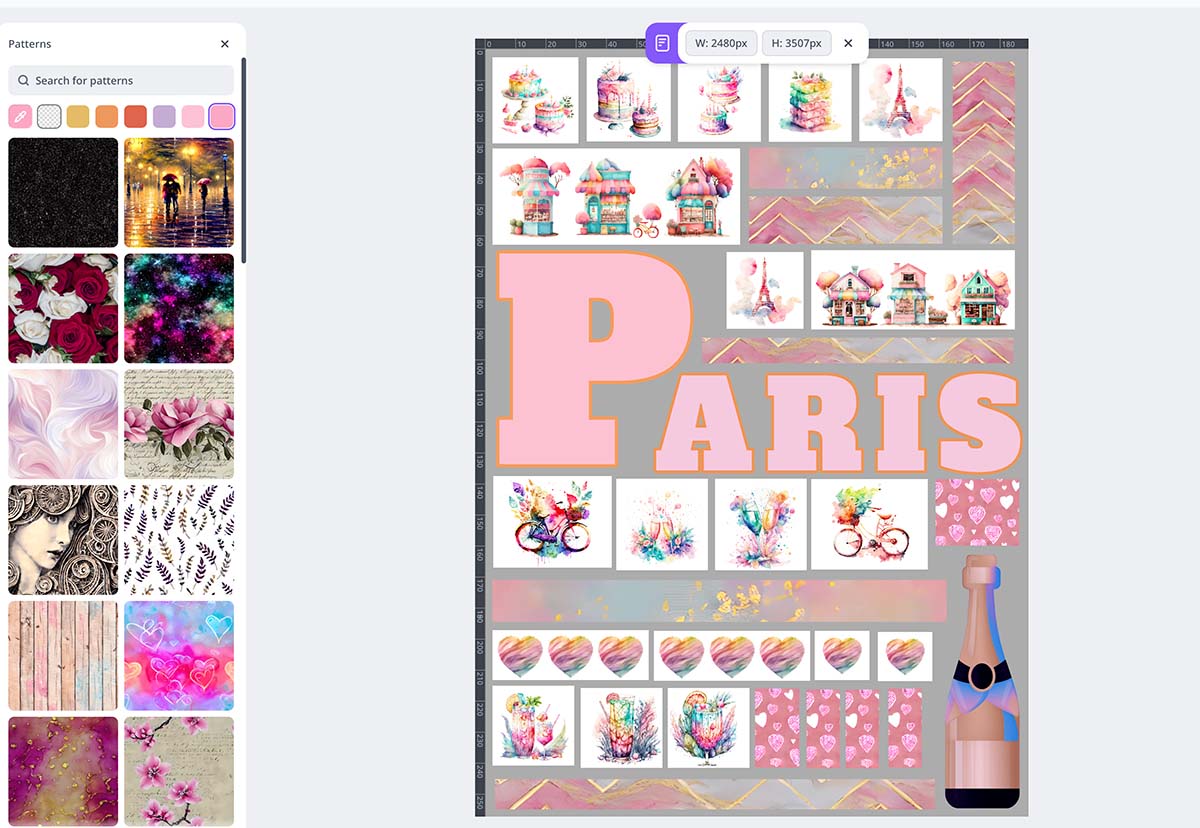
I started by deciding on a theme. I had just spent a fabulous weekend at Disneyland Paris and decided on a Pastel Pink Paris cake and cocktails theme. Once you have a theme it’s easy to get started.
Open A New Document
Click in the central top bar of Creative Studio and this gives you multiple options for designs and project sizes. For this custom sticker sheet, we are looking for an a4 document.

Now head to the righthand bar and change the background colour. Because I am working with white stickers, I need the background to be different. When we download the stickers as a PNG file, this background will be removed; this step is to make the design process easier.

How I Built The Stickers In Creative Fabrica Studio
You can do this in many ways, such as creating stickers with your imagination using the Spark AI feature. However, I built my sticker sheet with a combination of graphics, elements, patterns, and fonts, all of which can be found in the left-hand bar. Start by compiling a list of keywords to fit, and search the graphics bar until you have collected enough images.
The Keywords I Used Are
- Cakes
- Cake Shop
- Paris
- Cocktails
- Champage
- Bicycle
- Hearts

Make Backgrounds And Group Your Images
Once you have all of your images, it’s time to make backgrounds. Do this by selecting a square from the elements tab and changing the square to white by clicking the top bar. You can also drag the square to an oblong. I created a combination of squares and oblongs, grouping some images in 3s and some individually.
To create a single sticker, drag the square over the top of your chosen image, head to the layers panel on the right-hand side and drag the square to the bottom so it sits under your image. When you are happy with the positioning, right-click to select both layers and click group in the right-hand bar. This will make the sticker one layer, enabling you to move it about your sheet.

Build Your Text
The next step is to build your text. I wanted the word Paris and always make the first letter bigger when designing stickers, this looks great in a scrapbooking layout. Start by creating your first letter using Alfa Slab One font and size and size it by dragging to the size your want.
Now, choose a colour, click on the letter and all the letter actions will appear to the right. Here, you can choose the colour and a border weight and colour. Repeat this for the rest of the word. There is also a letter spacing option if your letters are too close together.
Once your letters are complete, arrange your images and stickers, leaving gaps; here, you will add patterns.

Add Your Patterns To Your Sticker Sheet
Head to the pattern tab and search your pattern by colour. I settled on three patterns: hearts, zig-zags, and a mottled pattern. These can be dragged to any shape or size, which is a great way to create fillers to fit spaces between stickers. I use the pattern blocks in my planner to add colour, so I always add a selection of shapes and sizes.

Check The Sticker Spacing Before You Download
Once you have built your sticker sheet, check it over to ensure there is spacing between every sticker. I created a larger gap so I could create a small pink offset outline in Cricut Design Space.
Download Your Stickers
Once you are happy, click share in the top right corner, and a pop-up will appear that says download or export. Click export, toggle the remove background and click PNG to download.

You can now upload to Cricut Design Space or Silhouette Studio.

If You Want To Use These Free Cricut Printable Paris Stickers
Click here or the image below to go to our free download shop to access our free designs.