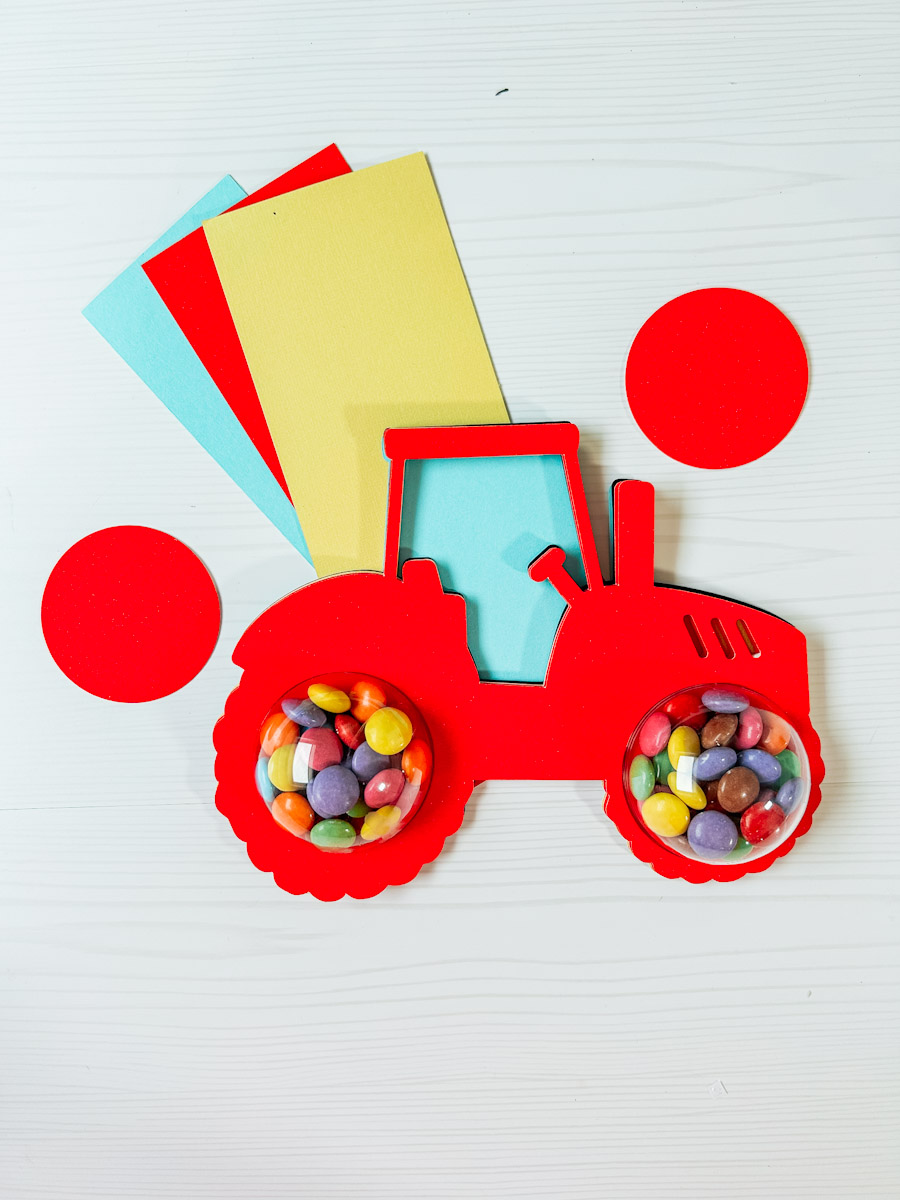
I am so excited about our new Tractor SVG; the cutest layered tractor with candy wheels is the perfect addition to our tractor alphabet and number set. Giving you all you need to make personalised cake toppers, tractor birthday parties and decorate kids’ bedrooms.
Today, I will share this fab tutorial to make your tractor with candy wheels. Because what tractor lover would be thrilled to get this adorable party favour? It would also make a wonderful 3D birthday card.
If you want to see me create my projects, follow me on Tik Tok and Instagram.

This post may contain affiliate links. This means I may receive a small commission if you click a link and purchase something that I have recommended at no extra cost to yourself. As an amazon, Cricut and Glowforge associate, I earn from qualifying purchases.
Dome Candy Holder Shopping List
- A Clear plastic bauble
- Card stock, red glitter, blue, yellow and black
- Cricut Maker 3, Joy, Explore or Silhouette
- Super Glue
- Acrylic craft glue
- Sticky pads
- Printer
- Sweets, I used smarties

How To Make A Layered Tractor with Dome Candy Wheels With Cricut
Adding Your Layered Tractor with Dome Candy Wheels to Cricut Design Space
Start by uploading all of your tractor files to Cricut Design Space. You should have 5 layers.
- Top Red Layer
- 2nd Red Layer
- Yellow
- Black (Wheels)
- Blue (Sky)

Measure your baubles and create a circle in Cricut Design Space as a guide the same size. Now, size your top red layer so your circle fits perfectly inside the wheel without gaps. Once you are happy with the size, discard the circle.

Size all the layers to the exact size of your top red layer, colour the layers so you know which is which and send the layers to cut.
Building Your Layered Tractor with Dome Candy Wheels
When your project is cut, line up all the layers to check they align correctly. You should have five layers.

Start by attaching the baubles to layer 2 with superglue. Put a fine layer of superglue around the edges of the bauble and hold until secure. You need to position them correctly so the top layer fits over the top and hides the top of the bauble.
Use sticky pads to attach the top layer to give it some depth. Then add the yellow layer to the back with sticky pads.

Fill the bauble wheels with whatever candy you choose when the glue is dry. Then, glue the back layers onto the back of the yellow layer with acrylic glue and hold till secure.

Next, add the black layer to the black-blue layer with acrylic glue. This will be the layer you position onto the back of the wheels to secure the sweets so you don’t want any gaps.

How to Get Our Layered SVG Tractor
Click the link or image below to get the free layered Tractor SVG from our shop. Click here to find out how to upload to Cricut Design Space.

Also, See These Amazing Farm Themed Files By Some Incredible Crafters and Designers
- Welcome To Our Farmhouse from Abbi Kirsten Collections
- Counting Sheep Sweet Dreams SVG from The Listed Home
- Farm Fresh Pumpkins SVG from Hello Creative Family
- Layered Highland Cow from Like Love Do
- Down at the Farm SVG from Little Miss Eden Rose
- Rise and Shine from The Denver Housewife
- Farm Fresh Eggs from The Quiet Grove
- 3D Tractor from Dinosaur Mama
- Cow Print Numbers from Kiy’s Craftroom
- Hay Girl Hay from Artsy Fartsy Mama
- Dressed Up Pig from Liz On Call
- Faith Family Farm from Simple Made Pretty
- Barnyard Box Card from The Bearded Housewife
- Home is Where the Herd Is from Sunshine and Munchkins
- Farmers Market from Crafting in the Rain
- Eat Fresh Buy Local from Tried & True Creative

Tips And Advice For Using Cricut
- Cricut Design Space Guide
- How to upload to Cricut Design Space
- How To Make Print And Cut Stickers In Cricut Design Space
- Where Else To Get Free SVG Files
Also, please do pop over to Instagram, or TikTok and give me a follow and if you make a project, please do tag me! I love seeing everyone else’s makes and chatting crafting. I could do that all day! This is also where I share all my projects in progress.
