In this tutorial, we’ll guide you through creating this cute layered Candy Flower SVG for Cricut, Silhouette, and other cutting machines. This craft project can be used for many occasions, such as birthday cards, party favours, or personalised gifts.
I wanted to create something perfect for parties, birthday cards, and crafting with kids. Teachers could build kits in zip-lock bags, simply pre-make the candy pod and add it to a bag with the rest of the layers for the kiddies to build. This would also make a great party activity.
If you want to see me create my projects, follow me on Tik Tok and Instagram.

This post may contain affiliate links. This means I may receive a small commission if you click a link and purchase something that I have recommended at no extra cost to yourself. As an amazon, Cricut and Glowforge associate, I earn from qualifying purchases.
Candy Flower SVG Shopping List
- Half a Clear plastic bauble
- Card stock, white glitter, green, orange, yellow, red, pink and purple card stock.
- Cricut Maker 3, Joy, Explore or Silhouette
- Super Glue
- Acrylic craft glue
- For sweets, I used mini eggs and mini chocolate orange eggs (You could use candy hearts for wedding favours)

How To Make A Layered Flower Candy Holder
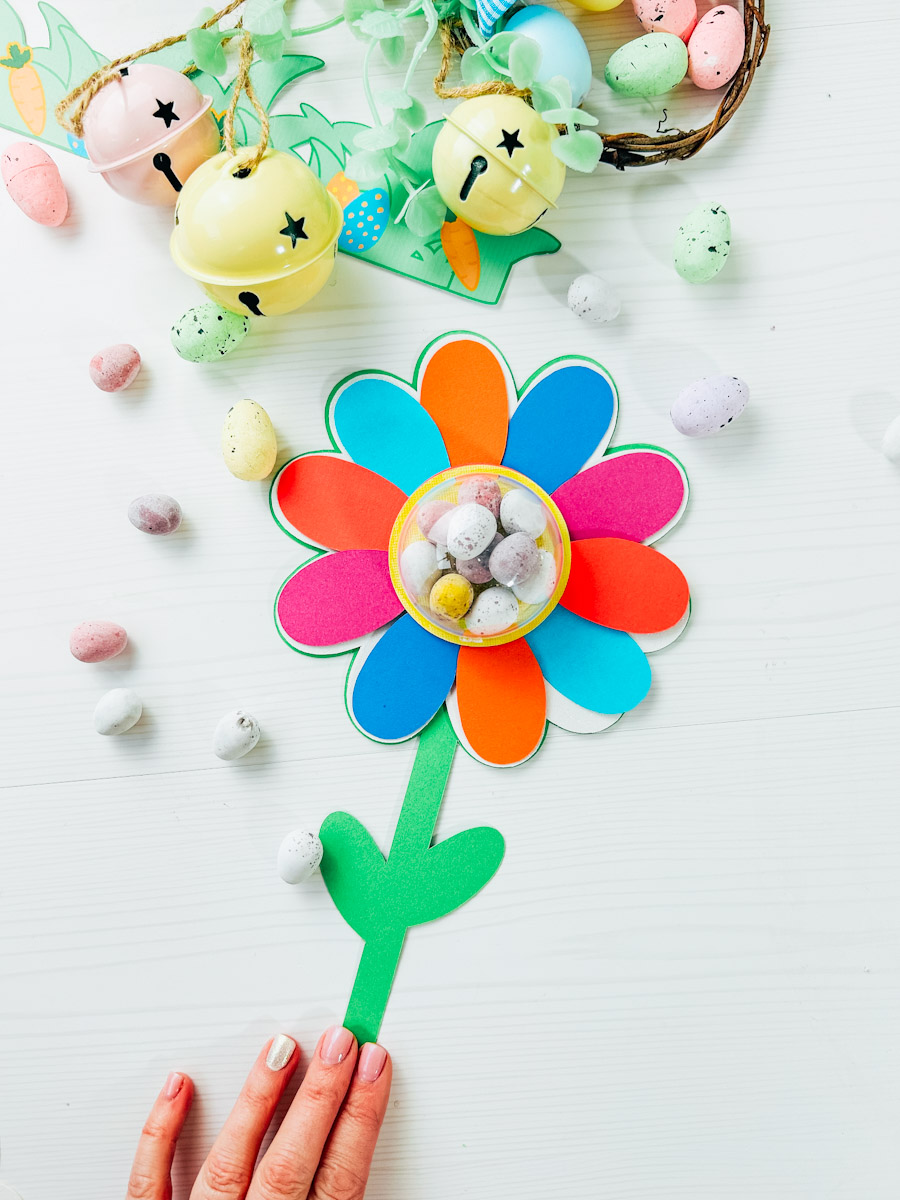
Start by uploading your Layered Flower SVG files to Cricut Design Space. You should have 5 layers.
- Top layer, hollow circle: I used a yellow card this is to sit over the bauble.
- Yellow circle layer, the back of the candy bauble.
- Petal layer, you will need to duplicate this so you have 10 layers, I used 5 colours, so 2 petals for each colour.
- White flower offset.
- Back green stalk layer, this is optional.
Create Your Candy Pod
Measure your bauble and size a circle in Cricut Design Space as a guide the same size. This is your guide; now, size your yellow circle layer so it’s slightly bigger; the bauble needs to sit on top and measure the hollow circle so it fits over the top.

Build Your Flower
Next, size the white layer so the yellow circle fits on the inside, and duplicate your petal layer ten times. You now need to colour your petals; I chose five colours and arranged them to fit inside the outer white layer. Rotate as you build your flower to create the flow shape.
Lastly, size your green stalk layer; this is optional but looks super cute. Now send to cut.

Building Your Layered Candy Flower SVG
When your project is cut, line up all layers to check they align correctly. Now start by filling the bauble with candy, then add superglue around the edge of the card circle cut out and pop on top of the bauble, keep to the edges so the glue doesn’t leak into the sweets and allow the glue to dry. I left it an hour before the next step.

Now build the flower. Start by placing the white glitter layer down, and build the petals one by one so that they rotate around the flower and the centre circle all match exactly.

Be sure to alternate the colours of the flower petals as you work around.

Lastly, add the candy pod with acrylic glue and attach the green later to the back.

How to Get Our Layered Candy Flower
Click here or image below to get the free layered Candy Flower SVG from our shop. Click here to find out how to upload to Cricut Design Space.

Also Check Out The Fab Files From Some Great Designers
- Persia Lou | Butterfly SVGs
- The Listed Home | Cute Easter Clip Art Designs
- Hello Creative Family | Live Life In Full Bloom Rain Boot SVG
- The Girl Creative In | My Spring Fever Era
- Like Love Do Spring | Floral Square
- Little Miss Eden Rose | Hello Spring Frame
- Color Me Crafty | Chasing Sunshine Free Spring SVG
- The Denver Housewife | Sunshine State of Mind
- 100 Directions | Spring Flowers SVG
- The Quiet Grove | Hello Spring SVG
- Kara Creates | Spring Break Squad
- Dinosaur Mama | Free Peony SVG
- Kiy’s Craftroom | Jar of Flowers
- Artsy-Fartsy Mama | No Rain, No Wildflowers
- Liz on Call | Dress up Bunny
- Simple Made Pretty | Bloom Where You Are Planted Wildflowers
- The Bearded Housewife | Hello Spring Layered Card
- Sunshine and Munchkins | Blooming Envelope and Card
- Crafting in the Rain | Gather Courage like Wildflowers
- Tried & True Creative | In the Garden
Tips And Advice For Using Cricut
- Cricut Design Space Guide
- How to upload to Cricut Design Space
- How To Make Print And Cut Stickers In Cricut Design Space
- Where Else To Get Free SVG Files
Also, please do pop over to Instagram, or TikTok and give me a follow and if you make a project, please do tag me! I love seeing everyone else’s makes and chatting crafting. I could do that all day! This is also where I share all my projects in progress.