
Today, I am sharing this gorgeous Free SVG Birthday Cake Alphabet and Number Set for Cricut and Silhouette. Creating stunning projects for cards, scrapbooking, and cake toppers has never been cuter.
If you’re looking for a fun and creative Cricut project, this layered Birthday Cake alphabet tutorial is perfect, whether you’re a beginner or a seasoned crafter. In this easy step-by-step guide, I’ll walk you through how to upload your files and create a super cool layered birthday card.

This post may contain affiliate links. Which means I may receive a small commission if you click a link and purchase something that I have recommended at no extra cost to yourself. As an amazon, Cricut and Glowforge associate, I earn from qualifying purchases.
What You Will Find Here
Craft Ideas For Our SVG Birthday Cake Alphabet Letters & Number Set For Cricut And Glowforge
- Birthday Cake Toppers
- Framed Art
- Scrapbooking Layouts
- Birthday Cards
- Iron on Vinyl Projects

Step-by-Step Instructions: How to Make a Birthday-Themed Layered Letter Using Cricut And Out Birthday Cake Alphabet and Number Set
Supplies You’ll Need
- Cricut machine (Joy, Explore, or Maker)
- Cricut Design Space (free software)
- Standard Gripmat (green)
- Cardstock in your chosen colours
- Weeding tool (for removing small bits)
- Brayer (optional, to smooth cardstock on mat)
- Cosmic Shimmer glue
- Pintasa Acrylic Paint Pens
Step 1: Upload Your Birthday Cake SVG Files
• Open Cricut Design Space.
• Upload your chosen layered number SVG from the Happy Birthday set.
• If you wish, you can upload these extra elements from the shop.
Step 2: Create Your Card Base
• Select your number and create a large offset around it (this will be your card base).
• Duplicate the offset and flip it horizontally.
• Align the two offsets at the bottom so they mirror each other.
• Use a rectangle to connect the two shapes, ensuring they join securely for your folding card base.
• Select all and weld together.

Step 3: Prepare Your Layers
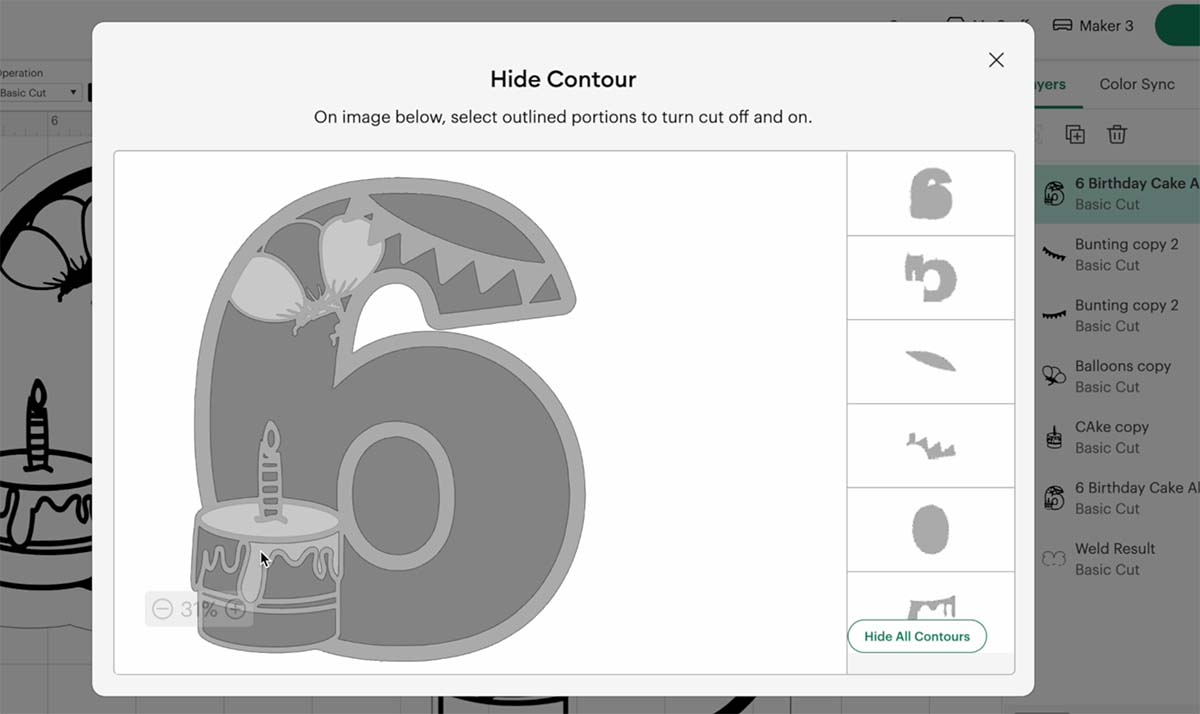
• Duplicate your number and use the Contour Tool to remove inner details on different copies to build up layers for your design (balloons, cake layers, icing, etc.).
• Colour each layer in Design Space to help you visualise which cardstock colours to use.
• Add optional bunting or balloons to your design for extra decoration.
Step 4: Cut Your Layers
• Cut the base card shape from sturdy white cardstock.
• Cut your top detail layer in black glitter card for a cartoon-style outline.
• Cut the middle layers in your chosen pink shades and white glitter card for contrast.
• Cut your decorative elements (bunting, balloons) in matching colours.
Step 5: Assemble Your Card
• Fold your card base along the top join to create a standing card.
• Use glue to attach larger layers, and sticky foam pads for the top number layer for dimension.
• Layer your cake, balloons, and bunting onto the card, adjusting until you are happy with the placement.

Step 6: Add Finishing Touches
• Use a white acrylic paint pen to add polka dots and highlights to balloons and bunting for a cartoony effect.
• Add small details like the candle flame with your paint pens.
• Write a personalised message on the back, or add a handmade sticker if you’re gifting or selling your cards.
Tips for Success:
• Use glitter cardstock for the top and back layers for a premium finish.
• If your top layer is too delicate for foam pads, glue can be easier to use for fine details.
• Adjust the offset if your card does not stand well, to create a stable base.
How To Get Your Birthday Cake Alphabet Letters And Numbers
Click here or the image below to get your free downloadable Birthday Cake SVG Alphabet from our shop and follow these instructions to add to Cricut Design Space if you are using a Cricut Machine. Note if you are using Glowforge you need SVG files to cut the image out of wood or acrylic. Or Png or SVG to engrave.
If You’re Having Problems?
Check out my trouble shooting page, hopefully it will answer any questions you may have.
Tips And Advice For Using Your Download For Cricut
This alphabet is also perfect to make cards and cake toppers with your Cricut, check out my guides below.
- How To Add Fonts To Cricut Design Space
- How To Remove Backgrounds On Illustrator
- Cricut Design Space Guide
- How To Slice And Weld In Cricut Design Space
- How to upload to Cricut Design Space
- Using Iron On Vinyl
- Where Else To Get Free SVG Files
Also please do pop over to TikTok or Instagram, and give me a follow and if you make a project tag me! I love seeing everyone else’s makes and chatting crafting. I could do that all day! This is also where I share videos of my makes.

