
Today, I’ll show you step by step how to make Kiss-Cut and Die-Cut Stickers in Cricut Design Space. Even if you haven’t got paid design space access.
If you’ve ever wanted a tidy sticker sheet you can peel from and a finished die-cut outline around the whole sheet or individual sticker, this easy Cricut Design Space method is for you. We’ll build a printable sticker sheet, kiss-cut every sticker once, then die-cut the outside edge, all in a single Make It. No fuss, no fancy tools, just a clever use of Attach (not Flatten!), a few duplicates, and the right print and cut settings.

What You Will Find Here
How to Make Kiss-Cut and Die-Cut Stickers in Cricut Design Space
What you’ll need
- Cricut machine with Print Then Cut (Joy Xtra, Explore, Maker family)
- Cricut Design Space
- Printable gloss sticker paper
- StandardGrip (green) mat
- Inkjet printer
- Optional: my free printable designs (e.g., Happy Birthday Alphabet)
Kiss-Cut vs Die-Cut: What’s The Difference?
- Kiss-cut: Cuts the sticker layer only, so stickers stay on the sheet and peel away cleanly.
- Die-cut: Cuts all the way through the sheet to create a shaped outer edge (like a postcard, style sticker pack).
This project does both in one pass: kiss-cuts for each sticker + a die-cut around the outer rounded rectangle.
Step By Step Kiss-Cut And Die-Cut Stickers: Design in Cricut Design Space
1) Set up a canvas
- Open a Blank Canvas and change the background to a pale colour (I use a soft lilac) so you can see your white sheet clearly. Canvas colour is at the bottom right: Blank Canvas, Colour.
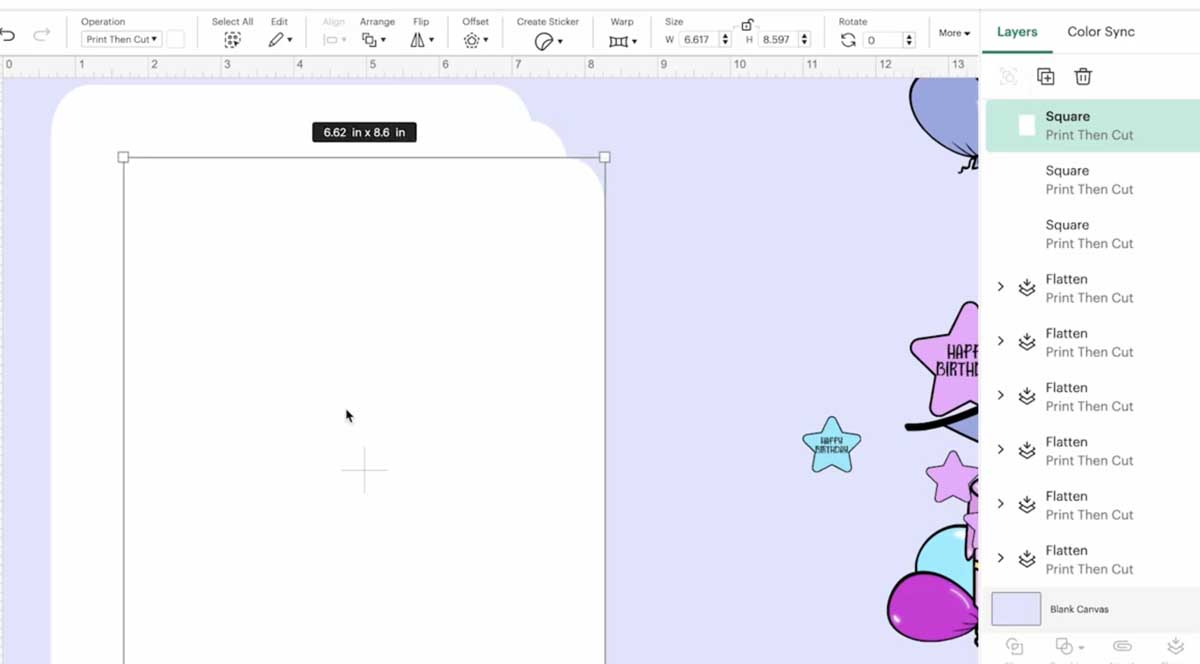
2) Build the sticker sheet base
- From Shapes, add a Rounded Square (free). Unlock the proportions and resize into a vertical rectangle.
- With the shape selected, go to Operation and change from Basic Cut to Print Then Cut.
- Keep within the Print Then Cut maximum: 6.75″ × 8.25″. If you see a red warning icon, it’s too big; scale it down slightly.
- Set the fill white (this is your sticker sheet outline). Duplicate this white rounded rectangle two more times so you have three identical sheets. Slide two of them off to one side for later.

3) Add your printable stickers
- Import or insert your designs. Mine have a neat black offset so Design Space has a clear cut path.
- If any design needs more white/colour around it, select it and go to Offset. Choose a size you like and set the offset colour (I keep it black here for a crisp outline).
- Arrange the stickers on the first white rounded rectangle. Nothing should touch the sheet’s outer edge or another sticker.
Tip: Give every sticker a sliver of breathing room. Touching edges can snag when cutting.
4) Create the triple-cut outer edge (for the die-cut)
- Bring back the other two white rounded rectangles so all three are visible again.
- Select the three white shapes and align them to the centre so they sit exactly on top of each other.
- With the three still selected, attach. This tells Cricut to cut this outer line three times in the same place, giving you a clean die-cut through the backing.
5) Assemble the kiss-cut and die-cut sticker sheet
- Send the attached triple-layer to the Back so your stickers are on top.
- Select All (stickers + triple-layer backer) and attach again. Now your kiss-cut (stickers) and the die-cut (outer edge) will stay together on the mat.
Important: This method uses Attach, not Flatten. Flatten would merge print layers and remove separate cut layers — we want distinct cuts.
Print and cut settings
6) Print using system dialogue
- Click Make. In the print dialogue, choose your printer and toggle Bleed: Off.
- Open System Dialogue if available, set quality: Best (or Fine/Best, naming varies).
- Load sticker paper and print. You should see crisp edges with no fuzzy bleed.

7) Choose materials and pressure
- In Design Space, set material to Printable Vinyl (works brilliantly for most glossy sticker papers).
- Set Pressure: Less. This ensures a gentle kiss-cut for the sticker shapes.
8) Cut — kiss-cut + die-cut in one go
- Place the printed sheet on the green StandardGrip mat (wait for it to dry on gloss paper before using a brayer).
- Start the cut. You’ll see Cricut:
- First, kiss-cut around each sticker once.
- Then, cut the outer rounded rectangle three times (because we stacked three identical shapes), creating the die-cut edge through the backing.
Results & troubleshooting
- Looks great, but an edge lifted. Ensure stickers aren’t touching each other or the sheet’s border. Nudge and re-attach, then re-print.
- Didn’t go all the way through on the outer edge. Add a fourth duplicate of the rounded rectangle.
- Overcutting stickers. Make sure you’re on Less Pressure and that your stickers are Print Then Cut items, not Basic Cut shapes.
- Offset missing. Some PNGs import tightly to the artwork. Add an Offset so there’s a clear contour to cut.
Why This Works
- Kiss-cut needs one light pass, perfect for stickers.
- Die-cut needs more depth. By stacking and attaching three identical outer shapes, you’re telling Cricut to follow the same line three times, creating a clean break through the backing without changing materials midway.

FAQs
Do I need Cricut Access?
No. We’re using free shapes and our own printables.
Why not use Flatten?
Because we want separate cut instructions: one pass for the stickers and multiple passes for the outer edge. Attach preserves that.
What size can I print?
Design Space’s Print Then Cut maximum is 6.75″ × 8.25″.
Paper choice?
I used gloss or matt sticker paper. Printable vinyl is also fab and durable.
What To Watch Next
- Cricut for Beginners Playlist: If you’re new to Cricut, start here for slicing, welding, contouring and more.
And That’s It, Kiss-Cut Stickers And A Die-Cut Outline
All in a single make. Once you know the trick (Attach + duplicates + Bleed off + Less Pressure), it’s honestly so easy. If you try this method, let me know how you get on and which settings worked best on your paper.

